In this user guide, we will learn to create a Raspberry Pi Pico web server with BME680 environmental sensor, which is used to measure ambient temperature, barometric pressure, relative humidity, and gas (VOC) or Indoor air quality (IAQ). We will learn how to display sensor values on a web page using Raspberry Pi Pico and MicroPython firmware. This web server will act as a weather station as it will show temperature, humidity, pressure, and IAQ readings on the web page.
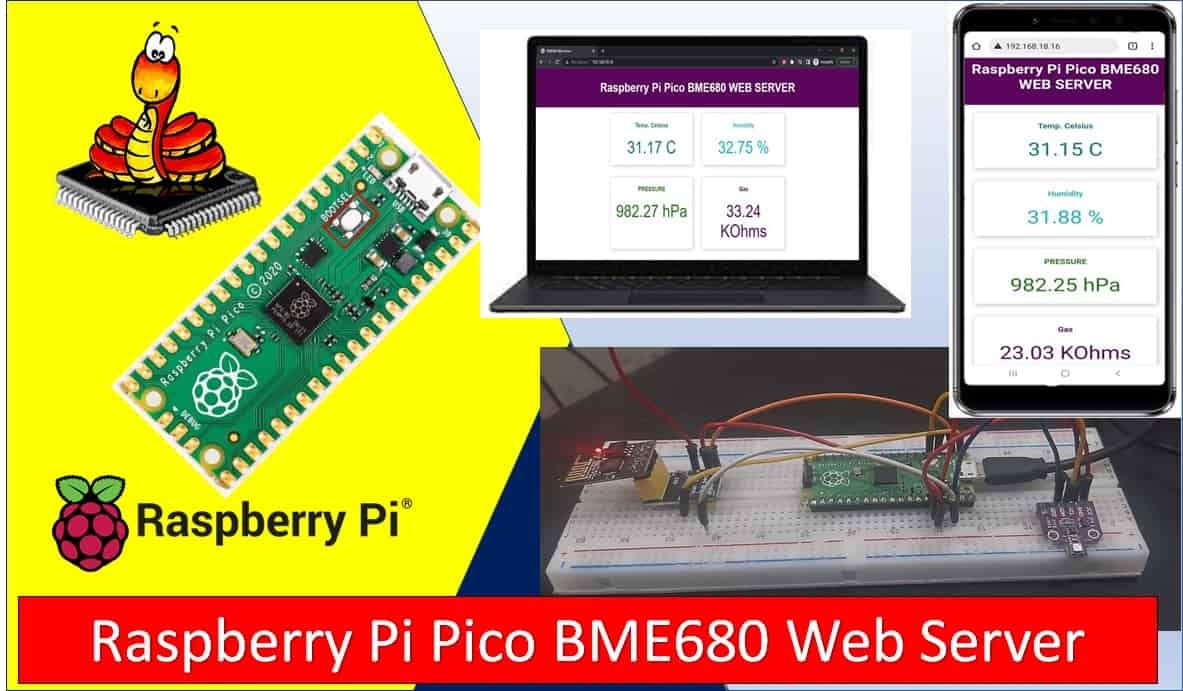
Raspberry Pi Pico does not support Wi-Fi capabilities hence we have to use a separate Wi-Fi module to enable Wi-Fi connectivity. Therefore, we will interface and program ESP-01 Wi-Fi module with Raspberry Pi Pico to enable Wi-Fi features. We will use Thonny IDE to program Raspberry Pi Pico with ESP-01 and BME680 in MircoPython. We will use AT commands through the serial port that is UART to configure the ESP-01 Wi-Fi module.
Prerequisites
Before we start this lesson make sure you are familiar with and have the latest version Python 3 in your system, have set up MicoPython in Raspberry Pi Pico, and have a running Integrated Development Environment(IDE) in which we will be doing the programming. We will be using the same Thonny IDE as we have done previously when we learned how to blink and chase LEDs in micro-python. If you have not followed our previous tutorial, you check here:
If you are using uPyCraft IDE, you can check this getting started guide:
Recommended Reading: Interface ESP8266 WiFi Module with Raspberry Pi Pico
BME680 Introduction
BME680 is a four in one low power-driven sensor, which has integrated temperature, pressure, humidity and gas detection sensors. It runs on an operating voltage of 1.8-3.8V and communicates with other microcontrollers through I2C and SPI protocol. This sensor is used in areas such as tracking the quality of air, humidity indicators, weather trends, home automation and controlling and GPS enhancements.
Operating Range and Accuracy
Some key features of BME680 include:
- Temperature measurement: measures the ambient temperature with an accuracy of ±1.0°C and an operating range of -40 to 85 ºC.
- Relative Humidity measurement: measures relative humidity with a fast response rate and an accuracy of ±3% and an operating range of 0-100%.
- Pressure measurement: measures barometric pressure with ±1 hPa absolute accuracy and altitude with an accuracy of ±1 meter. The operating range of pressure ranges from 300-1100 hPa.
| Accuracy | Operating Range | |
| Temperature | ±1.0°C | -40 to 85 ºC |
| Humidity | ±3% | 0-100% |
| Pressure | ±1 hPa | 300-1100 hPa |
- Gas measurement: detects a wide range of gases including volatile organic compounds (VOCs) thus determining the indoor air quality.
- Due to its compact size and low power operation, it is suitable in mobile applications, smartwatches, and navigation systems.
As compared to BME280, BME680 is a unique and updated sensor in the sense that it contains a small-sized MOX (metal oxide) sensor.
Gas Sensor
BME680 sensor can determine the number of pollutants/VOCs in the environment such as carbon monoxide, Ethane, Isoprene /2-methyl-1,3 Butadiene, Acetone, and Ethanol. The VOCs are detected by the adsorption of oxygen molecules onto the metal oxide layer. Its actual detection is done by the principle of changing the resistance of the MOX sensor. Whenever the MOX gets in contact with a pollutant in the air, the resistance of the sensor changes with the concentration of the pollutants present. This means that the higher number of pollutants in the air leads to significantly lower resistance of the sensor. Likewise, with the lower concentration of VOCs in the air, the resistance of the sensor is significantly higher.
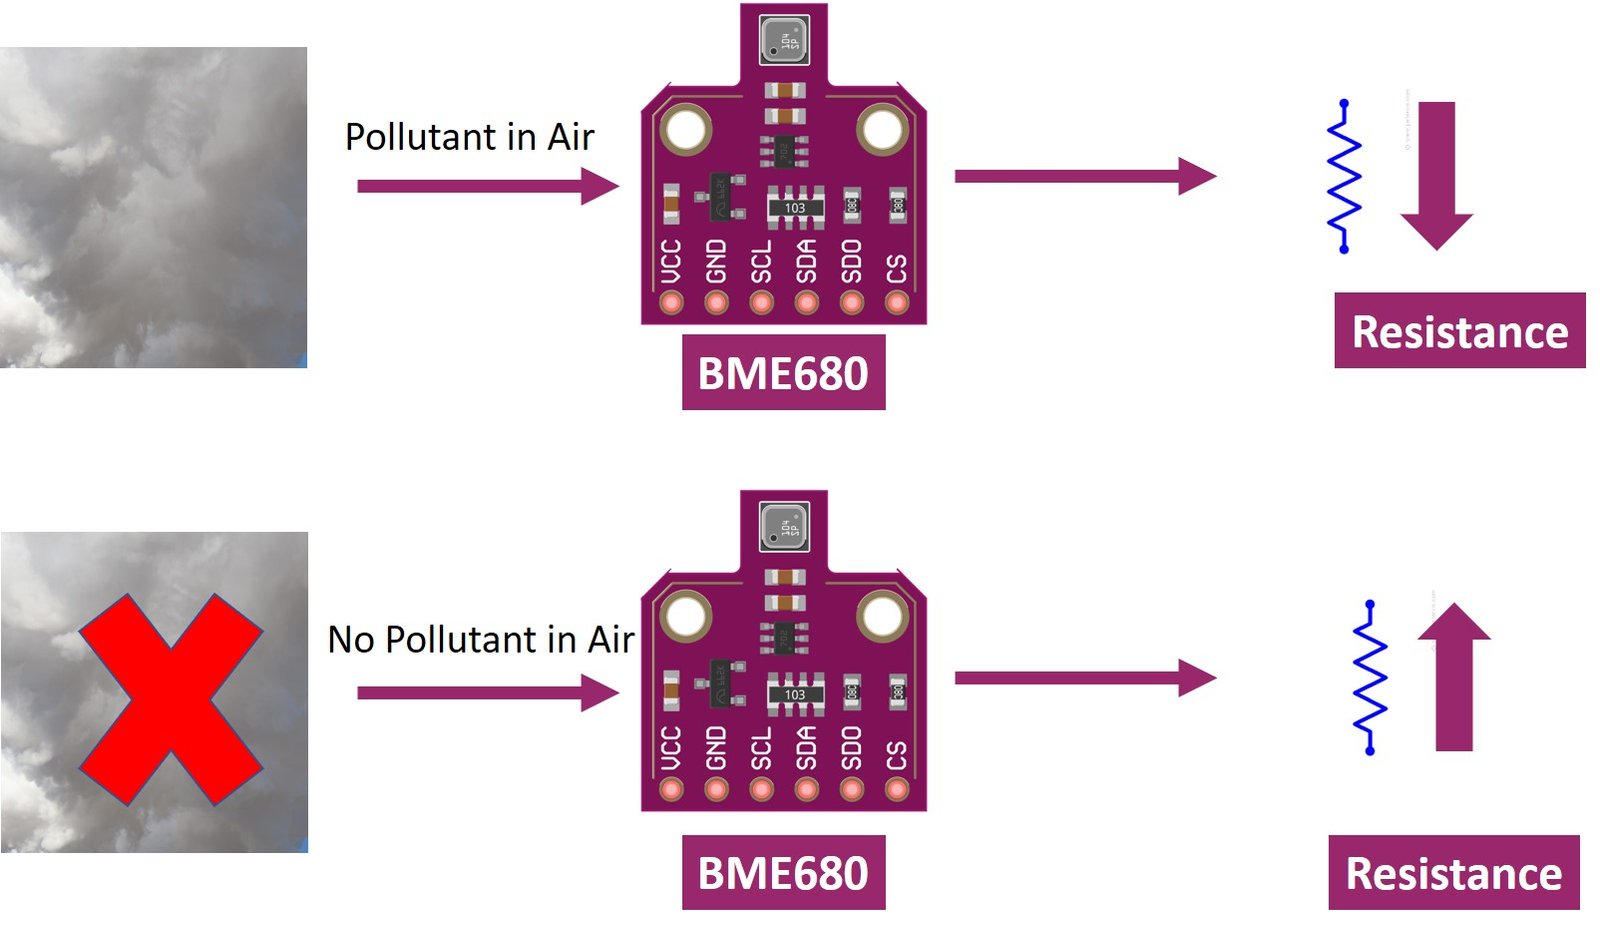
Note: The BME680 gas sensor is not a CO2 or ethanol measurement sensor. It gets the relative idea of CO2 from VOC in the air But we can not use it for direct measurement of CO2.
Like all other gas sensors, BME680 also gives variable results each time. To ensure greater accuracy, we have to calibrate it against a known source and then plot its curve. As the sensitivity levels are not constant during the initial use of the sensor, it is initially recommended to run it for forty-eight hours which can later be tuned down to thirty minutes before each use.
BME680 Modules
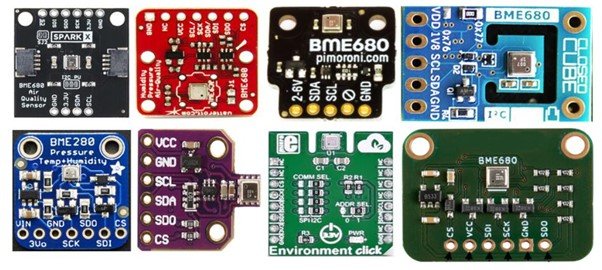
Several types of BME680 sensors with different sizes and numbers of terminals are available in the market. But all modules provide data through SPI and I2C interfaces and we can use the same MicroPython script to get sensor readings. Some of them are shown below:
You can choose the module according to your convenience and the type of microcontroller you want to connect it with. In this article, we will use the BME680 sensor with 6 terminals, which is shown below. It has 4 SPI and 2 I2C terminals.
Pinout Diagram
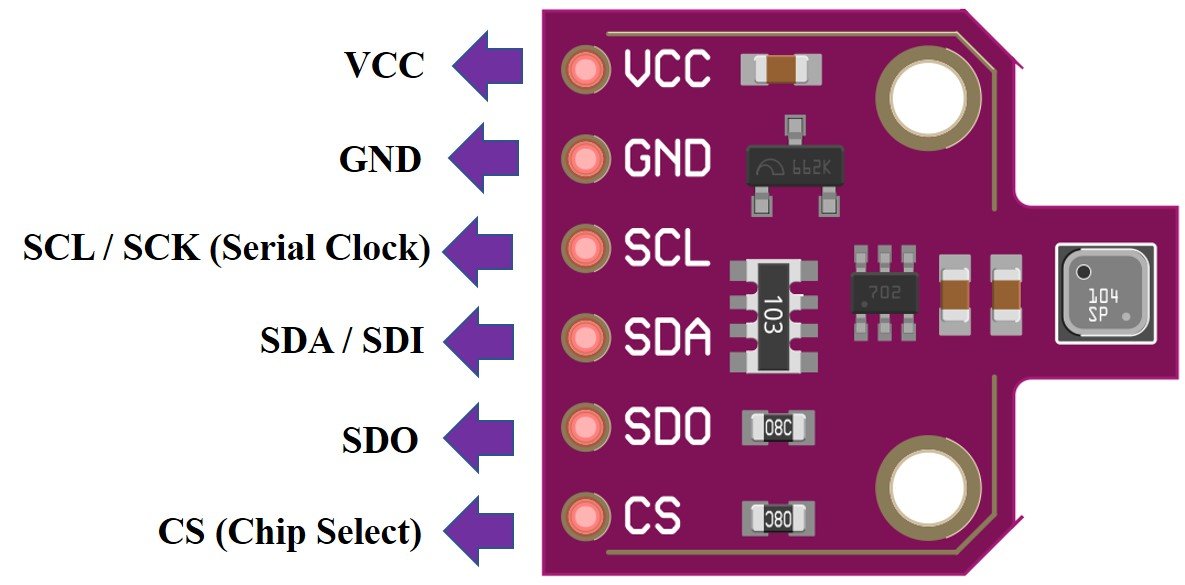
The following figure shows the pinout of BME680 sensor:
| Pin Name | Description |
| VCC | This pin powers up the sensor. |
| GND | This is the common ground pin for power and logic. |
| SCL | When using I2C protocol this pin acts as SCL or serial clock pin and when using SPI protocol this pin acts as SCK or the serial pin for SPI. It is the input to the chip. |
| SDA | When using I2C protocol this pin acts as SDA or Serial Data pin and when using SPI protocol this pin acts as SDI or Serial Data In also known as MOSI (‘Master out Slave in’). This is used as the I2C/SPI input to the sensor. |
| SDO | This is the SDO (Slave data out) /MISO (Master in slave out) pin for SPI communication. This pin is used as the SPI output from the sensor. |
| CS | This is the Chip Select pin used in SPI communication. Acts as an input to the sensor. |
Interfacing Raspberry Pi Pico with BME680 and ESP-01
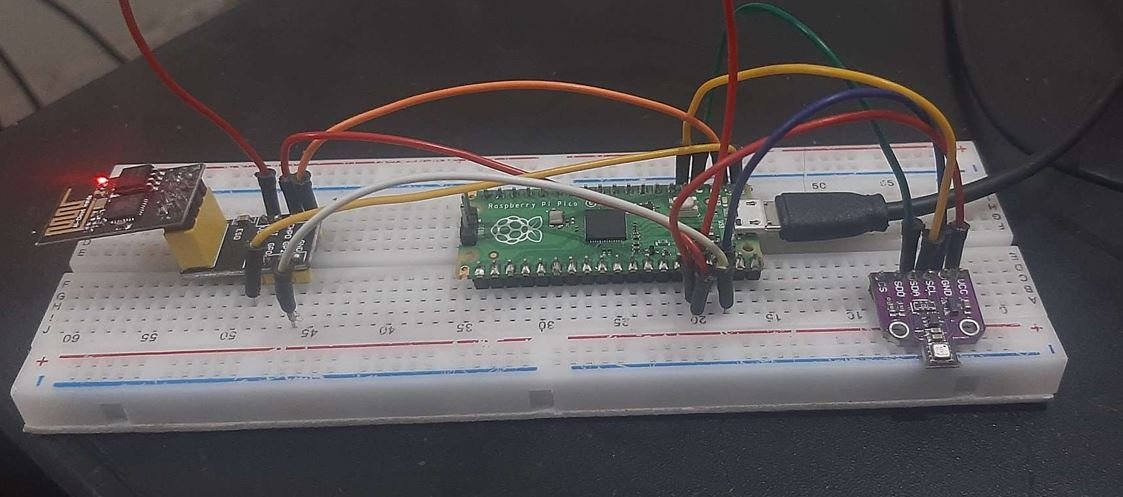
This section shows how to connect Raspberry Pi Pico with BME680 sensor and ESP-01.
We will require the following components:
- Raspberry Pi Pico
- BME680 Sensor
- ESP-01 Module
- Connecting Wires
- Breadboard
Raspberry Pi Pico with BME680
As discussed earlier, the BME680 offers two interfaces such as I2C and SPI. We can use either SPI or I2C interface to connect a sensor with Raspberry Pi Pico. SPI requires four pins to communicate. On the contrary, I2C requires two pins. Therefore, we will use the I2C interface for this article.
The connection of BME680 with the Raspberry Pi Pico is very simple. We have to connect the VCC terminal with 3.3V, ground with the ground (common ground), SCL of the sensor with SCL of the board, and SDA of the sensor with the SDA pin of the board.
Raspberry Pi Pico I2C Pins
Raspberry Pi Pico has two I2C controllers. Both I2C controllers are accessible through GPIO pins of Raspberry Pi Pico. The following table shows the connection of GPIO pins with both I2C controllers. Each connection of the controller can be configured through multiple GPIO pins as shown in the figure. But before using an I2C controller, you should configure in software which GPIO pins you want to use with a specific I2C controller.
| I2C Controller | GPIO Pins |
| I2C0 – SDA | GP0/GP4/GP8/GP12/GP16/GP20 |
| I2C0 – SCL | GP1/GP5/GP9/GP13/GP17/GP21 |
| I2C1 – SDA | GP2/GP6/GP10/GP14/GP18/GP26 |
| I2C1 – SCL | GP3/GP7/GP11/GP15/GP19/GP27 |
The connections between the two devices which we are using can be seen below.
| BME680 | Raspberry Pi Pico |
| VCC | 3.3V |
| SDA | GP2 (I2C1 SDA) |
| SCL | GP3 (I2C1 SCL) |
| GND | GND |
We have used the same connections as specified in the table above. However you can use other combinations of SDA/SCL pins as well but remember to change them in the MicroPython script.
Raspberry Pi Pico with ESP-01
The ESP-01 module consists of 8 pins. However we will use 5 pins to connect with the Pi Pico board. These include the VCC, EN, GND, RX and TX pins. RX and TX pins of the module will be connected with the UART pins of the Pi Pico board. Let us first have a look at the Raspberry Pi Pi UART Pins.
Raspberry Pi Pico UART Pins
Raspberry Pi Pico contains two identical UART peripherals with separate 32×8 Tx and 32×12 Rx FIFOs.
The following table lists the GPIO pins for both UART peripherals which are exposed on Raspberry Pi Pico development board pinouts.
| UART Pins | GPIO Pins |
| UART0-TX | GP0/GP12/GP16 |
| UART0-RX | GP1/GP13/GP17 |
| UART1-TX | GP4/GP8 |
| UART1-RX | GP5/GP9 |
For this guide we will use UART0-TX and RX pins.
Follow the connection diagram below to connect the two devices.
| Raspberry Pi Pico | ESP-01 |
| 3.3V | VCC |
| 3.3V | EN |
| GND | GND |
| GP1 (UART0 RX) | TX |
| GP0 (UART0 TX) | RX |
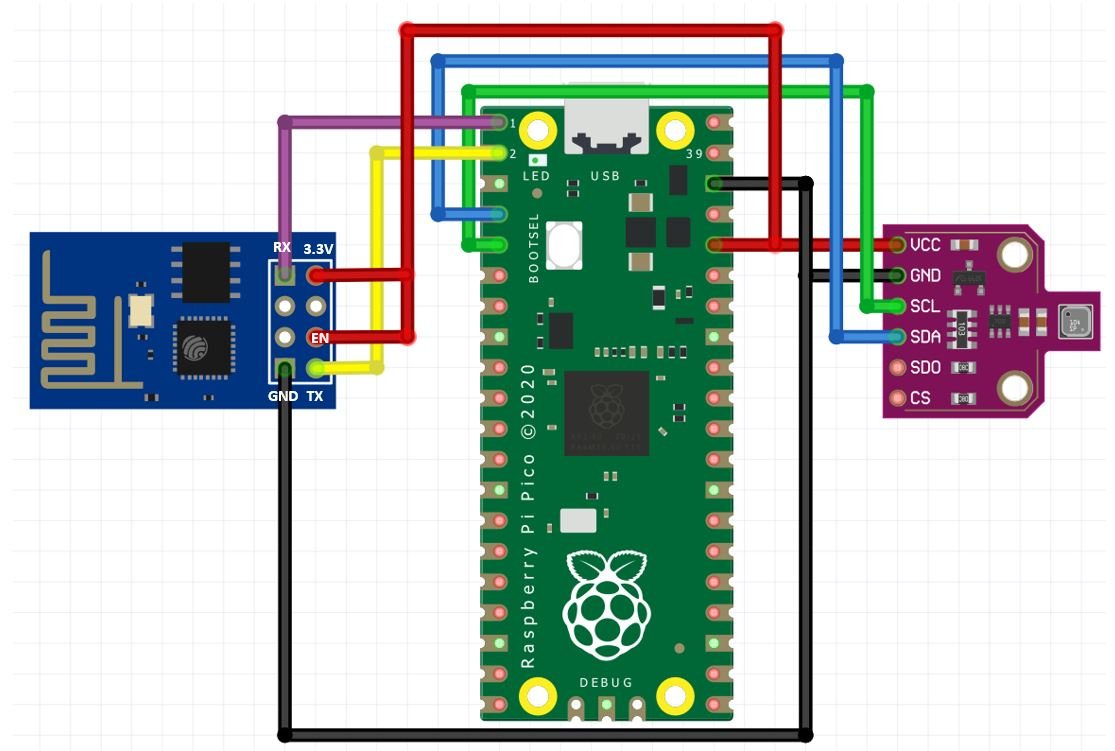
Connection Diagram Raspberry Pi Pico with BME680 and ESP-01
We have used the same connections as given in the two tables above. All three devices will be commonly grounded and will be powered with the same 3.3V pin of Raspberry Pi Pico.
The diagram below shows the connection diagram of Raspberry Pi Pico with BME680 and ESP-01.
Install BME680 MicroPython Library
For this project we will require the MicroPython BME680 library.
We will use Thonny IDE to program our Raspberry Pi Pico. Make sure you have the latest version of the IDE installed in your system. Open a new file in Thonny. Copy the library given below. Save it to Raspberry Pi Pico with the name bme680.py under the lib folder.
bme680.py
# Spaces, comments and some functions have been removed from the original file to save memory
# Original source: https://github.com/adafruit/Adafruit_CircuitPython_BME680/blob/master/adafruit_bme680.py
import time
import math
from micropython import const
from ubinascii import hexlify as hex
try:
  import struct
except ImportError:
  import ustruct as struct
_BME680_CHIPID = const(0x61)
_BME680_REG_CHIPID = const(0xD0)
_BME680_BME680_COEFF_ADDR1 = const(0x89)
_BME680_BME680_COEFF_ADDR2 = const(0xE1)
_BME680_BME680_RES_HEAT_0 = const(0x5A)
_BME680_BME680_GAS_WAIT_0 = const(0x64)
_BME680_REG_SOFTRESET = const(0xE0)
_BME680_REG_CTRL_GAS = const(0x71)
_BME680_REG_CTRL_HUM = const(0x72)
_BME280_REG_STATUS = const(0xF3)
_BME680_REG_CTRL_MEAS = const(0x74)
_BME680_REG_CONFIG = const(0x75)
_BME680_REG_PAGE_SELECT = const(0x73)
_BME680_REG_MEAS_STATUS = const(0x1D)
_BME680_REG_PDATA = const(0x1F)
_BME680_REG_TDATA = const(0x22)
_BME680_REG_HDATA = const(0x25)
_BME680_SAMPLERATES = (0, 1, 2, 4, 8, 16)
_BME680_FILTERSIZES = (0, 1, 3, 7, 15, 31, 63, 127)
_BME680_RUNGAS = const(0x10)
_LOOKUP_TABLE_1 = (2147483647.0, 2147483647.0, 2147483647.0, 2147483647.0, 2147483647.0,
  2126008810.0, 2147483647.0, 2130303777.0, 2147483647.0, 2147483647.0,
  2143188679.0, 2136746228.0, 2147483647.0, 2126008810.0, 2147483647.0,
  2147483647.0)
_LOOKUP_TABLE_2 = (4096000000.0, 2048000000.0, 1024000000.0, 512000000.0, 255744255.0, 127110228.0,
  64000000.0, 32258064.0, 16016016.0, 8000000.0, 4000000.0, 2000000.0, 1000000.0,
  500000.0, 250000.0, 125000.0)
def _read24(arr):
  ret = 0.0
  for b in arr:
    ret *= 256.0
    ret += float(b & 0xFF)
  return ret
class Adafruit_BME680:
  def __init__(self, *, refresh_rate=10):
    self._write(_BME680_REG_SOFTRESET, [0xB6])
    time.sleep(0.005)
    chip_id = self._read_byte(_BME680_REG_CHIPID)
    if chip_id != _BME680_CHIPID:
      raise RuntimeError('Failed 0x%x' % chip_id)
    self._read_calibration()
    self._write(_BME680_BME680_RES_HEAT_0, [0x73])
    self._write(_BME680_BME680_GAS_WAIT_0, [0x65])
    self.sea_level_pressure = 1013.25
    self._pressure_oversample = 0b011
    self._temp_oversample = 0b100
    self._humidity_oversample = 0b010
    self._filter = 0b010
    self._adc_pres = None
    self._adc_temp = None
    self._adc_hum = None
    self._adc_gas = None
    self._gas_range = None
    self._t_fine = None
    self._last_reading = 0
    self._min_refresh_time = 1000 / refresh_rate
  @property
  def pressure_oversample(self):
    return _BME680_SAMPLERATES[self._pressure_oversample]
  @pressure_oversample.setter
  def pressure_oversample(self, sample_rate):
    if sample_rate in _BME680_SAMPLERATES:
      self._pressure_oversample = _BME680_SAMPLERATES.index(sample_rate)
    else:
      raise RuntimeError("Invalid")
  @property
  def humidity_oversample(self):
    return _BME680_SAMPLERATES[self._humidity_oversample]
  @humidity_oversample.setter
  def humidity_oversample(self, sample_rate):
    if sample_rate in _BME680_SAMPLERATES:
      self._humidity_oversample = _BME680_SAMPLERATES.index(sample_rate)
    else:
      raise RuntimeError("Invalid")
  @property
  def temperature_oversample(self):
      return _BME680_SAMPLERATES[self._temp_oversample]
  @temperature_oversample.setter
  def temperature_oversample(self, sample_rate):
    if sample_rate in _BME680_SAMPLERATES:
      self._temp_oversample = _BME680_SAMPLERATES.index(sample_rate)
    else:
      raise RuntimeError("Invalid")
  @property
  def filter_size(self):
    return _BME680_FILTERSIZES[self._filter]
  @filter_size.setter
  def filter_size(self, size):
    if size in _BME680_FILTERSIZES:
      self._filter = _BME680_FILTERSIZES[size]
    else:
      raise RuntimeError("Invalid")
  @property
  def temperature(self):
    self._perform_reading()
    calc_temp = (((self._t_fine * 5) + 128) / 256)
    return calc_temp / 100
  @property
  def pressure(self):
    self._perform_reading()
    var1 = (self._t_fine / 2) - 64000
    var2 = ((var1 / 4) * (var1 / 4)) / 2048
    var2 = (var2 * self._pressure_calibration[5]) / 4
    var2 = var2 + (var1 * self._pressure_calibration[4] * 2)
    var2 = (var2 / 4) + (self._pressure_calibration[3] * 65536)
    var1 = (((((var1 / 4) * (var1 / 4)) / 8192) *
      (self._pressure_calibration[2] * 32) / 8) +
      ((self._pressure_calibration[1] * var1) / 2))
    var1 = var1 / 262144
    var1 = ((32768 + var1) * self._pressure_calibration[0]) / 32768
    calc_pres = 1048576 - self._adc_pres
    calc_pres = (calc_pres - (var2 / 4096)) * 3125
    calc_pres = (calc_pres / var1) * 2
    var1 = (self._pressure_calibration[8] * (((calc_pres / 8) * (calc_pres / 8)) / 8192)) / 4096
    var2 = ((calc_pres / 4) * self._pressure_calibration[7]) / 8192
    var3 = (((calc_pres / 256) ** 3) * self._pressure_calibration[9]) / 131072
    calc_pres += ((var1 + var2 + var3 + (self._pressure_calibration[6] * 128)) / 16)
    return calc_pres/100
  @property
  def humidity(self):
    self._perform_reading()
    temp_scaled = ((self._t_fine * 5) + 128) / 256
    var1 = ((self._adc_hum - (self._humidity_calibration[0] * 16)) -
      ((temp_scaled * self._humidity_calibration[2]) / 200))
    var2 = (self._humidity_calibration[1] *
      (((temp_scaled * self._humidity_calibration[3]) / 100) +
       (((temp_scaled * ((temp_scaled * self._humidity_calibration[4]) / 100)) /
         64) / 100) + 16384)) / 1024
    var3 = var1 * var2
    var4 = self._humidity_calibration[5] * 128
    var4 = (var4 + ((temp_scaled * self._humidity_calibration[6]) / 100)) / 16
    var5 = ((var3 / 16384) * (var3 / 16384)) / 1024
    var6 = (var4 * var5) / 2
    calc_hum = (((var3 + var6) / 1024) * 1000) / 4096
    calc_hum /= 1000
    if calc_hum > 100:
      calc_hum = 100
    if calc_hum < 0:
      calc_hum = 0
    return calc_hum
  @property
  def altitude(self):
    pressure = self.pressure
    return 44330 * (1.0 - math.pow(pressure / self.sea_level_pressure, 0.1903))
  @property
  def gas(self):
    self._perform_reading()
    var1 = ((1340 + (5 * self._sw_err)) * (_LOOKUP_TABLE_1[self._gas_range])) / 65536
    var2 = ((self._adc_gas * 32768) - 16777216) + var1
    var3 = (_LOOKUP_TABLE_2[self._gas_range] * var1) / 512
    calc_gas_res = (var3 + (var2 / 2)) / var2
    return int(calc_gas_res)
  def _perform_reading(self):
    if (time.ticks_diff(self._last_reading, time.ticks_ms()) * time.ticks_diff(0, 1)
        < self._min_refresh_time):
      return
    self._write(_BME680_REG_CONFIG, [self._filter << 2])
    self._write(_BME680_REG_CTRL_MEAS,
      [(self._temp_oversample << 5)|(self._pressure_oversample << 2)])
    self._write(_BME680_REG_CTRL_HUM, [self._humidity_oversample])
    self._write(_BME680_REG_CTRL_GAS, [_BME680_RUNGAS])
    ctrl = self._read_byte(_BME680_REG_CTRL_MEAS)
    ctrl = (ctrl & 0xFC) | 0x01
    self._write(_BME680_REG_CTRL_MEAS, [ctrl])
    new_data = False
    while not new_data:
      data = self._read(_BME680_REG_MEAS_STATUS, 15)
      new_data = data[0] & 0x80 != 0
      time.sleep(0.005)
    self._last_reading = time.ticks_ms()
    self._adc_pres = _read24(data[2:5]) / 16
    self._adc_temp = _read24(data[5:8]) / 16
    self._adc_hum = struct.unpack('>H', bytes(data[8:10]))[0]
    self._adc_gas = int(struct.unpack('>H', bytes(data[13:15]))[0] / 64)
    self._gas_range = data[14] & 0x0F
    var1 = (self._adc_temp / 8) - (self._temp_calibration[0] * 2)
    var2 = (var1 * self._temp_calibration[1]) / 2048
    var3 = ((var1 / 2) * (var1 / 2)) / 4096
    var3 = (var3 * self._temp_calibration[2] * 16) / 16384
    self._t_fine = int(var2 + var3)
  def _read_calibration(self):
    coeff = self._read(_BME680_BME680_COEFF_ADDR1, 25)
    coeff += self._read(_BME680_BME680_COEFF_ADDR2, 16)
    coeff = list(struct.unpack('<hbBHhbBhhbbHhhBBBHbbbBbHhbb', bytes(coeff[1:39])))
    coeff = [float(i) for i in coeff]
    self._temp_calibration = [coeff[x] for x in [23, 0, 1]]
    self._pressure_calibration = [coeff[x] for x in [3, 4, 5, 7, 8, 10, 9, 12, 13, 14]]
    self._humidity_calibration = [coeff[x] for x in [17, 16, 18, 19, 20, 21, 22]]
    self._gas_calibration = [coeff[x] for x in [25, 24, 26]]
    self._humidity_calibration[1] *= 16
    self._humidity_calibration[1] += self._humidity_calibration[0] % 16
    self._humidity_calibration[0] /= 16
    self._heat_range = (self._read_byte(0x02) & 0x30) / 16
    self._heat_val = self._read_byte(0x00)
    self._sw_err = (self._read_byte(0x04) & 0xF0) / 16
  def _read_byte(self, register):
    return self._read(register, 1)[0]
  def _read(self, register, length):
    raise NotImplementedError()
  def _write(self, register, values):
    raise NotImplementedError()
class BME680_I2C(Adafruit_BME680):
  def __init__(self, i2c, address=0x77, debug=False, *, refresh_rate=10):
    self._i2c = i2c
    self._address = address
    self._debug = debug
    super().__init__(refresh_rate=refresh_rate)
  def _read(self, register, length):
    result = bytearray(length)
    self._i2c.readfrom_mem_into(self._address, register & 0xff, result)
    if self._debug:
      print("\t${:x} read ".format(register), " ".join(["{:02x}".format(i) for i in result]))
    return result
  def _write(self, register, values):
    if self._debug:
      print("\t${:x} write".format(register), " ".join(["{:02x}".format(i) for i in values]))
    for value in values:
      self._i2c.writeto_mem(self._address, register, bytearray([value & 0xFF]))
      register += 1
MicroPython Script Raspberry Pi Pico BME280 Web Server with ESP-01 (Display Temperature, Humidity, Gas, and Pressure)
import uos
import machine
import utime
from machine import Pin, I2C
from bme680 import *

recv_buf="" # receive buffer global variable

print()
print("Machine: \t" + uos.uname()[4])
print("MicroPython: \t" + uos.uname()[3])


i2c=I2C(1,sda=Pin(2), scl=Pin(3), freq=400000)    #initializing the I2C method
bme = BME680_I2C(i2c=i2c)
uart0 = machine.UART(0, baudrate=115200)
print(uart0)

def Rx_ESP_Data():
    recv=bytes()
    while uart0.any()>0:
        recv+=uart0.read(1)
    res=recv.decode('utf-8')
    return res
def Connect_WiFi(cmd, uart=uart0, timeout=3000):
    print("CMD: " + cmd)
    uart.write(cmd)
    utime.sleep(7.0)
    Wait_ESP_Rsp(uart, timeout)
    print()

def Send_AT_Cmd(cmd, uart=uart0, timeout=3000):
    print("CMD: " + cmd)
    uart.write(cmd)
    Wait_ESP_Rsp(uart, timeout)
    print()

def Wait_ESP_Rsp(uart=uart0, timeout=3000):
    prvMills = utime.ticks_ms()
    resp = b""
    while (utime.ticks_ms()-prvMills)<timeout:
        if uart.any():
            resp = b"".join([resp, uart.read(1)])
    print("resp:")
    try:
        print(resp.decode())
    except UnicodeError:
        print(resp)

Send_AT_Cmd('AT\r\n')          #Test AT startup
Send_AT_Cmd('AT+GMR\r\n')      #Check version information
Send_AT_Cmd('AT+CIPSERVER=0\r\n')      #Check version information
Send_AT_Cmd('AT+RST\r\n')      #Check version information
Send_AT_Cmd('AT+RESTORE\r\n')  #Restore Factory Default Settings
Send_AT_Cmd('AT+CWMODE?\r\n')  #Query the Wi-Fi mode
Send_AT_Cmd('AT+CWMODE=1\r\n') #Set the Wi-Fi mode = Station mode
Send_AT_Cmd('AT+CWMODE?\r\n')  #Query the Wi-Fi mode again
#Send_AT_Cmd('AT+CWLAP\r\n', timeout=10000) #List available APs
Connect_WiFi('AT+CWJAP="HUAWEI-u67E","4uF77R2n"\r\n', timeout=5000) #Connect to AP
Send_AT_Cmd('AT+CIFSR\r\n',timeout=5000)    #Obtain the Local IP Address
Send_AT_Cmd('AT+CIPMUX=1\r\n')    #Obtain the Local IP Address
utime.sleep(1.0)
Send_AT_Cmd('AT+CIPSERVER=1,80\r\n')    #Obtain the Local IP Address
utime.sleep(1.0)
print ('Starting connection to ESP8266...')
while True:
    res =""
    res=Rx_ESP_Data()
    utime.sleep(2.0)
    if '+IPD' in res: # if the buffer contains IPD(a connection), then respond with HTML handshake
        temperature = str(round(bme.temperature, 2)) + ' C'
        humidity = str(round(bme.humidity, 2)) + ' %'
        pressure = str(round(bme.pressure, 2)) + ' hPa'
        gas = str(round(bme.gas/1000, 2)) + ' KOhms'
        print('Temperature:', temperature)
        print('Humidity:', humidity)
        print('Pressure:', pressure)
        print('Gas:', gas)
        print('-------')
        id_index = res.find('+IPD')
        print("resp:")
        print(res)
        connection_id =  res[id_index+5]
        print("connectionId:" + connection_id)
        print ('! Incoming connection - sending webpage')
        uart0.write('AT+CIPSEND='+connection_id+',1440'+'\r\n')  #Send a HTTP response then a webpage as bytes the 108 is the amount of bytes you are sending, change this if you change the data sent below
        utime.sleep(1.0)
        uart0.write('HTTP/1.1 200 OK'+'\r\n')
        uart0.write('Content-Type: text/html'+'\r\n')
        uart0.write('Connection: close'+'\r\n')
        uart0.write(''+'\r\n')
        uart0.write('<!DOCTYPE HTML>'+'\r\n')
        uart0.write('<html><head>'+'\r\n')
        uart0.write('<title>BME680 Web Server</title>'+'\r\n')
        uart0.write('<meta http-equiv=\"refresh\" content=\"10\">'+'\r\n')
        uart0.write('<meta name=\"viewport\" content=\"width=device-width, initial-scale=1\'\r\n')
        uart0.write('<link rel=\"icon\" href=\"data:,\">'+'\r\n')
        uart0.write('<style>'+'\r\n')
        uart0.write('html {font-family: Arial; display: inline-block; text-align: center;}'+'\r\n')
        uart0.write('p {  font-size: 1.2rem;}'+'\r\n')
        uart0.write('body {  margin: 0;}'+'\r\n')
        uart0.write('.topnav { overflow: hidden; background-color: #5c055c; color: white; font-size: 1.7rem; }'+'\r\n')
        uart0.write('.content { padding: 20px; }'+'\r\n')
        uart0.write('.card { background-color: white; box-shadow: 2px 2px 12px 1px rgba(140,140,140,.5); }'+'\r\n')
        uart0.write('.cards { max-width: 700px; margin: 0 auto; display: grid; grid-gap: 2rem; grid-template-columns: repeat(auto-fit, minmax(300px, 1fr)); }'+'\r\n')
        uart0.write('.reading { font-size: 2.8rem; }'+'\r\n')
        uart0.write('.card.temperature { color: #0e7c7b; }'+'\r\n')
        uart0.write('.card.humidity { color: #17bebb; }'+'\r\n')
        uart0.write('.card.pressure { color: hsl(113, 61%, 29%); }'+'\r\n')
        uart0.write('.card.gas { color: #5c055c; }'+'\r\n')
        uart0.write('</style>'+'\r\n')
        uart0.write('</head>'+'\r\n')
        uart0.write('<body>'+'\r\n')
        uart0.write('<div class=\"topnav\">'+'\r\n')
        uart0.write('<h3>Raspberry Pi Pico BME680 WEB SERVER</h3>'+'\r\n')
        uart0.write('</div>'+'\r\n')
        uart0.write('<div class=\"content\">'+'\r\n')
        uart0.write('<div class=\"cards\">'+'\r\n')
        uart0.write('<div class=\"card temperature\">'+'\r\n')
        uart0.write('<h4>Temp. Celsius</h4><p><span class=\"reading\">' + temperature + '</p>'+'\r\n')
        uart0.write('</div>'+'\r\n')
        uart0.write('<div class=\"card humidity\">'+'\r\n')
        uart0.write('<h4>Humidity</h4><p><span class=\"reading\">' + humidity + '</p>'+'\r\n')
        uart0.write('</div>'+'\r\n')
        uart0.write('<div class=\"card pressure\">'+'\r\n')
        uart0.write('<h4>PRESSURE</h4><p><span class=\"reading\">' + pressure +'</p>'+'\r\n')
        uart0.write('</div>'+'\r\n')
        uart0.write('<div class=\"card gas\">' +'\r\n')
        uart0.write('<h4>Gas</h4><p><span class=\"reading\">' + gas + '</p>'+'\r\n')
        uart0.write('</div></div></div>'+'\r\n')
        uart0.write('</body></html>'+'\r\n')
        utime.sleep(4.0)
        Send_AT_Cmd('AT+CIPCLOSE='+ connection_id+'\r\n') # once file sent, close connection
        utime.sleep(4.0)
        recv_buf="" #reset buffer
        print ('Waiting For connection...')
How the Code Works?
We will start by importing the machine module and the uos module. We will also import I2C and Pin class from the machine module. This is because we have to specify the pin for I2C communication. We also import the utime module so that we will be able to add a delay of 10 seconds in between our readings. Also, import all the methods from the bme680 library which we previously installed.
import uos
import machine
import utime
from machine import Pin, I2C
from bme680 import *
Then, we will print the information about our current operating system in the Thonny shell terminal. We will uos.uname() and print the operating system version and release.
print()
print("Machine: \t" + uos.uname()[4])
print("MicroPython: \t" + uos.uname()[3])
Initialize I2C Communication
Next, we will initialize the I2C GPIO pins for SCL and SDA respectively. We have used the I2C1 SCL and I2C0 SDA pins.
We have created an I2C() method which takes in four parameters. The first parameter is the I2C channel that we are using. The second parameter specifies the I2C GPIO pin of the board which is connected to the SDA line. The third parameter specifies the I2C GPIO pin of the board which is connected to the SCL line. The last parameter is the frequency connection.
We are setting the SCL on pin 3 and the SDA on pin 2.
i2c=I2C(1,sda=Pin(2), scl=Pin(3), freq=400000)Next, we create an object of BME680 named bme and specify the I2C communication protocol to read data from the sensor. This will be used to access the sensor readings.
bme = BME680_I2C(i2c=i2c)Initialize UART Communication
Then we will create an uart object by using UART() and specify the UART channel as the first parameter and the baud rate as the second parameter. We are using UART0 in this case with baud rate 115200 for the uart communication. ESP8266 has a default baud rate of 115200 hence we will use the same baud rate here for Raspberry Pi Pico UART communication in order to create synchronization. Moreover we will also print the UART details in the shell terminal.
uart0 = machine.UART(0, baudrate=115200)
print(uart0)
This Connect_WiFi() function is used to connect ESP8266 with WiFi.
def Connect_WiFi(cmd, uart=uart0, timeout=3000):
    print("CMD: " + cmd)
    uart.write(cmd)
    utime.sleep(7.0)
    Wait_ESP_Rsp(uart, timeout)
    print()
Next, we will define three functions. The first one is Rx_ESP_Data(). This reads the serial data being received. This data is decoded from UTF-8 format and returned.
def Rx_ESP_Data():
    recv=bytes()
    while uart0.any()>0:
        recv+=uart0.read(1)
    res=recv.decode('utf-8')
    return res
The second function is Send_AT_Cmd(cmd, uart=uart0, timeout=3000). It takes in three parameters, the AT command, the UART channel and the response time. This function will be used to it send an AT command to ESP8266 via uart0. The response time is set to 3 seconds.
def Send_AT_Cmd(cmd, uart=uart0, timeout=3000):
    print("CMD: " + cmd)
    uart.write(cmd)
    Wait_ESP_Rsp(uart, timeout)
    print()
The Wait_ESP_Rsp(uart=uart0, timeout=3000) function waits for 3 seconds to get the response from ESP8266. After receiving the data from ESP8266 it concatenates the received bytes and prints them on the shell terminal.
def Wait_ESP_Rsp(uart=uart0, timeout=3000):
    prvMills = utime.ticks_ms()
    resp = b""
    while (utime.ticks_ms()-prvMills)<timeout:
        if uart.any():
            resp = b"".join([resp, uart.read(1)])
    print("resp:")
    try:
        print(resp.decode())
    except UnicodeError:
        print(resp)
AT Commands
Now let us look at the series of AT commands that we will send through UART0 to ESP8266.
Send_AT_Cmd('AT\r\n')          #Test AT startup
Send_AT_Cmd('AT+GMR\r\n')      #Check version information
Send_AT_Cmd('AT+CIPSERVER=0\r\n')      #Check version information
Send_AT_Cmd('AT+RST\r\n')      #Check version information
Send_AT_Cmd('AT+RESTORE\r\n')  #Restore Factory Default Settings
Send_AT_Cmd('AT+CWMODE?\r\n')  #Query the Wi-Fi mode
Send_AT_Cmd('AT+CWMODE=1\r\n') #Set the Wi-Fi mode = Station mode
Send_AT_Cmd('AT+CWMODE?\r\n')  #Query the Wi-Fi mode again
Connect_WiFi('AT+CWJAP="HUAWEI-u67E","4uF77R2n"\r\n', timeout=5000) #Connect to AP
Send_AT_Cmd('AT+CIFSR\r\n',timeout=5000)    #Obtain the Local IP Address
Send_AT_Cmd('AT+CIPMUX=1\r\n')    #Obtain the Local IP Address
utime.sleep(1.0)
Send_AT_Cmd('AT+CIPSERVER=1,80\r\n')    #Obtain the Local IP Address
utime.sleep(1.0)AT: This type of command is used to test the startup function of WiFi module. The response would be ok, against this command if everything is ok.
Send_AT_Cmd('AT\r\n') #Test AT startupAT+GMR : This type of AT command is used to check the version of AT command and we used SDK version of AT command in this type of WIFI module.
Send_AT_Cmd('AT+GMR\r\n') #Check version informationAT+CIPSERVER=0: This configures the ESP8266 as server and sets the mode as 0 which means delete server (need to follow by restart)
Send_AT_Cmd('AT+CIPSERVER=0\r\n') AT+RST: This type of command is used for reset the WiFi module when it is in working condition. The response would be ok, when reset the module.
Send_AT_Cmd('AT+RST\r\n') AT+RESTORE: This type of command is used to restore factory settings means, when this command is entered then all the parameters are reset automatically to default one’s.
Send_AT_Cmd('AT+RESTORE\r\n') #Restore Factory Default SettingsAT+CWMODE? : This type of command is used to query the WiFi mode of ESP8266.
Send_AT_Cmd('AT+CWMODE?\r\n') #Query the WiFi modeAT+CWMODE=1 : This sets the WiFi mode of ESP8266 in this case in station mode.
Send_AT_Cmd('AT+CWMODE=1\r\n') #Set the WiFi mode = Station modeAT+CWJAP=”SSID”,”PASSWORD”\r\n’, timeout=TIME_ms : This connects the ESP8266 with an AP whose SSID and password are given, The timeout here is the reconnection time.
Connect_WiFi('AT+CWJAP="HUAWEI-u67E","4uF77R2n"\r\n', timeout=5000) #Connect to APAT+CIFSR: This command obtains the local IP address.
Send_AT_Cmd('AT+CIFSR\r\n')AT+CIPMUX=1:This command is used to enable multiple connections (maximum 4)
Send_AT_Cmd('AT+CIPMUX=1\r\n')AT+CIPSERVER=1: This command configures ESP8266 as server.
Send_AT_Cmd('AT+CIPSERVER=1,80\r\n')while loop
Inside the while loop, we will first call Rx_ESP_Data() which returns the data that the ESP8266 receives. This is saved in the variable ‘res.’
Add a delay of 2 seconds before proceeding further.
res =""
res=Rx_ESP_Data()
utime.sleep(2.0)
Next, we will check if the buffer contains an IPD connection or not. If it does then, respond with an HTML handshake.
To get the sensor readings, we will use the object “bme” on temperature, humidity, pressure, and gas methods. These readings are saved in their corresponding variables.
Print the BME680 sensor readings along with the response in the shell terminal. Obtain the connection ID and print it as well.
if '+IPD' in res: # if the buffer contains IPD(a connection), then respond with HTML handshake
        temperature = str(round(bme.temperature, 2)) + ' C'
        humidity = str(round(bme.humidity, 2)) + ' %'
        pressure = str(round(bme.pressure, 2)) + ' hPa'
        gas = str(round(bme.gas/1000, 2)) + ' KOhms'
        print('Temperature:', temperature)
        print('Humidity:', humidity)
        print('Pressure:', pressure)
        print('Gas:', gas)
        print('-------')
        id_index = res.find('+IPD')
        print("resp:")
        print(res)
        connection_id =  res[id_index+5]
        print("connectionId:" + connection_id)
Then by using the uart object on the write() method, we will send the bytes to the UART. First, we are writing the AT command: AT+CIPSEND=’ID’, ‘LENGTH’ This will set the length of the data that will be sent. Next after a delay of 1 second, we will write the HTML body that will build the web page to the serial port. After that, we will close the multiple connections as we are sending the AT command: AT+CIPCLOSE=’ID’. Then we will reset the buffer and wait for the connection.
print ('! Incoming connection - sending webpage')
        uart0.write('AT+CIPSEND='+connection_id+',1440'+'\r\n')  #Send a HTTP response then a webpage as bytes the 108 is the amount of bytes you are sending, change this if you change the data sent below
        utime.sleep(1.0)
        uart0.write('HTTP/1.1 200 OK'+'\r\n')
        uart0.write('Content-Type: text/html'+'\r\n')
        uart0.write('Connection: close'+'\r\n')
        uart0.write(''+'\r\n')
        uart0.write('<!DOCTYPE HTML>'+'\r\n')
        uart0.write('<html><head>'+'\r\n')
        uart0.write('<title>BME680 Web Server</title>'+'\r\n')
        uart0.write('<meta http-equiv=\"refresh\" content=\"10\">'+'\r\n')
        uart0.write('<meta name=\"viewport\" content=\"width=device-width, initial-scale=1\'\r\n')
        uart0.write('<link rel=\"icon\" href=\"data:,\">'+'\r\n')
        uart0.write('<style>'+'\r\n')
        uart0.write('html {font-family: Arial; display: inline-block; text-align: center;}'+'\r\n')
        uart0.write('p {  font-size: 1.2rem;}'+'\r\n')
        uart0.write('body {  margin: 0;}'+'\r\n')
        uart0.write('.topnav { overflow: hidden; background-color: #5c055c; color: white; font-size: 1.7rem; }'+'\r\n')
        uart0.write('.content { padding: 20px; }'+'\r\n')
        uart0.write('.card { background-color: white; box-shadow: 2px 2px 12px 1px rgba(140,140,140,.5); }'+'\r\n')
        uart0.write('.cards { max-width: 700px; margin: 0 auto; display: grid; grid-gap: 2rem; grid-template-columns: repeat(auto-fit, minmax(300px, 1fr)); }'+'\r\n')
        uart0.write('.reading { font-size: 2.8rem; }'+'\r\n')
        uart0.write('.card.temperature { color: #0e7c7b; }'+'\r\n')
        uart0.write('.card.humidity { color: #17bebb; }'+'\r\n')
        uart0.write('.card.pressure { color: hsl(113, 61%, 29%); }'+'\r\n')
        uart0.write('.card.gas { color: #5c055c; }'+'\r\n')
        uart0.write('</style>'+'\r\n')
        uart0.write('</head>'+'\r\n')
        uart0.write('<body>'+'\r\n')
        uart0.write('<div class=\"topnav\">'+'\r\n')
        uart0.write('<h3>Raspberry Pi Pico BME680 WEB SERVER</h3>'+'\r\n')
        uart0.write('</div>'+'\r\n')
        uart0.write('<div class=\"content\">'+'\r\n')
        uart0.write('<div class=\"cards\">'+'\r\n')
        uart0.write('<div class=\"card temperature\">'+'\r\n')
        uart0.write('<h4>Temp. Celsius</h4><p><span class=\"reading\">' + temperature + '</p>'+'\r\n')
        uart0.write('</div>'+'\r\n')
        uart0.write('<div class=\"card humidity\">'+'\r\n')
        uart0.write('<h4>Humidity</h4><p><span class=\"reading\">' + humidity + '</p>'+'\r\n')
        uart0.write('</div>'+'\r\n')
        uart0.write('<div class=\"card pressure\">'+'\r\n')
        uart0.write('<h4>PRESSURE</h4><p><span class=\"reading\">' + pressure +'</p>'+'\r\n')
        uart0.write('</div>'+'\r\n')
        uart0.write('<div class=\"card gas\">' +'\r\n')
        uart0.write('<h4>Gas</h4><p><span class=\"reading\">' + gas + '</p>'+'\r\n')
        uart0.write('</div></div></div>'+'\r\n')
        uart0.write('</body></html>'+'\r\n')
        utime.sleep(4.0)
        Send_AT_Cmd('AT+CIPCLOSE='+ connection_id+'\r\n') # once file sent, close connection
        utime.sleep(4.0)
        recv_buf="" #reset buffer
        print ('Waiting For connection...')
Create Web page (HTML+CSS)
To build the web page, we will add HTML code and for styling we will add CSS script.
Now let’s go through each line of HTML code to understand how it builds the web page.
In this HTML document, we use cards, paragraphs, headings and title tags to create a web page. This web page displays temperature, humidity, pressure and gas readings of BME680 sensor.
HTML is a hypertext markup language which is used to build web pages. All web browsers understand this language and can read web pages which are based on HTML language.
In HTML, we place all the content of a web page between <html> and </html> tags. The <html> tag shows the beginning of a web page and the </html> indicates the end of a web page.
HTML code mainly includes two parts such as head and body. The head part contains CSS, scripts, meta tags, links of external resources and styling codes. It is placed between <head> and </head> tags.
uart0.write('<!DOCTYPE HTML>'+'\r\n')
        uart0.write('<html><head>'+'\r\n')
        uart0.write('<title>BME680 Web Server</title>'+'\r\n')
        uart0.write('<meta http-equiv=\"refresh\" content=\"10\">'+'\r\n')
        uart0.write('<meta name=\"viewport\" content=\"width=device-width, initial-scale=1\'\r\n')
        uart0.write('<link rel=\"icon\" href=\"data:,\">'+'\r\n')
        uart0.write('<style>'+'\r\n')
        uart0.write('html {font-family: Arial; display: inline-block; text-align: center;}'+'\r\n')
        uart0.write('p {  font-size: 1.2rem;}'+'\r\n')
        uart0.write('body {  margin: 0;}'+'\r\n')
        uart0.write('.topnav { overflow: hidden; background-color: #5c055c; color: white; font-size: 1.7rem; }'+'\r\n')
        uart0.write('.content { padding: 20px; }'+'\r\n')
        uart0.write('.card { background-color: white; box-shadow: 2px 2px 12px 1px rgba(140,140,140,.5); }'+'\r\n')
        uart0.write('.cards { max-width: 700px; margin: 0 auto; display: grid; grid-gap: 2rem; grid-template-columns: repeat(auto-fit, minmax(300px, 1fr)); }'+'\r\n')
        uart0.write('.reading { font-size: 2.8rem; }'+'\r\n')
        uart0.write('.card.temperature { color: #0e7c7b; }'+'\r\n')
        uart0.write('.card.humidity { color: #17bebb; }'+'\r\n')
        uart0.write('.card.pressure { color: hsl(113, 61%, 29%); }'+'\r\n')
        uart0.write('.card.gas { color: #5c055c; }'+'\r\n')
        uart0.write('</style>'+'\r\n')
        uart0.write('</head>'+'\r\n')
We will start with the title of the web page. The <title> tag will indicate the beginning of the title and the </title> tag will indicate the ending. In between these tags, we will specify “BME680 Web Server” which will be displayed in the browser’s title bar.
uart0.write('<title>BME680 Web Server</title>'+'\r\n')This meta-tag http-equiv provides attributes to HTTP header. The http-equiv attribute takes many values or information to simulate header response. In this example, we use the http-equiv attribute to refresh the content of the web page after every specified time interval. Users aren’t required to refresh the web page to get updated sensor values. This line forces the HTML page to refresh itself after every 10 seconds. Moreover, this meta tag will make sure our web server is available for all browsers e.g., smartphones, laptops, computers etc.
uart0.write('<meta http-equiv=\"refresh\" content=\"10\">'+'\r\n')
uart0.write('<meta name=\"viewport\" content=\"width=device-width, initial-scale=1\'\r\n')
Styling Web Page with CSS
CSS is used to give styles to a web page. To add CSS files in head tags, we use <style></style> tags. This CSS code styles the cards and web page by specifying the colours, font, font size etc.
This CSS code sets text alignment, padding, margin and width of body tags of HTML document along with the font size, colour of the cards etc. We want to display temperature, pressure, humidity and gas readings on the cards and want them to show at the centre location of the web page.
        uart0.write('<style>'+'\r\n')
        uart0.write('html {font-family: Arial; display: inline-block; text-align: center;}'+'\r\n')
        uart0.write('p {  font-size: 1.2rem;}'+'\r\n')
        uart0.write('body {  margin: 0;}'+'\r\n')
        uart0.write('.topnav { overflow: hidden; background-color: #5c055c; color: white; font-size: 1.7rem; }'+'\r\n')
        uart0.write('.content { padding: 20px; }'+'\r\n')
        uart0.write('.card { background-color: white; box-shadow: 2px 2px 12px 1px rgba(140,140,140,.5); }'+'\r\n')
        uart0.write('.cards { max-width: 700px; margin: 0 auto; display: grid; grid-gap: 2rem; grid-template-columns: repeat(auto-fit, minmax(300px, 1fr)); }'+'\r\n')
        uart0.write('.reading { font-size: 2.8rem; }'+'\r\n')
        uart0.write('.card.temperature { color: #0e7c7b; }'+'\r\n')
        uart0.write('.card.humidity { color: #17bebb; }'+'\r\n')
        uart0.write('.card.pressure { color: hsl(113, 61%, 29%); }'+'\r\n')
        uart0.write('.card.gas { color: #5c055c; }'+'\r\n')
        uart0.write('</style>'+'\r\n')
HTML Web Page Body
The second most important part of an HTML document is the body which goes inside the tags <body> and </body>. The body part includes the main content of the web page such as headings, images, buttons, icons, tables, charts, etc. For example, in this Raspberry Pi Pico BME680 MicroPython based web server, the body part includes heading and four cards to display the BME680 sensor readings.
        uart0.write('<body>'+'\r\n')
        uart0.write('<div class=\"topnav\">'+'\r\n')
        uart0.write('<h3>Raspberry Pi Pico BME680 WEB SERVER</h3>'+'\r\n')
        uart0.write('</div>'+'\r\n')
        uart0.write('<div class=\"content\">'+'\r\n')
        uart0.write('<div class=\"cards\">'+'\r\n')
        uart0.write('<div class=\"card temperature\">'+'\r\n')
        uart0.write('<h4>Temp. Celsius</h4><p><span class=\"reading\">' + temperature + '</p>'+'\r\n')
        uart0.write('</div>'+'\r\n')
        uart0.write('<div class=\"card humidity\">'+'\r\n')
        uart0.write('<h4>Humidity</h4><p><span class=\"reading\">' + humidity + '</p>'+'\r\n')
        uart0.write('</div>'+'\r\n')
        uart0.write('<div class=\"card pressure\">'+'\r\n')
        uart0.write('<h4>PRESSURE</h4><p><span class=\"reading\">' + pressure +'</p>'+'\r\n')
        uart0.write('</div>'+'\r\n')
        uart0.write('<div class=\"card gas\">' +'\r\n')
        uart0.write('<h4>Gas</h4><p><span class=\"reading\">' + gas + '</p>'+'\r\n')
        uart0.write('</div></div></div>'+'\r\n')
        uart0.write('</body></html>'+'\r\n')
We will include the heading of our webpage inside the <h3></h3> tags and it will be “Raspberry Pi Pico BME680 WEB SERVER”.
uart0.write('<h3>Raspberry Pi Pico BME680 WEB SERVER</h3>'+'\r\n')Next, we will include the following lines of code to display texts and cards for temperature, pressure, humidity and gas readings.
        uart0.write('</div>'+'\r\n')
        uart0.write('<div class=\"content\">'+'\r\n')
        uart0.write('<div class=\"cards\">'+'\r\n')
        uart0.write('<div class=\"card temperature\">'+'\r\n')
        uart0.write('<h4>Temp. Celsius</h4><p><span class=\"reading\">' + temperature + '</p>'+'\r\n')
        uart0.write('</div>'+'\r\n')
        uart0.write('<div class=\"card humidity\">'+'\r\n')
        uart0.write('<h4>Humidity</h4><p><span class=\"reading\">' + humidity + '</p>'+'\r\n')
        uart0.write('</div>'+'\r\n')
        uart0.write('<div class=\"card pressure\">'+'\r\n')
        uart0.write('<h4>PRESSURE</h4><p><span class=\"reading\">' + pressure +'</p>'+'\r\n')
        uart0.write('</div>'+'\r\n')
        uart0.write('<div class=\"card gas\">' +'\r\n')
        uart0.write('<h4>Gas</h4><p><span class=\"reading\">' + gas + '</p>'+'\r\n')
        uart0.write('</div></div></div>'+'\r\n')
Demonstration
After you have copied the following code onto a new file, click the ‘Save’ icon to save your program code on your PC.
After you have saved the code press the Run button to upload the code to your board. Before uploading code make sure the correct board is selected.
In the shell terminal of your IDE, you will be able to view the IP address after a successful connection gets established:

Now, open your web browser either on your laptop or mobile and type the IP address which we have found in the last step. As soon as you type the IP address on your web browser and hit enter, the Raspberry Pi Pico web server will receive an HTTP request.

You will see the web page with the latest temperature values in your web browser:

The web page viewed from a cell phone will look like this:

Demo video:
You may also like to read other Web Server projects with Raspberry Pi Pico:
- Raspberry Pi Pico Web Server with BME280 (Weather Station)
- Interface ESP8266 WiFi Module with Raspberry Pi Pico
- Raspberry Pi Pico DS18B20 Web Server (Weather Station)
- Raspberry Pi Pico DHT22 Web Server (Weather Station)
More BME680 tutorials and projects:
- BME680 Web Server with ESP8266 NodeMCU (Arduino IDE)
- MicroPython: BME680 Web Server with ESP32 and ESP8266 (Gas, Pressure, Temperature, Humidity)
- BME680 Web Server with ESP32 ( Arduino IDE)
- MicroPython: BME680 with ESP32 and ESP8266 (Gas, Pressure, Temperature, Humidity)
- BME680 with Arduino: Display Gas, Pressure, Temperature and Humidity on OLED
- BME680 with ESP8266 NodeMCU using Arduino IDE (Gas, Pressure, Temperature, Humidity)
- BME680 with ESP32 using Arduino IDE (Gas, Pressure, Temperature, Humidity)


Good Work…a porting for the Pico W would be nice..!
Yes, we are waiting for one of our Pico wireless boards and port all this to raspberry pi pico Wireless.
Hi I was looking for a guide on the Pico wireless board online and could not find one. How is your guide coming along?
Hi i was wondering how the port to Pico W is going? Looking forward to it!
We are still waiting to receive our Pico W boards.
Please I really need that pico w port