In this tutorial, we will explain the workings of conditional and logical statements in MATLAB Simulink. First of all, we provide a brief and concise introduction to logical statements, i.e., IF-else statements. Then we will look at how to implement it in MATLAB’s Simulink. Finally, we will compare the theoretical results with the virtual results of the block diagram in Simulink. At the end of the tutorial, we have provided an exercise for you to do on your own, and in the next tutorials, we will assume that you have done those exercises and not explain the concept regarding them.
Introduction to If-Else Conditional Statements
If-else statements allow us to perform different executions depending on the value of the conditional logic. This works on the basis of matching an input variable with a condition. In case the input variable satisfies a condition, the if statements under the if block will start executing, and if the condition does not match, the program executes the else block.
Those who have experience working with other programming languages must be familiar with conditional statements, i.e., If-Else statements or If-Then-Else statements. We use these statements to implement a certain portion of code when a specific condition is true and implement the other portion if that condition turns out to be false. Sometimes we can refer to conditional statements as conditional expressions or conditional constraints, which we can specifically use in cases where we want to execute only selective lines of code.
However, Simulink identifies these conditional statements as switch blocks. Their working depends on a certain condition; when it comes true, the program will execute one statement, and when it turns out to be false, it will implement another statement, as we will see shortly in the explanation of the program portion.
Example of Using If-Else Conditional Statements in Simulink
Let’s now move towards the programming part. Here we will perform a simple example to help us understand the workings of the switch block in Simulink and how it is able to perform the if-else statement. First of all, open the MATLAB software. Then open Simulink by using either the command window or the Simulink icon on the front page of MATLAB. After that, click on the library browser icon present on the main window of Simulink, as shown in the figure below.

This button will open the library browser of Simulink, from which we can select any block we need. From the commonly used blocks section of the library browser, select the constant block. Refer to the figure below.

Placing Components
Drag and drop the constant block from the library browser to the Simulink block diagram portion. We will use this block as an input to determine if the condition is true. Place three such blocks in Simulink’s block diagram, as we can see in the figure below.
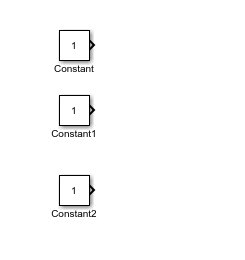
These blocks have different purposes. One of these blocks stores the input to display at the output if the condition of the conditional statement block is true. Similarly, one of the blocks displays the output if the condition is false. The third block is a special-purpose block, and we use it as a conditional block. For instance, the condition in the switch block will be verified with respect to this conditional constant block. And the condition will be named true or false depending on this block. Name these blocks according to their workings so that they are recognizable in the future. Refer to the figure below.

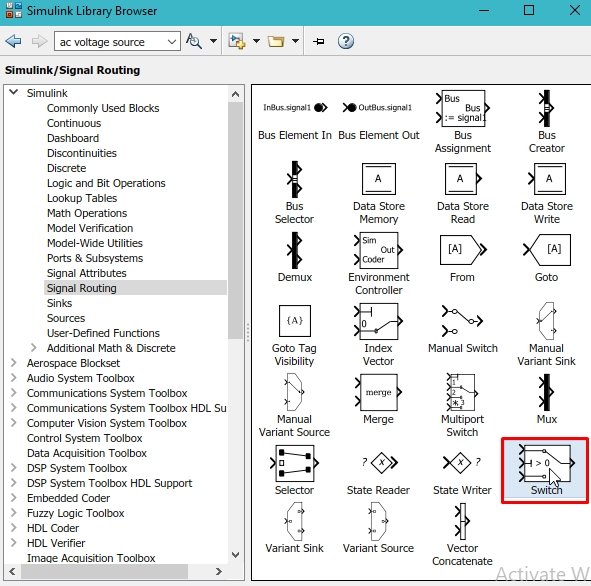
After naming the blocks, let’s now come to the switching part. Simulink provides us with a block named switch. We can either search for it by its name or go to the library browser of Simulink and click on the signal routing section, as shown in the figure below.

In this section, click on the switch block as shown in the figure below.
Connected Blocks
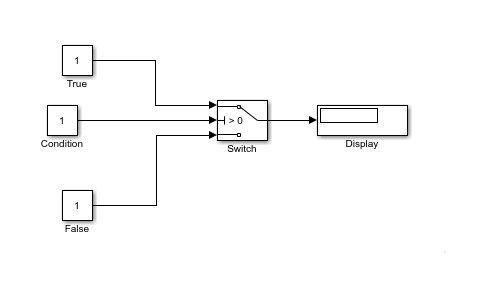
Drag this block from the library browser and drop it in front of the already-placed three blocks. Connect the true block to the top input of the switch block. After this, connect the condition at the middle input and false at the lower input of the switch block, as we can see in the figure below.

Now our interest is to display the result at the output of the switch to verify the operation. Let’s place a display block. Go to the sinks section of the library browser, as shown in the figure below.

From this sinks section, select the display block as shown in the figure below.

Drag this block from the library browser and drop it at the output of the switch block. Now connect both blocks, as shown in the figure below.
Threshold Properties
Now let’s set the condition of the switch block, which will decide whether the condition in the condition constant is true or false. Double-click on the switch block, and in the parameter dialog box, we can select the type of condition and the threshold value as well. For instance, in our case, we selected the threshold condition as shown in the figure below.

Now we can also change the value of the threshold, as we have selected 5 in this case. Refer to the figure below.

Setting Condition
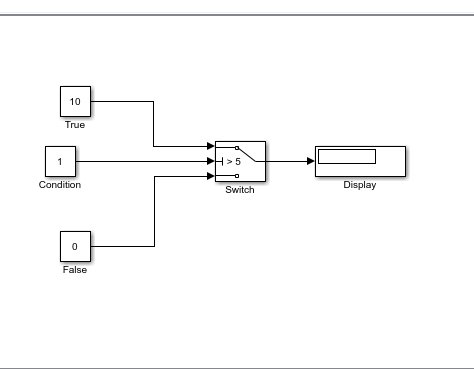
The condition we have selected above will give a true output if the value in the conditional statement block is greater than 5 and false otherwise, as we will see shortly. Now in the true constant block, by double-clicking on it, set a value of 10 in the block parameter dialog box, as shown in the figure below.

In the false constant block, enter a value of 0, as shown in the figure below.

Simulink Model
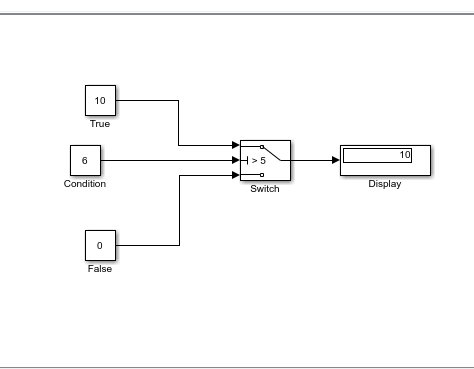
The complete block diagram is shown in the figure below.
Simulation
Run the block diagram from the run button, and the output will be displayed in the display block as shown in the figure below.

The output is zero because the condition is false in this case. Now update the value of the conditional statement block to a value greater than 5. For this case, we change the constant value to 6, as shown in the figure below.

Again, run the function, and the output this time will be 10 (the true condition value) because the condition in this case is true, as shown in the figure below.
Exercise
Design a conditional block diagram that will display a 10 at the output if the conditional statement block is 0 and 100 otherwise.
Conclusion
In conclusion, this tutorial provides an in-depth overview of programming conditional statements in Simulink. It covers step-by-step procedures along with an explanation of an example to help us better understand the concept. You can utilize this to design and simulate more complex conditions. At last, we have provided an exercise to reinforce the concept of this tutorial. Hopefully, this was helpful in expanding your knowledge of Simulink.
You may also like to read:
- 4×4 Keypad Interfacing with TM4C123 Tiva Launchpad
- Download and Install STM32CubeIDE – Getting Started Guide
- ESP32 Receive Data from Google Firebase with Example to Control Outputs
- Arduino Rosserial Publish Range HC-SR04 Ultrasonic Readings to ROS
- MicroSD Card Module with STM32 Blue Pill using STM32CubeIDE
- ESP32/ESP8266 Thermostat Web Server – Control Output Based on Temperature Threshold
This concludes today’s article. If you face any issues or difficulties, let us know in the comment section below.