In this tutorial, you will learn how to program a PIC Microcontroller compiler software called MikroC. This is a simple and user-friendly software designed to convert the C-language code into a hex file, which can then be fed to the microcontroller to perform specific tasks. After completing this tutorial, you will be able to generate the hex code of a program in the C language using any PIC Microcontroller and simulate it.
The hex code is loaded into the flash memory of the microcontroller in the form of zeros and ones, interpreted by the CPU as commands that are executed. To understand how the hex file is generated, let us take the example of a simple program to set all eight port pins of PORTC to logic 1.
If you have not used MikroC for Pic before, you can follow this tutorial:
Recommended Components
The following components are used in this project or are helpful for building it with a PIC microcontroller.
| Component | How it’s used in this project | Buy on Amazon |
|---|---|---|
| PIC16F877A microcontroller | The target device you compile and flash MikroC code for. | Check Price |
| PICkit 5 programmer/debugger | Uploads the generated hex file to the PIC16F877A. | Check Price |
| Breadboard | Provides a base for testing your compiled program on hardware. | Check Price |
| Jumper Wires | Wires up power and I/O when running the code on a real PIC. | Check Price |
As an Amazon Associate we earn from qualifying purchases. Prices and availability are accurate as of the date/time indicated and are subject to change.
Compiler Code with MikroC for Pic
Open the mikroC PRO software by double-clicking the icon on your desktop. From the menu on the top, select Project à New Project.

A New Project Wizard window will appear. Click “Next” to reach the “Project Settings” window. Specify a unique name for the project, select the device name as PIC16F877A, and browse the project folder where the hex file will be saved. Choose the device clock according to the one used in the design, and then press “Next.”

Step 2 allows you to add a file to the project, while Step 3 allows you to include all or select libraries. Press Next without making any changes on both windows and then press Finish to end the wizard. The Code Editor Window will be displayed with “void main()” written on the first line. This is where you have to write your program. Write the code and press BUILD on the horizontal toolbar at the top.
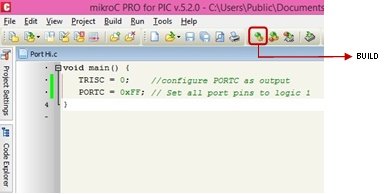
Here we have a two-liner code where all pins of Port C are set to high.
On successful completion of the Building process, a message would appear in the ‘Message’ window at the bottom of the screen, indicating that the code has been compiled without any errors and the hex file is ready.

Upload and Debug Code
The above-mentioned program is then simulated to ensure its proper functioning. To carry out the simulation, the required steps are as follows:
- Select Run àStart Debugger from the menu bar.

The Debugger feature goes through all instructions one at a time and reflects the step-by-step changes caused to the port pins, registers, etc. The variables that you want to display can be selected from the ‘Watch Value’ window on the right side of the screen.
Select the variable PORTC by clicking on “Select Variable from list” and then click on the Add button to add it to the watchlist.

Press F8 to move the blue line onto the next instruction, the blue line highlights the instruction that will be executed next. The point to note in the ‘Watch Value’ window is that the value of PORTC is still zero since the third instruction has not been executed yet.
Press F8 again, and now the value of PORTC has been changed to 255 i.e. all highs

If you want to upload code to a Pic microcontroller, you can follow this guide:
Conclusion
In summary, follow these step to flash code to a PIC microcontroller using the MikroC for PIC compiler, follow these steps:
- Launch the MikroC PRO software by double-clicking the icon on your desktop.
- From the menu on the top, select Project and then click on New Project.
- A “New Project Wizard” window will appear. Click “Next” to proceed to the “Project Settings” window.
- In the “Project Settings” window, provide a unique name for the project and select the device name as PIC16F877A (or any other specific PIC model you are using).
- Browse and select the project folder where the generated hex file will be saved.
- Choose the device clock according to the one used in your design and click “Next”.
- In Step 2 of the wizard, you have the option to add a file to the project. Select the C-language file containing your code.
- In Step 3, you can include any necessary libraries for your code. You can either include all libraries or select specific ones as needed.
- Press “Next” without making any changes on both Step 2 and Step 3 windows.
- Finally, click “Finish” to end the wizard.
- The Code Editor Window will be displayed with the “void main()” function written on the first line. This is where you can write your program.
- Write your code in the Code Editor Window.
- Once you have finished writing your code, click on the BUILD button on the horizontal toolbar at the top. This will compile your code into a hex file.
- After the successful completion of the building process, a message will appear in the “Message” window at the bottom of the screen, indicating that the code has been compiled without any errors and the hex file is ready.
- Now, you can proceed to upload the hex file to the PIC microcontroller using a programmer such as PICKit3, as described in the How to Use PICKit3 to Upload Code to PIC Microcontroller guide.
Remember to double-check the specific microcontroller model and connections to ensure compatibility and successful flashing of the code.
Related content:
- Getting Started With PIC Microcontrollers
- LED Blinking using PIC Microcontroller with Examples
- KEYPAD INTERFACING WITH PIC16F877A MICROCONTROLLER
- STEPPER MOTOR INTERFACING WITH PIC16F877A MICROCONTROLLER
- Interfacing a Servo Motor with PIC16F877A Microcontroller
- SERIAL COMMUNICATION USING PIC16F877A MICROCONTROLLER
Please send me the code foretal detecting vehicle
Hi.
Can you post all tutorials in one place for downloading. It is very learnfull. But we do not have access to internet all the time and it is very costly for us to travel to places where we can get to the internet.
Regards.
Hi Johnny,
I have access to internet, if you wish I can compile what is on here and send it straight to you so that you can download it
USEFUL STUFF
Why would the tutorial recommend a software IDE that is cost prohibiting to purchase for most of us, looks old fashioned (Windows Vista/7) and only works on Windows?
I am not a fan of MPXLAB and would very much like to find a viable alternative, but at that price it is out of my reach and ought to have a modern interface and be cross-platform with a Macintosh version available at least.
Puzzled why it has been recommended as it means I can follow through with the tutorial.