This guide focuses on the TM1637 4-digit 7-segment display module and its interfacing with the Raspberry Pi Pico. Unlike a standard 4-digit 7-segment display which requires 12 pins to connect to a microcontroller, the TM1637 module uses only four pins, making it a very convenient and practical choice. We will discuss this module’s description, pinout, internal communication protocol, and its connection with the Raspberry Pi Pico board. We will then show you a MicroPython sketch that will familiarize you with the module’s various display capabilities.

Prerequisites
Before we start this lesson, make sure you are familiar with and have the latest version of Python 3 installed on your system, have set up MicroPython on your Raspberry Pi Pico, and have a running Integrated Development Environment (IDE) for programming. We will be using the Thonny IDE, which we have used in previous tutorials. If you have not followed our previous tutorials, you can check here:
If you are using uPyCraft IDE, you can check this getting started guide:
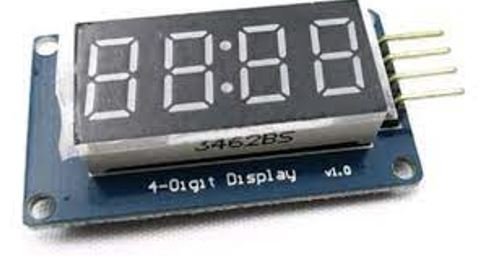
TM1637 4-Digit 7-Segment Display Module
The TM1637 4-digit display module is a compact 4-pin module that provides a digital display by combining four 7-segment LED units. Each 7-segment unit can display any digit from 0 to 9, as well as select alphabetical characters, making it suitable for displaying alphanumeric data such as time, temperature, and sensor readings.
The basic structure of the module is a combination of four 7-segment displays and two colon LEDs (between the second and third digit). These colon LEDs are typically used as a separator when displaying time in HH:MM format. A standard 7-segment display without the TM1637 driver IC would require 12 control pins — one for each segment and one per digit for multiplexing. The TM1637 IC reduces this to just two data pins (CLK and DIO), communicating using a proprietary two-wire serial protocol similar to I2C. This makes wiring much simpler and frees up GPIO pins on your microcontroller for other peripherals.
The TM1637 IC is manufactured by Titan Micro Electronics and is specifically designed to drive LED displays. It uses an internal RAM to store the segment data for each digit, which means the microcontroller only needs to send updated data when the display content needs to change, rather than continuously refreshing it. This reduces CPU overhead significantly compared to software multiplexing approaches.
Features
- Only two data pins (CLK and DIO) are needed to control all four 7-segment digits.
- Compatible with the Raspberry Pi Pico board using the MicroPython TM1637 library.
- Can display any alphanumeric value, including digits 0–9 and letters A–Z (with some limitations based on 7-segment encoding).
- Provides 8 adjustable brightness levels (0 to 7) configurable through software.
- Operates on both 3.3V and 5V power supplies, making it compatible with a wide range of microcontrollers.
- Built-in LED driver removes the need for current-limiting resistors on each segment.
- Integrated key scan function can also detect button presses (on modules that support this feature).
Pinout
The TM1637 display module is popular because of its minimal number of control pins. Out of the four pins available, two are power pins and two are data communication pins.
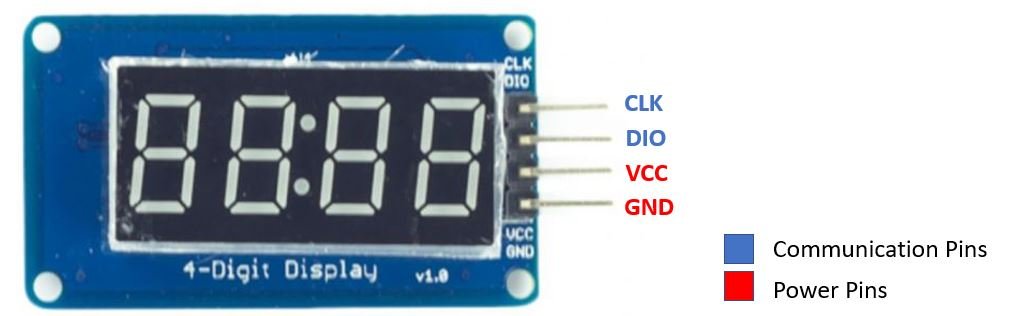
| Pin Name | Function |
|---|---|
| CLK | Clock pin – synchronizes data transfer between the module and the microcontroller. |
| DIO | Data I/O pin – sends and receives serial data from the microcontroller. |
| GND | Ground pin – connect to the common ground of the circuit. |
| VCC | Power supply pin – accepts 3.3V to 5V input. |
TM1637 Communication Protocol
The TM1637 uses a proprietary two-wire serial protocol that is similar in concept to I2C but is not fully I2C compliant. Communication starts with a START condition (DIO going LOW while CLK is HIGH) and ends with a STOP condition (DIO going HIGH while CLK is HIGH). Data is transmitted LSB (Least Significant Bit) first, 8 bits at a time, and the device sends an acknowledgment (ACK) bit after each byte by pulling DIO LOW during the 9th clock pulse.
Three types of commands are used: the Data Command (0x40) to set the addressing mode, the Address Command (0xC0–0xC5) to specify which display register to write to, and the Display Control Command (0x80–0x8F) to turn the display on or off and set brightness. The MicroPython library handles all of this low-level communication automatically, so you simply call easy-to-use methods like number(), show(), and temperature() in your code.
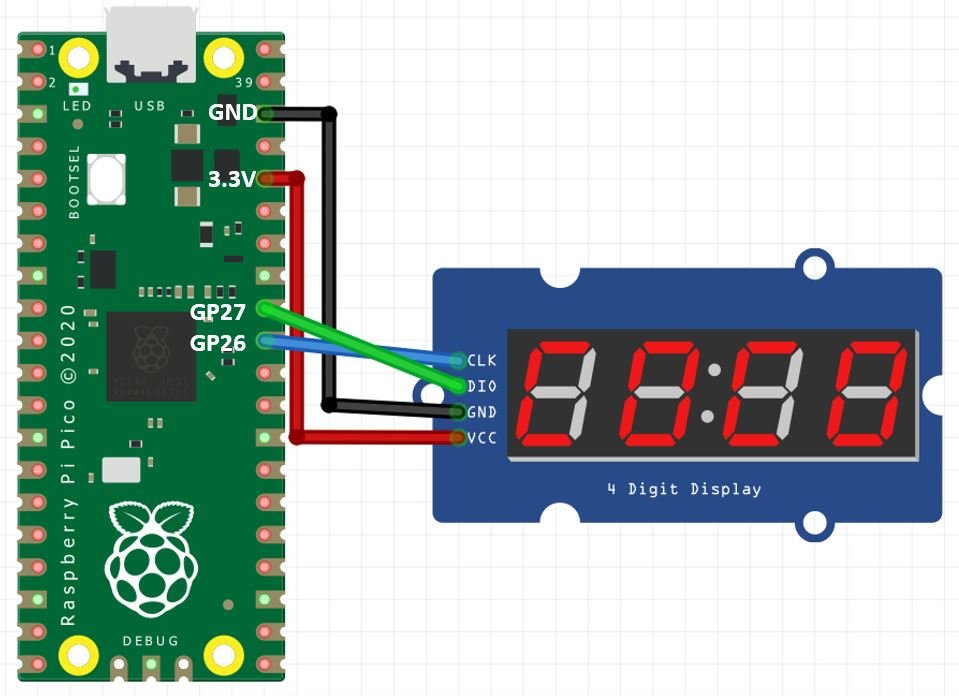
Interfacing TM1637 4-Digit 7-Segment Display Module with Raspberry Pi Pico
The following components are required:
- Raspberry Pi Pico
- TM1637 4-Digit 7-Segment Display Module
- Connecting Wires
Connect the VCC and GND pins of the module to the 3.3V and GND pins of the Raspberry Pi Pico respectively. Additionally, connect the CLK pin to GP26 and the DIO pin to GP27. Although the TM1637 communicates over a two-wire protocol similar to I2C, it does not use the hardware I2C peripheral — it uses bit-banging through any two GPIO pins. This means you can use virtually any available GPIO pins for CLK and DIO. Let us look at the Raspberry Pi Pico I2C pins for reference in case you wish to use hardware I2C for other sensors alongside this module.
Raspberry Pi Pico I2C Pins
The RP2040 chip has two I2C controllers. Both I2C controllers are accessible through the GPIO pins of the Raspberry Pi Pico. The following table shows the GPIO pin mapping for both I2C controllers. Each controller can be configured through multiple GPIO pin combinations as shown below. Note that for the TM1637, you are NOT required to use these specific I2C pins — any GPIO pair works.
| I2C Controller | GPIO Pins |
|---|---|
| I2C0 – SDA | GP0/GP4/GP8/GP12/GP16/GP20 |
| I2C0 – SCL | GP1/GP5/GP9/GP13/GP17/GP21 |
| I2C1 – SDA | GP2/GP6/GP10/GP14/GP18/GP26 |
| I2C1 – SCL | GP3/GP7/GP11/GP15/GP19/GP27 |
For this tutorial, we have used GP26 for CLK and GP27 for DIO. You are free to use any other available GPIO pins as well — just make sure to update the pin numbers in your code accordingly.
Follow the schematic diagram below:

Installing the TM1637 Library
To program the Raspberry Pi Pico with the TM1637 display module, you will need the MicroPython TM1637 library. This is a pure MicroPython driver written by Mike Causer and hosted on GitHub.
Open a new file in Thonny IDE. Copy the full library code below (or download it from this GitHub link). Save the file to your Raspberry Pi Pico’s /lib folder with the name tm1637.py. It is important to save it under the lib folder so that the main script can import it correctly.
Important Note: One common issue users encounter is an AttributeError: 'module' object has no attribute 'TM1637' error. This happens when the library file is not saved correctly on the Pico, or when it is named incorrectly. Make sure the file is named exactly tm1637.py (all lowercase) and is saved in the /lib folder on the Raspberry Pi Pico — not on your computer.
tm1637.py
"""
MicroPython TM1637 quad 7-segment LED display driver
https://github.com/mcauser/micropython-tm1637
MIT License
Copyright (c) 2016 Mike Causer
"""

from micropython import const
from machine import Pin
from time import sleep_us, sleep_ms

TM1637_CMD1 = const(64)
TM1637_CMD2 = const(192)
TM1637_CMD3 = const(128)
TM1637_DSP_ON = const(8)
TM1637_DELAY = const(10)
TM1637_MSB = const(128)

_SEGMENTS = bytearray(b'\x3F\x06\x5B\x4F\x66\x6D\x7D\x07\x7F\x6F\x77\x7C\x39\x5E\x79\x71\x3D\x76\x06\x1E\x76\x38\x55\x54\x3F\x73\x67\x50\x6D\x78\x3E\x1C\x2A\x76\x6E\x5B\x00\x40\x63')

class TM1637(object):
    def __init__(self, clk, dio, brightness=7):
        self.clk = clk
        self.dio = dio
        if not 0 <= brightness <= 7:
            raise ValueError("Brightness out of range")
        self._brightness = brightness
        self.clk.init(Pin.OUT, value=0)
        self.dio.init(Pin.OUT, value=0)
        sleep_us(TM1637_DELAY)
        self._write_data_cmd()
        self._write_dsp_ctrl()

    def _start(self):
        self.dio(0)
        sleep_us(TM1637_DELAY)
        self.clk(0)
        sleep_us(TM1637_DELAY)

    def _stop(self):
        self.dio(0)
        sleep_us(TM1637_DELAY)
        self.clk(1)
        sleep_us(TM1637_DELAY)
        self.dio(1)

    def _write_data_cmd(self):
        self._start()
        self._write_byte(TM1637_CMD1)
        self._stop()

    def _write_dsp_ctrl(self):
        self._start()
        self._write_byte(TM1637_CMD3 | TM1637_DSP_ON | self._brightness)
        self._stop()

    def _write_byte(self, b):
        for i in range(8):
            self.dio((b >> i) & 1)
            sleep_us(TM1637_DELAY)
            self.clk(1)
            sleep_us(TM1637_DELAY)
            self.clk(0)
            sleep_us(TM1637_DELAY)
        self.clk(0)
        sleep_us(TM1637_DELAY)
        self.clk(1)
        sleep_us(TM1637_DELAY)
        self.clk(0)
        sleep_us(TM1637_DELAY)

    def brightness(self, val=None):
        if val is None:
            return self._brightness
        if not 0 <= val <= 7:
            raise ValueError("Brightness out of range")
        self._brightness = val
        self._write_data_cmd()
        self._write_dsp_ctrl()

    def write(self, segments, pos=0):
        if not 0 <= pos <= 5:
            raise ValueError("Position out of range")
        self._write_data_cmd()
        self._start()
        self._write_byte(TM1637_CMD2 | pos)
        for seg in segments:
            self._write_byte(seg)
        self._stop()
        self._write_dsp_ctrl()

    def encode_digit(self, digit):
        return _SEGMENTS[digit & 0x0f]

    def encode_string(self, string):
        segments = bytearray(len(string))
        for i in range(len(string)):
            segments[i] = self.encode_char(string[i])
        return segments

    def encode_char(self, char):
        o = ord(char)
        if o == 32: return _SEGMENTS[36]
        if o == 42: return _SEGMENTS[38]
        if o == 45: return _SEGMENTS[37]
        if o >= 65 and o <= 90: return _SEGMENTS[o-55]
        if o >= 97 and o <= 122: return _SEGMENTS[o-87]
        if o >= 48 and o <= 57: return _SEGMENTS[o-48]
        raise ValueError("Character out of range: {:d} '{:s}'".format(o, chr(o)))

    def hex(self, val):
        string = '{:04x}'.format(val & 0xffff)
        self.write(self.encode_string(string))

    def number(self, num):
        num = max(-999, min(num, 9999))
        string = '{0: >4d}'.format(num)
        self.write(self.encode_string(string))

    def numbers(self, num1, num2, colon=True):
        num1 = max(-9, min(num1, 99))
        num2 = max(-9, min(num2, 99))
        segments = self.encode_string('{0:0>2d}{1:0>2d}'.format(num1, num2))
        if colon:
            segments[1] |= 0x80
        self.write(segments)

    def temperature(self, num):
        if num < -9:
            self.show('lo')
        elif num > 99:
            self.show('hi')
        else:
            string = '{0: >2d}'.format(num)
            self.write(self.encode_string(string))
        self.write([_SEGMENTS[38], _SEGMENTS[12]], 2)

    def show(self, string, colon=False):
        segments = self.encode_string(string)
        if len(segments) > 1 and colon:
            segments[1] |= 128
        self.write(segments[:4])

    def scroll(self, string, delay=250):
        segments = string if isinstance(string, list) else self.encode_string(string)
        data = [0] * 8
        data[4:0] = list(segments)
        for i in range(len(segments) + 5):
            self.write(data[0+i:4+i])
            sleep_ms(delay)


class TM1637Decimal(TM1637):
    def encode_string(self, string):
        segments = bytearray(len(string.replace('.','')))
        j = 0
        for i in range(len(string)):
            if string[i] == '.' and j > 0:
                segments[j-1] |= TM1637_MSB
                continue
            segments[j] = self.encode_char(string[i])
            j += 1
        return segments
Raspberry Pi Pico MicroPython: TM1637 Sketch
Now let us run the following sketch to explore the capabilities of the TM1637 display module. Copy the following code into a new file named main.py and upload it to the Raspberry Pi Pico.
import tm1637
from machine import Pin
from utime import sleep

display = tm1637.TM1637(clk=Pin(26), dio=Pin(27))

# Display a 4-character word
display.show("AbCd")
sleep(1)

# Clear the display
display.show("    ")
sleep(1)

# Display a 4-digit number
display.number(1234)
sleep(1)

# Display time (HH:MM format) with colon
display.numbers(10, 40)
sleep(1)

# Set to lowest brightness
display.brightness(0)
sleep(1)

# Restore to highest brightness
display.brightness(7)
sleep(1)

# Scrolling text
display.scroll("SCrOLL", delay=500)
sleep(1)

# Display temperature with degree Celsius symbol
display.temperature(37)
sleep(1)

# Clear the display
display.show("    ")
This sketch demonstrates the different functions provided by the TM1637 library, including displaying static text, numbers, time with a colon, scrolling text, and temperature readings, as well as adjusting the brightness and clearing the display.
How the Code Works?
We start by importing the required modules. The tm1637 module contains the display driver, Pin is used to define the GPIO pins, and sleep is used to add delays between each display effect.
import tm1637
from machine import Pin
from utime import sleep
Next, we create a TM1637 display object. The clk parameter specifies the GPIO pin connected to the CLK input of the module, and the dio parameter specifies the GPIO pin connected to DIO. You can optionally pass a brightness argument (0–7) here as well; the default is 7 (maximum brightness).
display = tm1637.TM1637(clk=Pin(26), dio=Pin(27))The show() method accepts a string of up to four characters. Each character must be one that the library can encode into 7-segment format (digits, letters A–Z, space, dash, or asterisk). Here we display the text “AbCd” for one second.
display.show("AbCd")
sleep(1)
To clear the display, we pass a four-space string to show(). This turns off all segments on all four digits.
display.show("    ")
sleep(1)
The number() method displays an integer value between -999 and 9999, right-aligned on the display.
display.number(1234)
sleep(1)
The numbers() method accepts two separate integers and displays them on the left and right halves of the display with a colon separator. This is ideal for showing time in HH:MM format. The optional third argument colon controls whether the colon is shown (default is True).
display.numbers(10, 40)
sleep(1)
The brightness() method adjusts the display brightness. Valid values range from 0 (lowest, about 1/16 pulse width duty cycle) to 7 (highest, about 14/16 pulse width duty cycle). Note that even at brightness level 0, the display is still visible — it is not turned off.
display.brightness(0)
sleep(1)
display.brightness(7)
sleep(1)
The scroll() method scrolls text across the display from right to left. The first parameter is the string to scroll, and the second parameter is the delay in milliseconds between each step of scrolling. A longer delay makes the scrolling slower.
display.scroll("SCrOLL", delay=500)
sleep(1)
The temperature() method displays a temperature reading up to two digits, followed by the degree symbol (°) and the letter C for Celsius. It accepts values from -9°C to 99°C. Values below -9 will display “Lo” and values above 99 will display “Hi”.
display.temperature(37)
sleep(1)
Practical Applications
The TM1637 display is widely used in real-world embedded projects. Here are some common use cases you can explore once you are comfortable with the basics:
- Digital clock: Connect a real-time clock (RTC) module such as the DS3231 to the Raspberry Pi Pico, read the current time, and display it on the TM1637 in HH:MM format using the
numbers()method with the colon enabled. - Temperature monitor: Connect a DS18B20 or DHT11 temperature sensor and display the live temperature reading using the
temperature()method. - Countdown timer: Implement a countdown timer by starting from a set time value and decrementing it each second using the
utimemodule, displaying the remaining time withnumbers(). - Score display: Use the display as a scoreboard in a simple game or quiz, updating the score with the
number()method after each round. - Sensor data readout: Display ADC readings, distance measurements from an HC-SR04 ultrasonic sensor, or voltage values by converting them to integers and calling
number().
Troubleshooting
If you encounter issues while working with the TM1637 module and Raspberry Pi Pico, here are the most common problems and their solutions:
- AttributeError: ‘module’ object has no attribute ‘TM1637’: This error means the library file was not found or saved correctly. Make sure the file is named
tm1637.py(all lowercase) and is saved to the/libdirectory on the Raspberry Pi Pico, not on your computer. - Display not turning on: Check your wiring. Make sure VCC is connected to 3.3V (not 5V unless your module explicitly supports it), GND is connected correctly, and that the CLK and DIO pins in your code match the physical connections.
- Garbled or incorrect characters: Ensure the string passed to
show()contains only supported characters (0–9, A–Z letters, space, dash, asterisk). Unsupported characters will raise aValueError. - Display flickering: This can occur if the power supply is insufficient. The TM1637 module draws up to about 80mA at full brightness. Power it directly from the Pico’s 3.3V pin or use an external 3.3V supply if driving multiple modules.
- Scrolling text not working: Ensure you are importing from
utimeand nottime, as some MicroPython builds may behave differently. Thescroll()function relies onsleep_msfrom thetimemodule imported inside the library itself.
Demonstration
Once the code is uploaded to your board, the TM1637 display will cycle through all the different numbers, texts, and display modes shown in the sketch. Watch the video demonstration below:
You may also read our other guides on 7-segment displays:
- Interface ESP8266 with 74HC595 and 4-Digit 7-Segment Display
- 74HC595 Interfacing with 7-Segment Display and PIC Microcontroller
- Interface ESP32 with 74HC595 and 4-Digit 7-Segment Display
- LM35 Temperature Sensor with 7-Segment Display using PIC Microcontroller
- 7-Segment Display Interfacing with PIC Microcontroller
Other Raspberry Pi Pico tutorials:
- Data Logger with Raspberry Pi Pico and Micro SD Card
- Interface Micro SD Card Module with Raspberry Pi Pico
- RC522 RFID Reader Module with Raspberry Pi Pico
- NEO-6M GPS Module with Raspberry Pi Pico using MicroPython
- Raspberry Pi Pico Dual Core Programming
- 28BYJ-48 Stepper Motor with Raspberry Pi Pico using MicroPython
- HC-05 Bluetooth Interfacing with Raspberry Pi Pico – Control Outputs
hello my name is Bill Tugboat and I used 4000 of these to display ” GET BENT” on top of my roof for when my X wife comes over
Except… The code does not work…
>>> %Run -c $EDITOR_CONTENT
Traceback (most recent call last):
File “”, line 5, in
AttributeError: ‘module’ object has no attribute ‘TM1637’
>>>