In this tutorial, we will learn how to use case structures in Labview. Case structures help us selectively execute our code. A case structure will execute one part of the VI at a time, depending on the condition of the case selector. We can execute one of many cases or one of two cases at a time, depending on whether we use a numeric constant as a condition or a Boolean constant, respectively.
At the start, we have given a brief but explanatory introduction to the case structures and compared their functionality with other programming environments. After that, we have provided a program that will use case structures and help us understand their use in depth. At the end of the tutorial, an exercise is provided for you to do on your own, and in the next tutorials, we will assume that you have done those exercises, and its concept explanation is not given.
Case Structures in LabVIEW
A Case Structure allows different executions depending on the value of the label using a branching control mechanism. Based on what case value the input variable matches, the case structure will choose the correct cases for execution; it is analogous to the Case block in Java or C++.
Those who are familiar with other programming environments must have worked with conditional statements or commands, including if-else statements, if-then-else statements, or maybe switch statements, and must know well about their functional principles. But for beginners, let us briefly explain the functionality of conditional statements.
Conditional Statements
In computer science, the features of a programming language that perform different computations or actions depending on whether a Boolean condition is true or false are said to be conditional statements, conditional expressions, and conditional constructs. These conditional statements are used when we only want to execute selective lines of our code.
However, in LabView, the conditional statements used are called case structures. They work in the same way as other conditional statements do. You can add an infinite number of conditions to your code and easily execute selective statements of your code using cas structures in LabView.
Examples of Case Structures in LabVIEW
Let’s design a simple VI to explain the workings of case structures in depth. Create a blank VI as discussed in Tutorial 1 and save it as we have done in previous tutorials.
Design a block diagram that will convert temperature from Fahrenheit scale to Celsius scale (we have done that in the previous tutorial; open the VI you have already created in that tutorial). The resulting block diagram will look like the one shown in the figure below.

Now, what we want to do with this program is make it conditional, so that depending on the needs of the programmer, the VI will either convert temperature from Fahrenheit to Celsius or return it as it is.
For this purpose, what we need is to add a conditional statement that says that if the toggle switch is down, then return the temperature as it is, and if it is up, return the value of the temperature in Celsius. In our case, since we are working with LabVIEW, we will use a case structure instead.
Selecting Case Structure
For this task to be done, go to the function palette, select structures, and then select case structure, as shown in the figure below.

After selecting the case structure, drag the arrow over the area where the conversion is being done, as shown in the figure below.

After the placement of the case structure, the boundary of the structure will have one input point, one output point, a true or false selection window, and a question mark.
The question mark will decide the condition depending on whether the true or false window will execute. When you select false from the window at the top, it will show a blank block. Add the statements (blocks in this case) that you want to be executed when the condition at the boundary is false, and it will execute the true statements when the condition is true. Refer to the figure below.

From the window above, select false; a blank window will appear as shown in the one below.

In the case of a false condition, connect the input directly to the output because, for a false condition, we want a direct Fahrenheit scale temperature.

Now, we need to set the conditions for true and false in the statement. For that purpose, place a toggle switch that will return a Boolean output (true or false). From the control palette, select Boolean, then select the toggle switch and place it on the front panel. Connect the associated block of the Boolean switch from the block diagram to the case selector of the case structure, as shown in the figure below.

Condition of Case Structure
Run the program continuously and see the results. When the switch is up, the VI will give a Celsius scale output, whereas if the switch is down, the output will give the temperature as it is. See the figure below for when the switch is up (True condition).
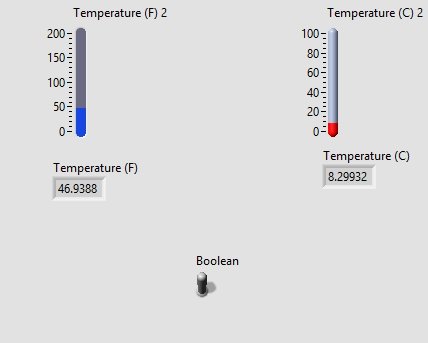
And now press the switch down to see the false result. See the figure below.

Using Numeric Conditions in LabVIEW
We can also use a numeric constant instead of the Boolean switch we used previously. The benefit of using a numeric constant instead of a Boolean switch is that we can have more than one condition.
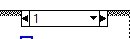
The use of numeric constants is the same as that of the switch statement in C. Replace the toggle switch block with a numeric constant as shown in the figure below.

This will also change the selector label to numeric values, as shown in the figure below.
Adding Case
That is how we can give an infinite number of cases to one case structure. To explain this, add a case with numeric value 2, right-click on the border of the case structure, and select add case after, as shown in the figure below.

Adding a case after
This will add a case after 0 and 1, i.e., case 2, and a blank window will appear. In this case, let’s suppose we want the VI to return a value of 50. On the output side of the case, simply create a numeric constant and set its value to 50. As shown in the figure below.

Case2 operation
Output
Now if you run the program continuously and set the value of 2 to the numeric constant and see the output,

Output with numeric conditions
No matter what the value of the input temperature is on the Fahrenheit scale, the output will always be a constant value of 50. Even if we change the value of the input slide bar, the output will still remain constant. You can add as many cases in case structures as you want, depending on the requirements of the VI.
Exercise
- Add a case in the above structure (case 3) that will convert temperature from the Fahrenheit scale to the Kelvin scale.
Conclusion
In conclusion, the use of case structures in LabVIEW provides a powerful tool for selectively executing code based on different conditions. By using case structures, we can easily control the flow of our program and choose which parts of the VI to execute. This tutorial has explained the functionality of case structures in LabVIEW, compared them to other programming environments, and provided examples to further illustrate their practical application. With the knowledge gained from this tutorial, readers can now confidently incorporate case structures into their LabVIEW projects, allowing for more flexible and adaptive programming.
a very helpful tutorial indeed have been reading from tutorial 1. could i please have videos for all the tutorial or at least a pdf format of this excellent presentation.
thank you in advance