In this user guide, we will introduce you to Microsoft Azure IoT central and send DHT22 sensor readings to this IoT platform with ESP8266 NodeMCU. Through Azure IoT core, we’ll show you how to publish sensor readings to the dashboard using Arduino IDE. The sensor readings will be displayed in a dashboard. Most importantly, you can access this sensor data from anywhere in the world. We will show you set up an Azure IoT account, create IoT central applications, add a device, create a template and finally publish the device to the template and visualize data in the dashboard.

Any appropriate sensor can be used such as DS18B20, BME680, LM35, and MPU6050 but for this project, we will use a DHT22 sensor which is used to measure temperature and humidity. Through Azure IoT central, you will be able to monitor sensor readings using your mobile as well as on the web dashboard.
Previously, we looked into another great application, Amazon Web Services (AWS) through which we published sensor readings obtained from the DHT22 sensor connected with the ESP32 development board. Connect ESP32 to AWS IoT MQTT and Publish Sensor Readings
We will require the following for our project:
Hardware Required:
- ESP8266 NodeMCU
- DHT22 Sensor
- 10k ohm resistor (not required if using DHT22 module)
- Connecting Wires
- Breadboard
Software Required:
- Microsoft Azure Account (pre-requisite Microsoft Account)
- Arduino IDE
Prerequisites
We will use Arduino IDE to program our ESP8266 NodeMCU. Therefore, you should have the latest version of Arduino IDE. Additionally, you also need to install the ESP8266 plugin in Arduino IDE. If your IDE does not have the plugin installed you can visit the link below:
Installing ESP8266 library in Arduino IDE and upload code
Introduction to DHT22 sensor
The DHT22 is an inexpensive sensor which measures relative humidity and temperature sensor. It provides a calibrated digital output with a 1-wire protocol. It measures temperature and humidity with higher accuracy and supports a wider range as compared to DHT11.
DHT sensors are pre-calibrated. We can directly connect them with ESP8266 board to obtain sensor output reading. They are internally composed of a humidity sensing sensor and a thermistor. These two components measure humidity and temperature.
DHT22 Pinout
The following figure shows the pinout diagram of DHT sensors. DHT sensor consists of four pins. But on DHT modules only three pins are exposed to the pinout of the module and the 10k ohm pull-up resistor is internally connected to pin 2.
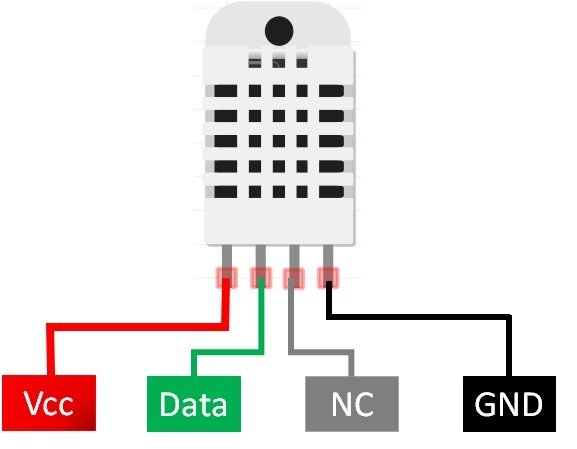
The following lists the pinout of the DHT sensor and their brief description. Pin number starts from left to right when you hold the sensor from the front end. It also shows how these pins will be connected with the ESP8266 board.
| DHT22 Pin | ESP8266 |
| 1 (VCC) | 3.3V |
| 2 (Data Out) | Any GPIO pins of ESP8266 board along with 10k ohm pull-up resistor |
| 3 (NC) | Not used |
| 4 (GND) | Ground |
- VCC is the power supply pin. Apply voltage in a range of 3.3 V to 5.0 V to this pin
- Data Out is the digital output pin. It sends out the value of measured temperature and humidity in the form of serial data
- N/C is not connected
- GND: Connect the GND pin
DHT22 Interfacing with ESP8266 board
Connect the DHT22 to ESP8266 along with a 10K ohm pull-up resistor. The connection diagram is shown in the picture below.

- The first pin is the power supply (VCC) pin. Connect it with the 3.3 volt pin of ESP8266.
- Data out is the pin through which we get temperature and humidity samples from the DHT sensor. Connect this pin with D6 of ESP8266 and also connect the data pin with a 10k pull-up resistor. You can also use any appropriate digital pin of ESP8266.
A Pull-up resistor is used to keep the data pin high for proper communication between the microcontroller and sensor. You can check the datasheet of DHT11 and DHT22 to get more information about it. DHT22 is also known by the name of AM2302.
- Third pin is not used
- Connect the fourth pin (GND) to the ground pin of the ESP8266 board
Getting Started with Azure IoT Central
Microsoft Azure is the company’s cloud computing platform for public use. Through Microsoft-managed data centers, you may use Microsoft Azure to create, test, deploy, and manage apps and services.
It also offers a variety of cloud computing, analytics, storage, and networking services. Software as a service (SaaS), platform as a service (PaaS), infrastructure as a service (IaaS), and server less are all available on Microsoft Azure. Finally, it is compatible with a wide range of programming languages, tools, and frameworks.
Microsoft Azure IoT is a suite of Microsoft-managed cloud services that connect, monitor, and govern billions of Internet-of-Things (IoT) devices. It covers device and equipment security and operating systems, as well as data and analytics that assist organizations in developing, deploying, and managing IoT applications.
With Microsoft Azure, the user is granted inexpensive cloud computing services which are reliable and interactive. Although this web service is free to join for the first month, you will have to provide your credit/debit card information. For the user, it becomes extremely fun and easy to use this application to build IoT projects from anywhere over the internet.
Working in the Azure IoT Central is very simple and easy. Thus, follow the steps given below to successfully set up the ESP8266 board and start with your very first project.
Setting up Microsoft Azure Account
To start working with Azure IoT Central, we will first have to sign in to Microsoft Azure. To do that, make sure you have a Microsoft Account. Outlook and Hotmail will both work. Now head over to the following site.(https://azure.microsoft.com/en-us/services/iot-central/)
This will open the Microsoft IoT Central main web page. Click ‘Free Account’ button found at the top right corner.

Click ‘Start free’ to proceed further.

Now you will be asked to sign in to your Microsoft account. After successfully signing in, you will be able to create your Azure free account. Fill in the information asked for your profile. You will be asked to give your phone number and credit/debit card information which will be checked for authentication.

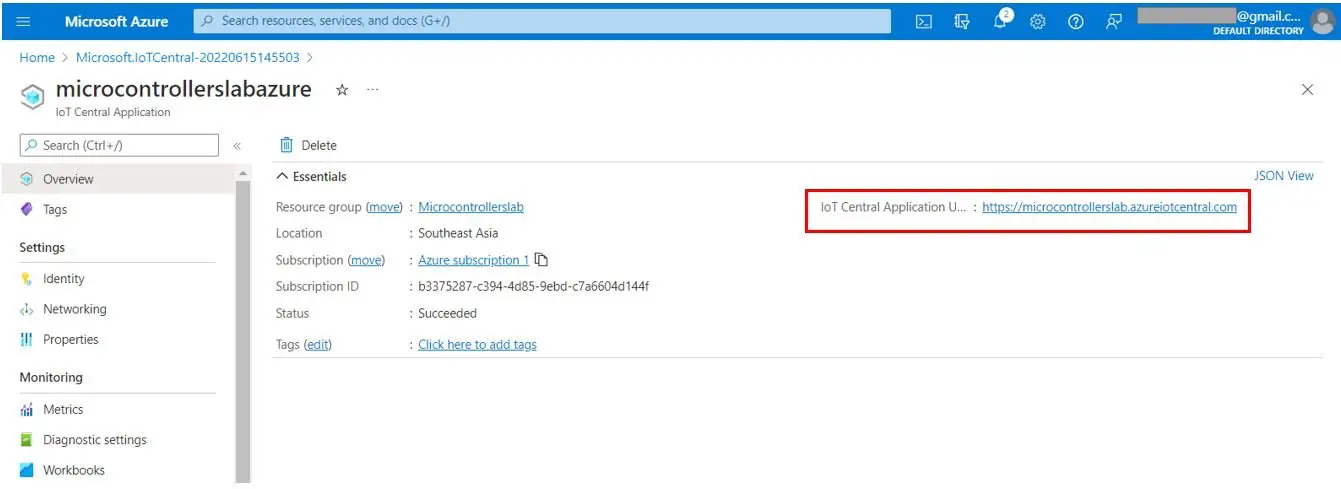
Once, your Azure account is created, you can go to the Azure portal by clicking the button shown below.

Set Azure IoT Central Applications
The Azure portal opens up as shown below. Here in the search bar at the top, type ‘IoT Central Applications’ and open it.

Then, click ‘Create iot central application’ button.

The IoT Central Application will open up. Here specify the project details including the Resource group, Instance details, template, region and pricing plan. You can specify any name for the resource group and the instance details. For template we have set it to Custom application. For region, select the region closest to your location.
Click ‘Review + create’ after you are done with the project details.

You can review your project details in this section. After a few moments, you will receive a validation passed notification. Click the ‘Create’ button to create your IoT Central Application.

Now the deployment starts. After the deployment is completed, the following screen will open up. To proceed further, click ‘Go to resource’ button found at the bottom.

Create Device Template
We have successfully created IoT central applications. Now let us move ahead and create the device template.
The following page opens up when you click ‘Go to resource button.’ Here, click the IoT Central Application URL highlighted in the red box below:
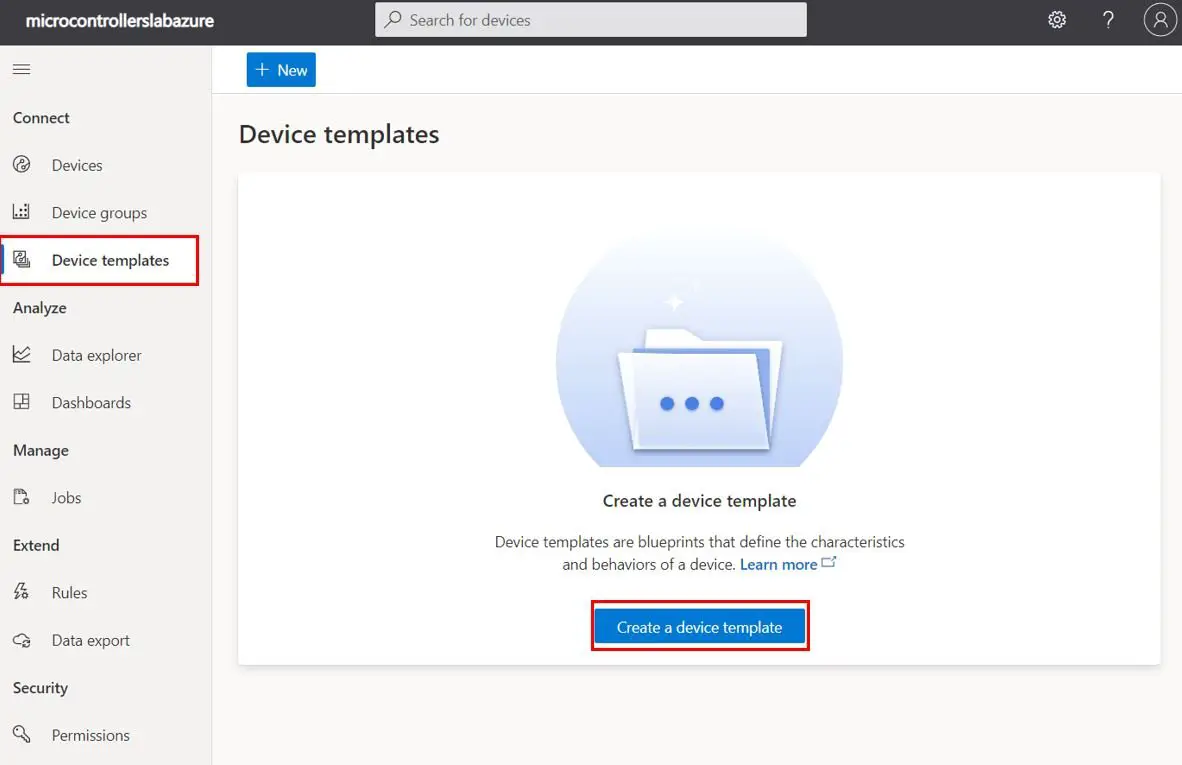
The following page opens up. Now we will create a template for our device.

Click ‘Device templates’ from the connect section found at the extreme left. Then click ‘Create a device template.’
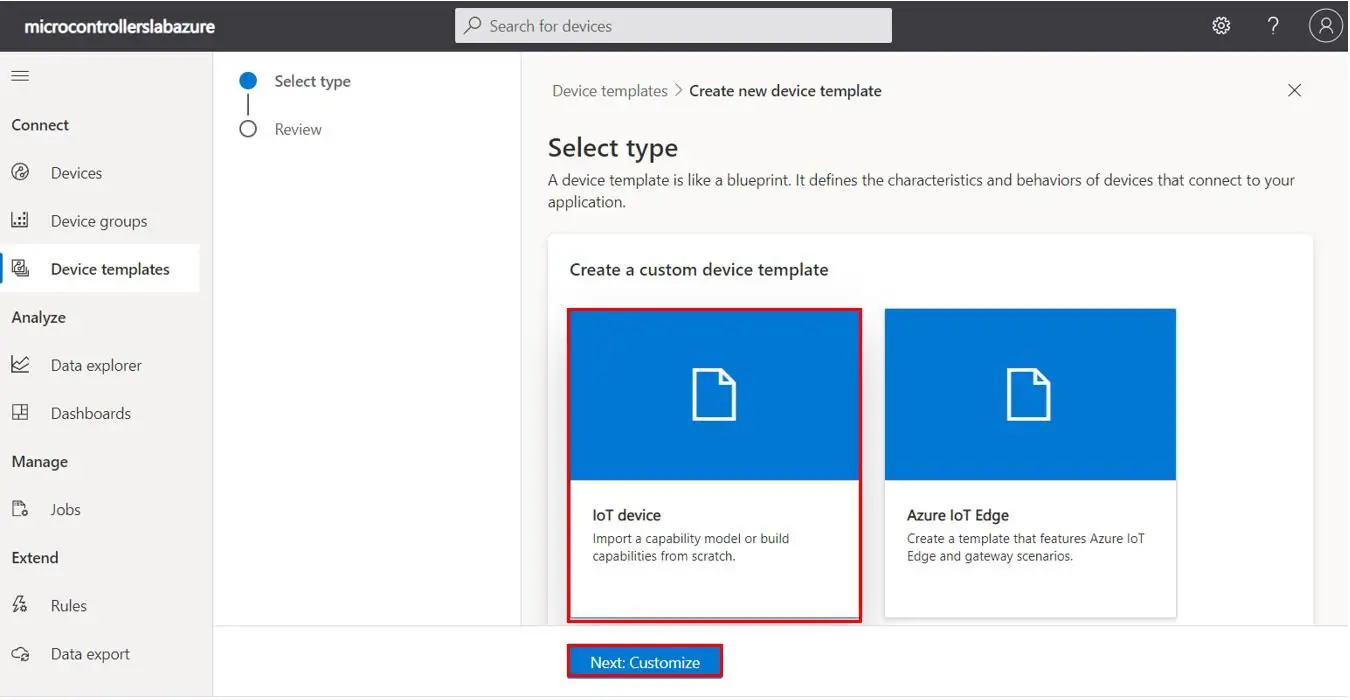
Now you will be asked to select the type of device template. We choose ‘IoT device’ and click ‘Next: Customize’ button to proceed further.
Give a name to the device template. Here we are using the name ‘DHT22.’ You can give any name according to your preference. Click ‘Next: Review’ to move ahead.

You can review the device template that we created. Click ‘Create’ to finish creating the device template.

We will create our own custom model for this device template. Hence, select ‘Custom model.’

The next step is to add a capability to our DHT22 device template. Click +Add capability as shown below:
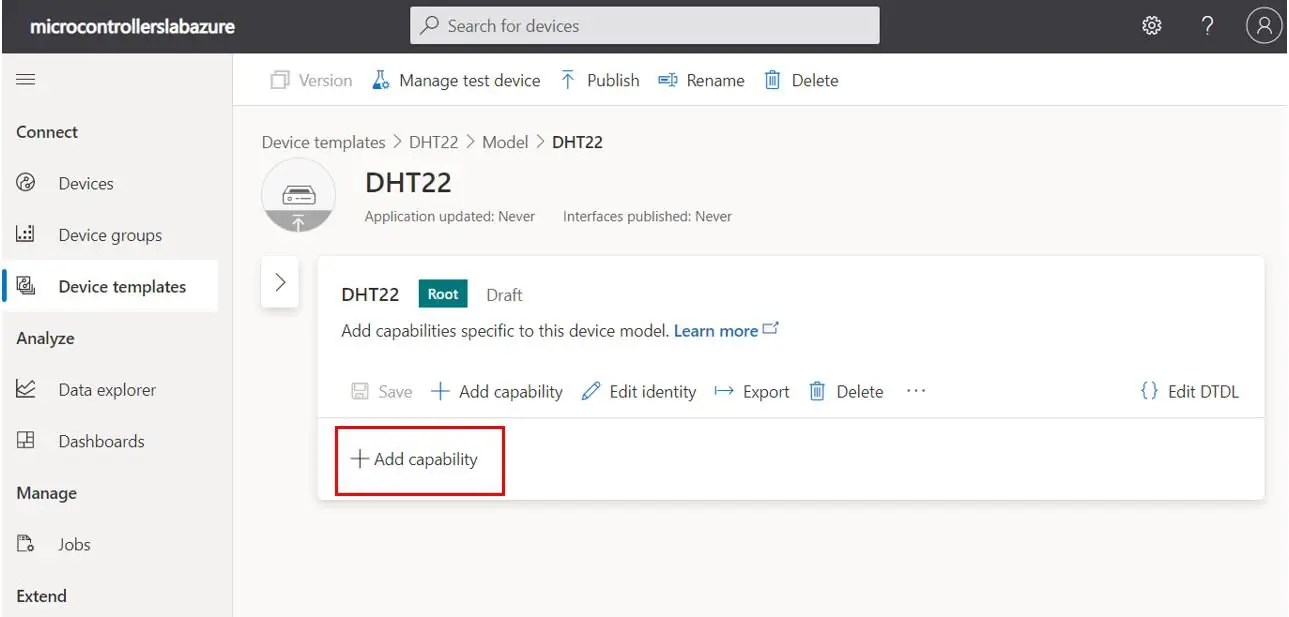
Here we have added two capabilities to our model. The first one is Temperature and the second one is Humidity. We have set the following parameter for both of these capabilites.
Click Save to save the changes.

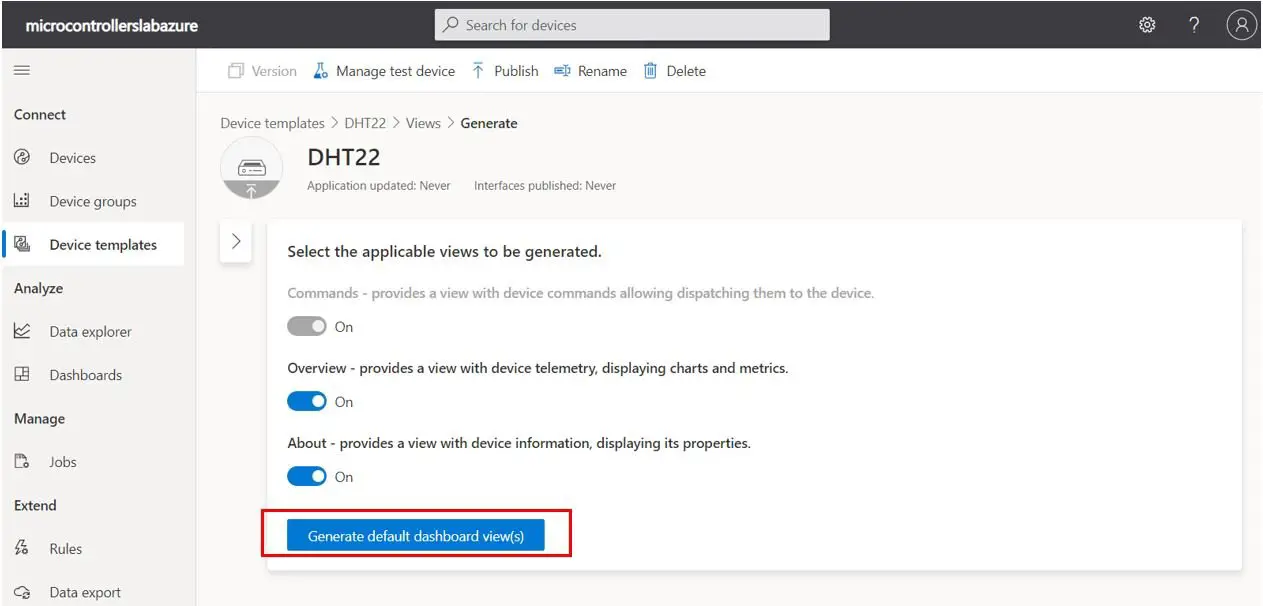
Next, click Views and select ‘Generate default views’ block. This will decide how the data will be displayed.

Here click ‘Generate Default Dashboard View(s)’ button as shown below:
Next, to add more visualizations, click the ‘Visualizing the device’ block as shown below:

Select Temperature and Humidity from the Telemetry section and then scroll down and click ‘Add tile’. Select the type of visualization by clicking the Change visualization icon. Here we have set line chart and Last Known Value for both temperature and humidity readings. You have many options to choose from eg. KPI, bar chart, heat map, pie chart, line chart and Last Known Value.
Remember to click Save to save the changes.

Now we are ready to publish our device template. Click ‘Publish’ to publish the DHT22 device template to the application.

Set up Device
Now we are ready to set up our device. In the Connect section, head over to Devices and then click ‘+ New.’

In order to create a device, you will be asked to specify the Device name, Device ID and the Device template. Use any name for the device and its ID. For the device template, select the template that we just created. It is DHT22 in our case. Click the ‘Create’ button to create a new device.

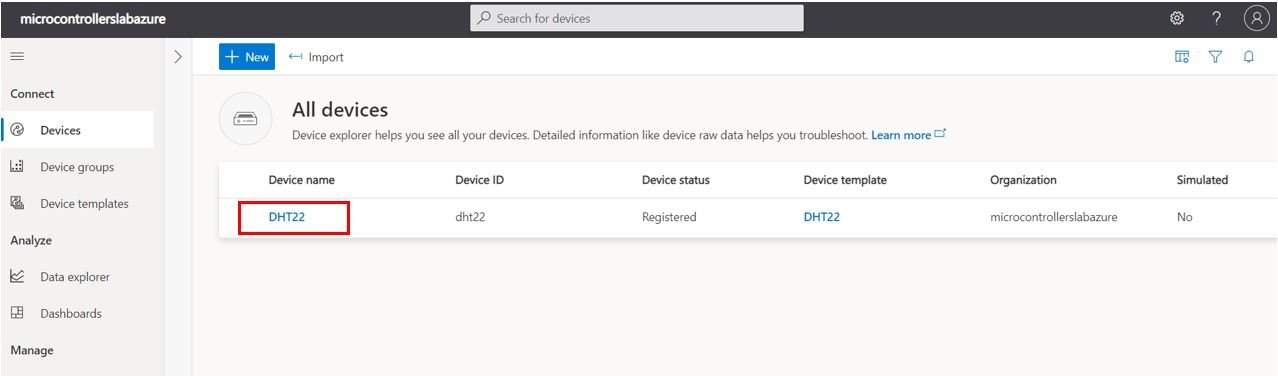
As you can view below, the DHT22 device has been created. Click the device name to view it.
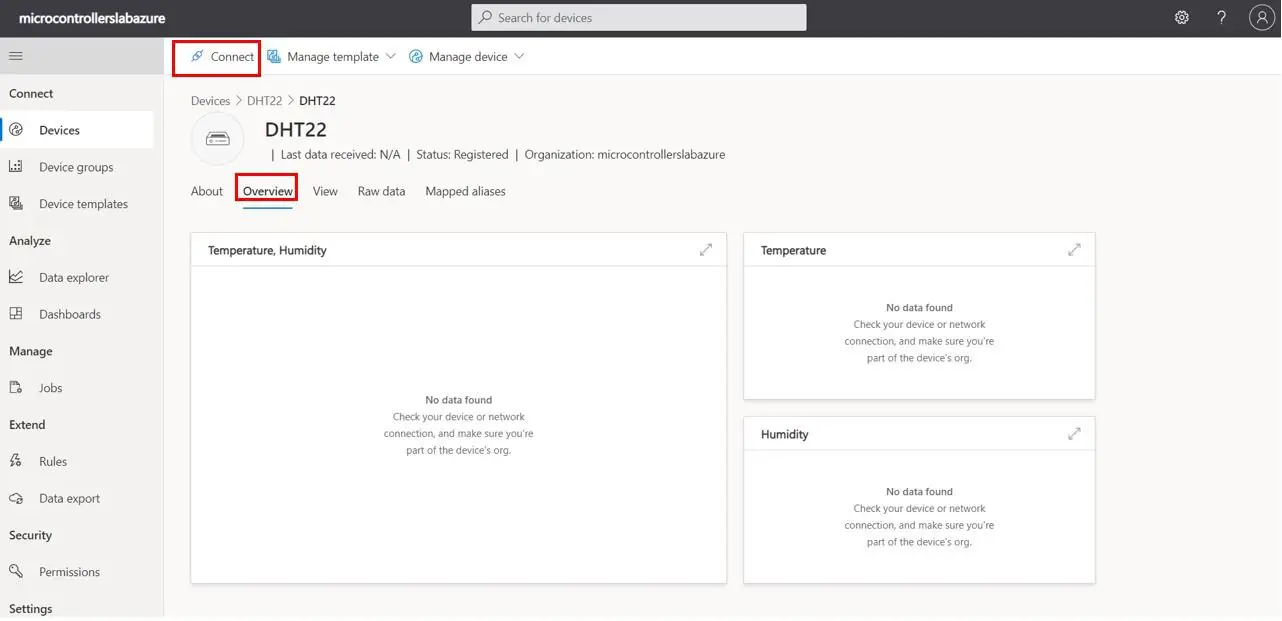
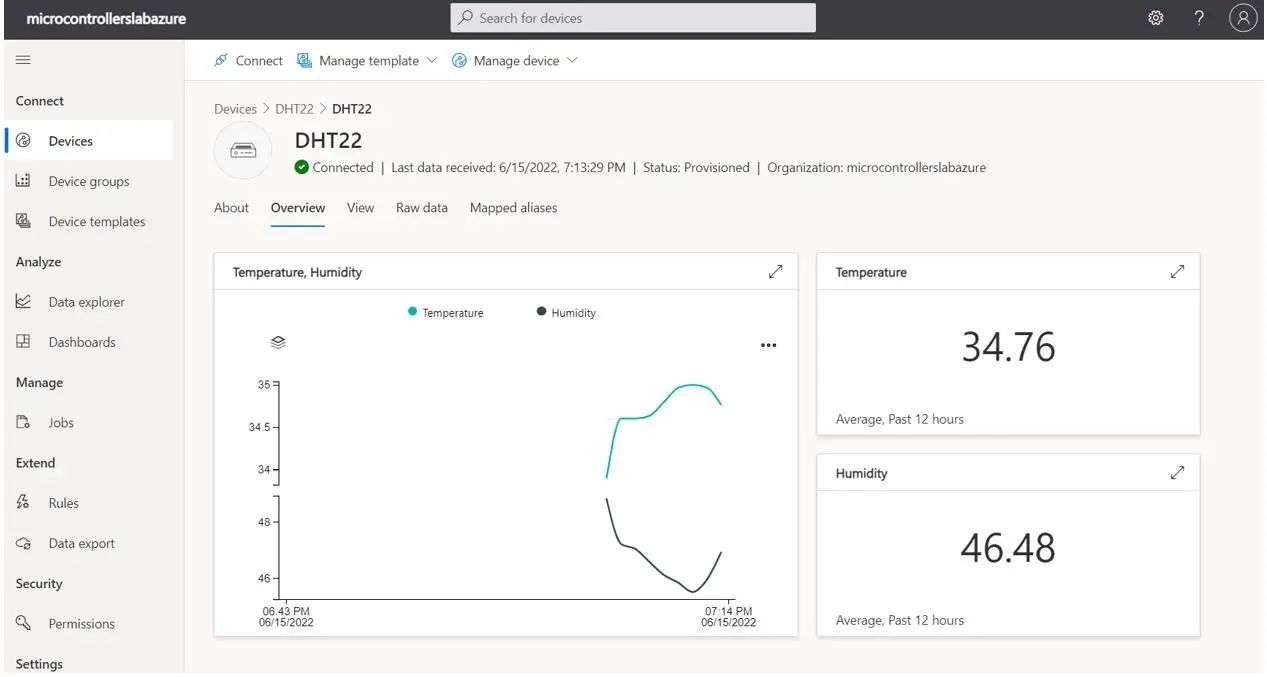
This opens the DHT22 device. Here you can view multiple tabs such as About, Overview, View, Raw data and Mapped aliases. In the Overview tab, we can view the data visualizations as shown below:
Click ‘Connect’ to establish connection.
This opens the Device connection groups. Here you can view the ID scope, Device ID and Primary key. These parameters will be necessary to establish a connection between ESP8266 NodeMCU and Azure IoT Central.

Installing DHT11/DHT22 Library in Arduino IDE
Both DHT11 and DHT22 provide the output of temperature and humidity in the complex digital output format which can not be directly read with GPIO pins without writing any technique which can read these output signals. These sensors provide data through a single wire two-way communication protocol. A single process communication consists of 40 bits. But we do not need to worry about the working of these sensors and on which protocol we can receive this data. We have an Arduino library for DHT sensors which can be easily used to get values of temperature and humidity only by calling two lines of functions. We will see later on how to do it. Now let’s see how to install the DHT library in Arduino. This library is provided by Adafruit. Follow these steps to install the DHT sensor library:
Open Arduino IDE and click on Sketch > Library > Manage Libraries.
When you click on the manage libraries option, you will get this window. In this window write ‘DHT sensor‘ in the search bar and press enter.
You will see many options available for DHT11 and DHT22 libraries. Select Adafruit library and click on the install button. You can select the latest version from the version window.

The same library can be used for both DHT11 and DHT22/AM2302 sensors.
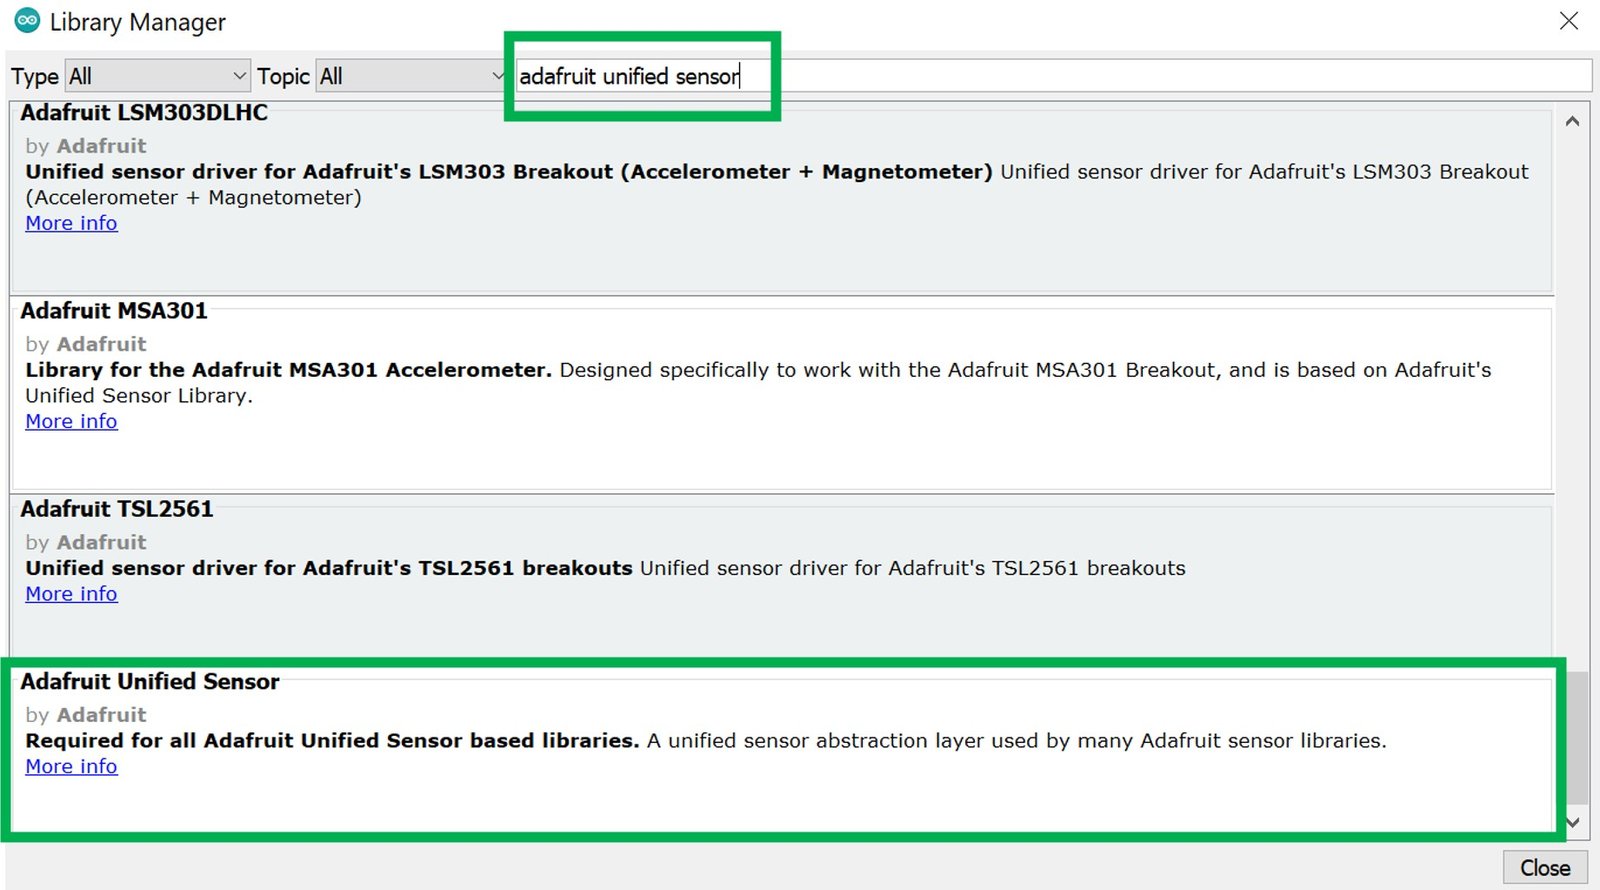
Adafruit also provides libraries for other sensors. So they provided a support package which is used to handle all sensor libraries. We also need to install the Adafruit Unified Sensor library. To install this, paste the Adafruit Unified Sensor search bar and select this option and click on the install button.
After installation of the libraries, restart your IDE.
You may also like to read:
- DHT11 DHT22 with ESP8266 NodeMCU – Display Readings on OLED
- DHT11 DHT22 with ESP32 – Display Readings on OLED
Publish DHT22 Data Azure IoT Central with NodeMCU Program
Now, let’s move to the next step. Go to GitHub (https://github.com/adesolasamuel/NodeMCUtoAzureIoTCentral/blob/main/DHTDataToAzureIoTCentral.zip) and download the zip file provided by Samuel Adesola. After extracting that file, copy the src file folder to your Arduino sketch folder. The src files contain the necessary libraries for this project.
Open your Arduino IDE and create a new file. Copy the code given below in that file. You need to enter your network credentials. Additionally, you also have to provide your Device ID, Primary key, and ID scope to successfully connect with Azure IoT central.
// Copyright (c) Microsoft. All rights reserved.
// Licensed under the MIT license. See LICENSE file in the project root for full
// license information.

#include <ESP8266WiFi.h>
#include "src/iotc/common/string_buffer.h"
#include "src/iotc/iotc.h"
#include "DHT.h"

#define DHTPIN D6

#define DHTTYPE DHT22


#define WIFI_SSID "************"
#define WIFI_PASSWORD "*****************"

const char* ID_SCOPE = "***********";
const char* DEVICE_ID = "*******";
const char* PRIMARY_KEY = "****************************";

DHT dht(DHTPIN, DHTTYPE);

void on_event(IOTContext ctx, IOTCallbackInfo* callbackInfo);
#include "src/connection.h"

void on_event(IOTContext ctx, IOTCallbackInfo* callbackInfo) {
  // ConnectionStatus
  if (strcmp(callbackInfo->eventName, "ConnectionStatus") == 0) {
    LOG_VERBOSE("Is connected ? %s (%d)",
                callbackInfo->statusCode == IOTC_CONNECTION_OK ? "YES" : "NO",
                callbackInfo->statusCode);
    isConnected = callbackInfo->statusCode == IOTC_CONNECTION_OK;
    return;
  }

  // payload buffer doesn't have a null ending.
  // add null ending in another buffer before print
  AzureIOT::StringBuffer buffer;
  if (callbackInfo->payloadLength > 0) {
    buffer.initialize(callbackInfo->payload, callbackInfo->payloadLength);
  }

  LOG_VERBOSE("- [%s] event was received. Payload => %s\n",
              callbackInfo->eventName, buffer.getLength() ? *buffer : "EMPTY");

  if (strcmp(callbackInfo->eventName, "Command") == 0) {
    LOG_VERBOSE("- Command name was => %s\r\n", callbackInfo->tag);
  }
}

void setup() {
  Serial.begin(9600);

  connect_wifi(WIFI_SSID, WIFI_PASSWORD);
  connect_client(ID_SCOPE, DEVICE_ID, PRIMARY_KEY);

  if (context != NULL) {
    lastTick = 0;  // set timer in the past to enable first telemetry a.s.a.p
  }
   dht.begin();
}

void loop() {

float h = dht.readHumidity();
float t = dht.readTemperature();


  if (isConnected) {

    unsigned long ms = millis();
    if (ms - lastTick > 10000) {  // send telemetry every 10 seconds
      char msg[64] = {0};
      int pos = 0, errorCode = 0;

      lastTick = ms;
      if (loopId++ % 2 == 0) {  // send telemetry
        pos = snprintf(msg, sizeof(msg) - 1, "{\"Temperature\": %f}",
                       t);
        errorCode = iotc_send_telemetry(context, msg, pos);

        pos = snprintf(msg, sizeof(msg) - 1, "{\"Humidity\":%f}",
                       h);
        errorCode = iotc_send_telemetry(context, msg, pos);

      } else {  // send property

      }

      msg[pos] = 0;

      if (errorCode != 0) {
        LOG_ERROR("Sending message has failed with error code %d", errorCode);
      }
    }

    iotc_do_work(context);  // do background work for iotc
  } else {
    iotc_free_context(context);
    context = NULL;
    connect_client(ID_SCOPE, DEVICE_ID, PRIMARY_KEY);
  }

}
Demonstration
Choose the correct board and COM port before uploading your code to the board. Therefore go to Tools > Board and select NodeMCU 1.0.
When uploading the code to your board, make sure you using version 2.7.4 for ESP8266. Check Tools > Board > Boards Manger. Otherwise, you may get compilation errors.

Then, go to Tools > Port and select the appropriate port through which your board is connected.
Click on the upload button to upload the code ESP8266 development board.
After you have uploaded your code to the ESP8266 development board, press its RST button.

In your Arduino IDE, open up the serial monitor and set the baud rate to 9600. First the board will connect with the local Wi-Fi then it will establish a connection with Azure IoT Server. After a successful connection has been established, the DHT22 sensor readings get published to the platform. All of this can be monitored in the serial monitor.

Now open the DHT22 device and notice that is is connected with the ESP8266 board. You can also view the data and time of the last data that was received.
Inside the Overview tab, you can view the temperature and humidity readings in a graphical format and the average reading of temperature and humidity over the past 12 hours.
Inside the Raw data tab, you can view the current temperature and humidity readings stored in the form of telemetry with timestamps.

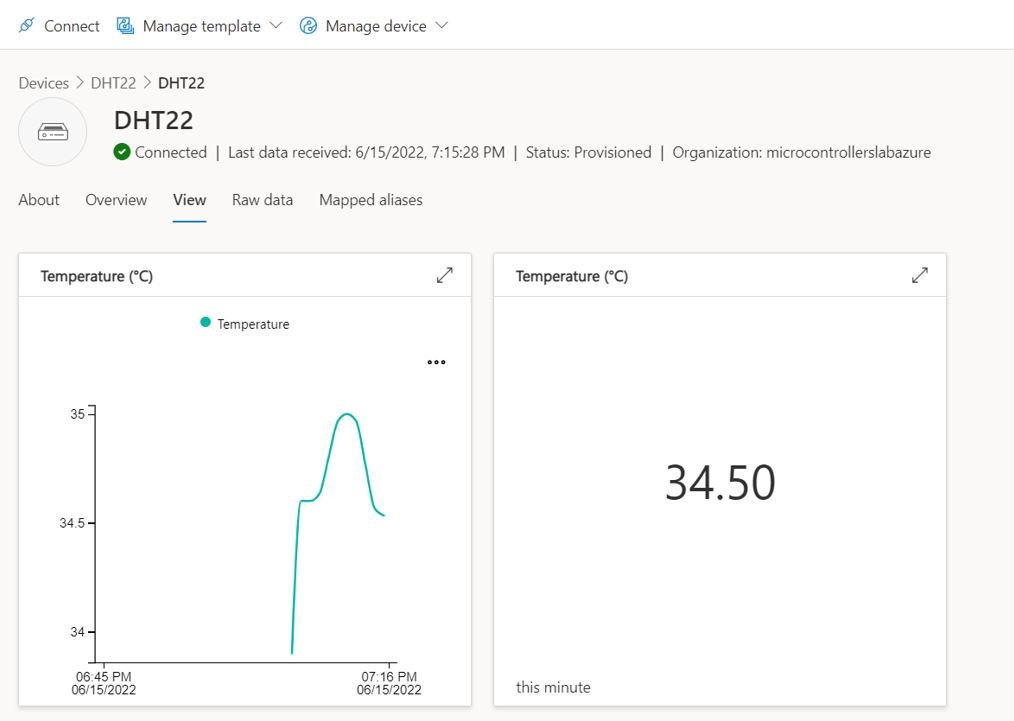
Inside the View tab, you can visualize the temperature readings as a line chart and as the Last Known Value.
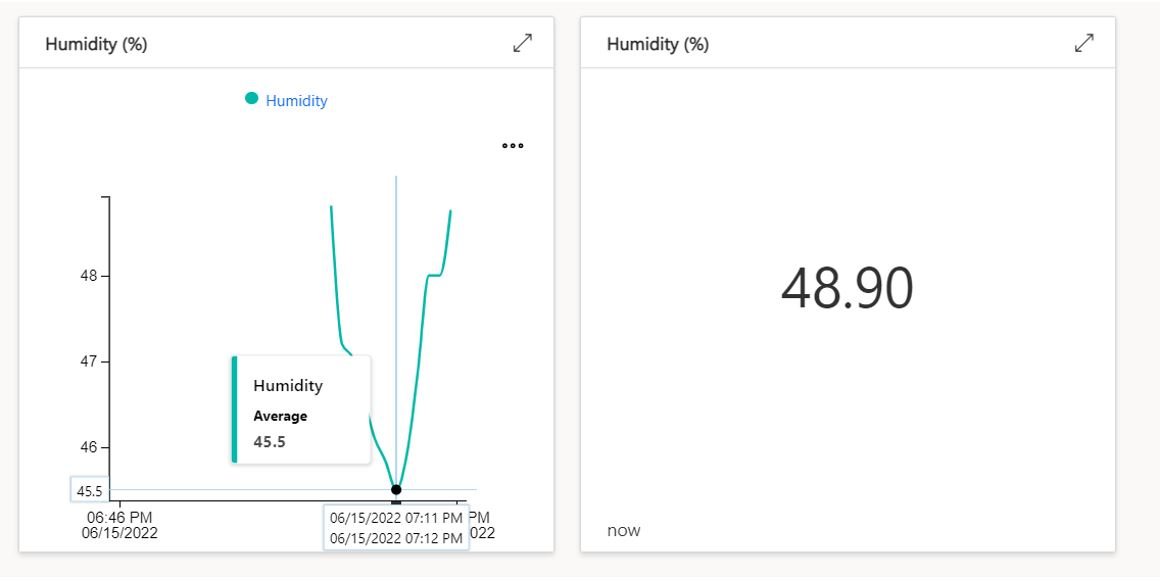
Similarly, you can visualize the humidity readings as a line chart and as the Last Known Value.
You may also like to read:
- ESP32/ESP8266 Send DS18B20 Sensor Readings to InfluxDB
- Display Sensor Readings in Gauges with ESP8266 Web Server
- ESP8266 NodeMCU Wifi Manager Stop Hardcoding WiFi Credentials
- Send sensor Readings to IBM Watson Cloud Platform with ESP8266 NodeMCU
- ESP8266 MPU6050 Web Server Accelerometer and Gyroscope Dashboard with 3-D animation (SSE Events)
- Control ESP8266 Outputs using Blynk App and Arduino IDE
- ESP8266 NodeMCU Data Logging to Firebase Realtime Database
- IoT Based Analog and Digital Clock using OLED and ESP32/ESP8266