In this tutorial, we will be looking at keypad interfacing with the 8051 microcontroller. In this article, we will discuss the code part as well as the structure of the keypad. We can interface any size keypad with the 8051 microcontroller. Matrix Keypads have applications in calculators, mobile phones, telephones, ATMs, etc. It is useful when we require a number of input switches. We will provide an example where the user will give input through the keypad, and then the LCD will display this input number.
Before starting this article, you should know how to write your first program in KEIL and how to use the input and output ports of the 8051 microcontroller, because we use the keypad as an input with the 8051 microcontroller.
Keypad Structure
On a keypad, push-button switches are arranged in rows and columns. In a 4×4 keypad, 16 switches are present, and to connect to the microcontroller, we need 16 input pins. But the arrangement of keypad switches is quite special. Hence, we only require 8 pins of the microcontroller to connect the keypad to it.
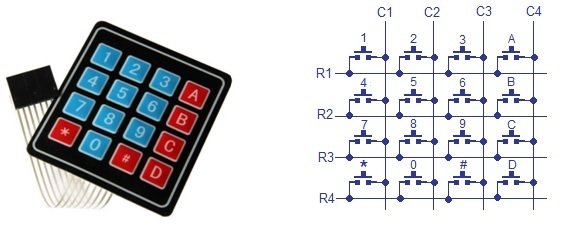
The microcontroller can determine the status of each key or switch by scanning the rows or columns. The column pins (Col1–Col4) connect as the input pins, and the row pins (Row 1–Row 4) connect as the output pins of the microcontroller. Normally, we can pull all the column pins high by using internal or external pull-up resistors. Now we can read the status of each switch by scanning.
Reading Data
Scanning is done in a different way. Column pins are used as input pins and row pins are used as output. If the microcontroller gives low logic to all the rows and high logic to each column, the 8051 microcontrollers can efficiently detect key presses by sequentially activating each column and checking the corresponding rows for any low logic.
For Finding Column Number
- When a switch or key is pressed, the corresponding row and column will get short.
- The output of the corresponding column goes low.
- Since we have made all the rows zero, this gives the column number of the pressed key.
For Finding Row Number
- After detecting the column number, the controller sets all the rows to high.
- The microcontroller sets each row to zero one by one, and then it checks the last, and obviously, it becomes zero.
- The row due to which the column gets zero is the row number of the pressed key.
Keypad Interfacing 8051 Microcontroller
For the interfacing of the keypad with the microcontroller, it is good to connect the LCD as well; this way, we can observe specific changes when we press the key on the keypad. We will connect the Keypad 4×3 (which has 4 rows and 3 columns) to Port 3 of the 8051 microcontroller to scan the input. The LCD will connect to Port 2 of the microcontroller for displaying output. Lastly, we will connect pins 1 and 2 of the microcontroller’s Port 1 to the RS and EN pins of the LCD, respectively. The LED will connect to pin 3 of port 1.
Programming Steps of Keypad Interfacing 8051 Microcontroller
- Firstly, we will initialize the circuits by declaring ports as inputs or outputs. P1, P2, and P3 are used as output ports. We will use P3’s lower bits as outputs and the upper bits as inputs.
- Then we initialize the LCD using specific commands.
- All columns are given high logic, and all rows are given low logic.
- col1=1;
col2=1;
col3=1;
row1=row2=row3=row4=0;
- col1=1;
- Externally, when any keypad button is pressed, a specific column’s output goes low. Check each column for it.
- if(col1==0) check_col1();
else if(col2==0) check_col2();
else if(col3==0) check_col3();
- if(col1==0) check_col1();
- For that specific column, check each row one by one. Give low logic to a single row and high logic to other rows; repeat this process for other rows until a row is found.
For Example:
- By pressing 1, col 1 goes low.
- For col 1, check row 1 (give low logic to row 1 and high logic to others).
row1=row2=row3=row4=1;
row1=0;
if(col1==0){writecmd(0x01); led = 1; writedata(‘1’); delay(5000000); led = 0;}
Proteus Simulation Keypad Interfacing 8051 Microcontroller
In this section, we have provided the Proteus schematic. We have performed simulations on this schematic using the code below.
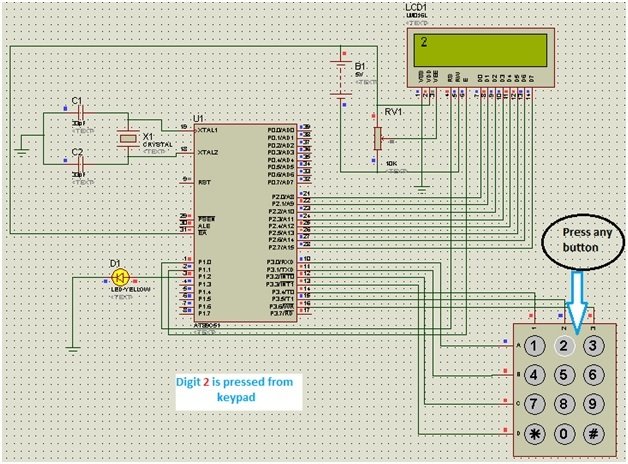
Working of Keypad Interfacing 8051 Microcontroller
At the start, the LCD will display “WELCOME” and then display “Enter No.”. In the above screenshot, when we press 2, the LCD displays this number. So, when we press the button, the LED will turn on and then off after some delay. The number will remain on the screen as long as we don’t press another number. This display arrangement can be changed by arranging the code in different ways.
Code of Keypad Interfacing 8051 Microcontroller
Here we have provided the 8051 code used in the Proteus simulation above.
This code demonstrates how to interface a keypad and LCD with an 8051 microcontroller and a basic user interface. When a user presses keys on the keypad, a respective key-value displays on LCD.
#include<reg51.h>

void lcd_init(void);
void writecmd(int);
void writedata(char);
void delay(int);
void check_col1();
void check_col2();
void check_col3();

sbit RS = P1 ^ 0;
sbit E = P1 ^ 1;
sbit led = P1 ^ 2;

sbit row1 = P3 ^ 0;
sbit row2 = P3 ^ 1;
sbit row3 = P3 ^ 2;
sbit row4 = P3 ^ 3;
sbit col1 = P3 ^ 4;
sbit col2 = P3 ^ 5;
sbit col3 = P3 ^ 6;

int i = 0;

void main()
{
  P0 = 0x00; //not used
  P1 = 0x00; //output port for setting RS and EN
  P2 = 0x00; //used as data output port   for LCD
  P3 = 0xf0; //lower bits as outputs, upper bits as inputs

  lcd_init();

  writedata('W');
  delay(5000000);

  writedata('e');
  delay(5000000);

  writedata('l');
  delay(5000000);

  writedata('c');
  delay(5000000);

  writedata('o');
  delay(5000000);

  writedata('m');
  delay(5000000);

  writedata('e');
  delay(5000000);

  writecmd(0x01); //clear display
  writedata('E');
  writedata('N');
  writedata('T');
  writedata('E');
  writedata('R');
  writedata(' ');
  writedata('N');
  writedata('o');
  writedata('.');
  delay(5000000);

  do
  {
    col1 = 1;
    col2 = 1;
    col3 = 1;

    row1 = row2 = row3 = row4 = 0;

    if (col1 == 0) check_col1();
    else if (col2 == 0) check_col2();
    else if (col3 == 0) check_col3();

  } while (1);
}

void lcd_init(void)
{
  writecmd(0x38); //for 8 bit mode
  writecmd(0x0C); //display on, cursor off
  writecmd(0x01); //clear display
  writecmd(0x80); //force cursor to beginning of 1st line
}

void writedata(char t) //data function
{
  RS = 1;
  P2 = t; //Data transfer
  E = 1;
  delay(150);
  E = 0;
  delay(150);
}

voidwritecmd(int z) //command function
{
  RS = 0;
  P2 = z; //Data transfer
  E = 1;
  delay(150);
  E = 0;
  delay(150);
}

void delay(int a) //Delay function
{
  inti;
  for (i = 0; i < a; i++);
}

void check_col1() //Function for checking column one
{
  row1 = row2 = row3 = row4 = 1;
  row1 = 0;

  if (col1 == 0) {
    writecmd(0x01);
    led = 1;
    writedata('1');
    delay(5000000);
    led = 0;
  }

  row1 = 1;
  row2 = 0;

  if (col1 == 0) {
    writecmd(0x01);
    led = 1;
    writedata('4');
    delay(5000000);
    led = 0;
  }

  row2 = 1;
  row3 = 0;

  if (col1 == 0) {
    writecmd(0x01);
    led = 1;
    writedata('7');
    delay(5000000);
    led = 0;
  }

  row3 = 1;
  row4 = 0;

  if (col1 == 0) {
    writecmd(0x01);
    led = 1;
    writedata('*');
    delay(5000000);
    led = 0;
  }
  row4 = 1;
}

void check_col2() //Function for checking column two
{
  row1 = row2 = row3 = row4 = 1;
  row1 = 0;

  if (col2 == 0) {
    writecmd(0x01);
    led = 1;
    writedata('2');
    delay(5000000);
    led = 0;
  }

  row1 = 1;
  row2 = 0;

  if (col2 == 0) {
    writecmd(0x01);
    led = 1;
    writedata('5');
    delay(5000000);
    led = 0;
  }

  row2 = 1;
  row3 = 0;

  if (col2 == 0) {
    writecmd(0x01);
    led = 1;
    writedata('8');
    delay(5000000);
    led = 0;
  }

  row3 = 1;
  row4 = 0;

  if (col2 == 0) {
    writecmd(0x01);
    led = 1;
    writedata('0');
    delay(5000000);
    led = 0;
  }
  row4 = 1;
}

void check_col3() //Function for checking column three
{
  row1 = row2 = row3 = row4 = 1;
  row1 = 0;

  if (col3 == 0) {
    writecmd(0x01);
    led = 1;
    writedata('3');
    delay(5000000);
    led = 0;
  }

  row1 = 1;
  row2 = 0;

  if (col3 == 0) {
    writecmd(0x01);
    led = 1;
    writedata('6');
    delay(5000000);
    led = 0;
  }

  row2 = 1;
  row3 = 0;

  if (col3 == 0) {
    writecmd(0x01);
    led = 1;
    writedata('9');
    delay(5000000);
    led = 0;
  }

  row3 = 1;
  row4 = 0;

  if (col3 == 0) {
    writecmd(0x01);
    led = 1;
    writedata('#');
    delay(5000000);
    led = 0;
  }
  row4 = 1;
}
Code Explanation
Here we will explain the workings of this code:
#include<reg51.h>

void lcd_init(void);
void writecmd(int);
void writedata(char);
void delay(int);
void check_col1();
void check_col2();
void check_col3();
In the first line, we add a header tag, reg51.h. This header file helps us deal with the 8051 microcontroller’s registers. Next, we declare a few functions we need to interface with the keypad and the LED.
sbit RS = P1 ^ 0;
sbit E = P1 ^ 1;
sbit led = P1 ^ 2;

sbit row1 = P3 ^ 0;
sbit row2 = P3 ^ 1;
sbit row3 = P3 ^ 2;
sbit row4 = P3 ^ 3;
sbit col1 = P3 ^ 4;
sbit col2 = P3 ^ 5;
sbit col3 = P3 ^ 6;

int i = 0;
Now we set pins for connecting the keypad and microcontroller. We use the microcontroller’s Port 1, lower 3 pins for connection with the LCD display, and P3 pins for connection with the row and column pins of the keypad.
void main()
{
  P0 = 0x00; //not used
  P1 = 0x00; //output port for setting RS and EN
  P2 = 0x00; //used as data output port   for LCD
  P3 = 0xf0; //lower bits as outputs, upper bits as inputs

  lcd_init();

  writedata('W');
  delay(5000000);

  writedata('e');
  delay(5000000);

  writedata('l');
  delay(5000000);

  writedata('c');
  delay(5000000);

  writedata('o');
  delay(5000000);

  writedata('m');
  delay(5000000);

  writedata('e');
  delay(5000000);

  writecmd(0x01); //clear display
  writedata('E');
  writedata('N');
  writedata('T');
  writedata('E');
  writedata('R');
  writedata(' ');
  writedata('N');
  writedata('o');
  writedata('.');
  delay(5000000);

  do
  {
    col1 = 1;
    col2 = 1;
    col3 = 1;

    row1 = row2 = row3 = row4 = 0;

    if (col1 == 0) check_col1();
    else if (col2 == 0) check_col2();
    else if (col3 == 0) check_col3();

  } while (1);
}
In the main function, first, we initialize the Ports for input and output functions. Then we initialize the LCD by calling the lcd_init() function. After this, we display the welcome on this LCD with a delay. Lastly, in the while loop, we check whether any key has been pressed on the keypad or not.
void lcd_init(void)
{
  writecmd(0x38); //for 8 bit mode
  writecmd(0x0C); //display on, cursor off
  writecmd(0x01); //clear display
  writecmd(0x80); //force cursor to beginning of 1st line
}
In the lcd_init() function, we initialize a few settings for the LCD display using the microcontroller.
void writedata(char t) //data function
{
  RS = 1;
  P2 = t; //Data transfer
  E = 1;
  delay(150);
  E = 0;
  delay(150);
}
This writedatacmd() function is responsible for printing the character on the LCD display. It gets the data and sends it to the LCD’s data pins.
voidwritecmd(int z) //command function
{
  RS = 0;
  P2 = z; //Data transfer
  E = 1;
  delay(150);
  E = 0;
  delay(150);
}
This function sets the RS pin for command transmission. It also sends the command to the LCD pins by toggling the Enable pin with a delay.
void delay(int a) //Delay function
{
  int i;
  for (i = 0; i < a; i++);
}
In this delay function, we keep the microcontroller busy by running iterations. This is useful for adding delays to the program.
void check_col1() //Function for checking column one
{
  row1 = row2 = row3 = row4 = 1;
  row1 = 0;

  if (col1 == 0) {
    writecmd(0x01);
    led = 1;
    writedata('1');
    delay(5000000);
    led = 0;
  }

  row1 = 1;
  row2 = 0;

  if (col1 == 0) {
    writecmd(0x01);
    led = 1;
    writedata('4');
    delay(5000000);
    led = 0;
  }

  row2 = 1;
  row3 = 0;

  if (col1 == 0) {
    writecmd(0x01);
    led = 1;
    writedata('7');
    delay(5000000);
    led = 0;
  }

  row3 = 1;
  row4 = 0;

  if (col1 == 0) {
    writecmd(0x01);
    led = 1;
    writedata('*');
    delay(5000000);
    led = 0;
  }
  row4 = 1;
}

void check_col2() //Function for checking column two
{
  row1 = row2 = row3 = row4 = 1;
  row1 = 0;

  if (col2 == 0) {
    writecmd(0x01);
    led = 1;
    writedata('2');
    delay(5000000);
    led = 0;
  }

  row1 = 1;
  row2 = 0;

  if (col2 == 0) {
    writecmd(0x01);
    led = 1;
    writedata('5');
    delay(5000000);
    led = 0;
  }

  row2 = 1;
  row3 = 0;

  if (col2 == 0) {
    writecmd(0x01);
    led = 1;
    writedata('8');
    delay(5000000);
    led = 0;
  }

  row3 = 1;
  row4 = 0;

  if (col2 == 0) {
    writecmd(0x01);
    led = 1;
    writedata('0');
    delay(5000000);
    led = 0;
  }
  row4 = 1;
}

void check_col3() //Function for checking column three
{
  row1 = row2 = row3 = row4 = 1;
  row1 = 0;

  if (col3 == 0) {
    writecmd(0x01);
    led = 1;
    writedata('3');
    delay(5000000);
    led = 0;
  }

  row1 = 1;
  row2 = 0;

  if (col3 == 0) {
    writecmd(0x01);
    led = 1;
    writedata('6');
    delay(5000000);
    led = 0;
  }

  row2 = 1;
  row3 = 0;

  if (col3 == 0) {
    writecmd(0x01);
    led = 1;
    writedata('9');
    delay(5000000);
    led = 0;
  }

  row3 = 1;
  row4 = 0;

  if (col3 == 0) {
    writecmd(0x01);
    led = 1;
    writedata('#');
    delay(5000000);
    led = 0;
  }
  row4 = 1;
}
These three functions, check_col1(), check_col2(), and check_col3(), continuously check whether a key is pressed or not by checking against corresponding rows.
Video Demonstration of Keypad Interfacing with 8051 Microcontroller
Conclusion
In this tutorial, we have discussed the following topics:
- 8051 Keypad structure and interfacing
- 8051 Programming steps of keypad interfacing
- Proteus schematic
- Working of keypad interfacing
- Code and its explanation
Related Articles
If you are interested in reading similar articles, please check out the links below:
- 8051 Microcontroller tutorials in c programming examples
- Servo motor interfacing with 8051 using KEIL compiler
- Interface LCD with 8051 Microcontroller
- 4×3 Keypad with STM32 Blue Pill using STM32CubeIDE.
- 4×4 Keypad Interfacing with TM4C123 Tiva Launchpad
- 4×4 keypad Interfacing with Arduino
This is all for the article, if you face any difficulties or issues, let us know in the comment section below.
I’m getting an error in Proteus simulation like no model specified for RV1
http://microcontrollerslab.com/keypad-interfacing-8051-microcontroller/
can you share the square of a number in this program?
Interesting but what I don’t understand is why everyone is connecting a keypad directly to the ports of a MCU. When connecting it via I2C one can free up ports for other uses.