In this article, we will learn how to interface an LCD with an 8051 microcontroller. It is not very hard to interface an LCD with an 8051 microcontroller if you already know how to use KEIL for programming and how to use the input-output ports of the 8051 microcontroller. We can use LCD to display alphabets, numbers, messages, etc.
16×2 LCD is very simple and easy to understand for beginners, and several electronic products commonly use it as a display. LCD (Liquid Crystal Display) provides a user-friendly interface and can be very useful for debugging purposes. After completion of this tutorial, we will be able to display data on an LCD using the 8051 and KEIL software.
The reason LCD is more popular than seven-segment displays is because we can display characters, numbers, and custom characters with ease on the LCD (simply by programming a module).
Recommended Components
The following parts and reference books are useful for building and learning 8051 microcontroller projects.
| Component | How it’s used in your 8051 projects | Buy on Amazon |
|---|---|---|
| AT89S52 (8051) microcontroller | A modern, in-system-programmable 8051-core MCU that runs the code in these tutorials. | Check Price |
| USBasp programmer (ISP) | Burns the compiled HEX file into the AT89S51/AT89S52 over the ISP header. | Check Price |
| Breadboard | Solderless base for wiring the 8051 and the project’s components. | Check Price |
| Jumper Wires | Make the connections between the MCU, components and power rails. | Check Price |
| Book: The 8051 Microcontroller & Embedded Systems (Mazidi) | The classic 8051 textbook — architecture, assembly & C programming with interfacing examples. | Check Price |
| Book: The 8051 Microcontroller, 3rd Ed. (Ayala) | A popular reference covering 8051 architecture, programming and applications. | Check Price |
As an Amazon Associate we earn from qualifying purchases. Prices and availability are accurate as of the date/time indicated and are subject to change.
Why do We Need to Interface LCD with 8051?
The first question that must come to your mind is: why do we need to interface LCD with 8051? There are many embedded projects that want to display different types of data on LCD. For example, we can use it to display different sensor data such as temperature, humidity, pressure, light intensity, voltage, current, and many others. Hence, the use of liquid crystal displays is very popular and common in the 8051 project. We recommend learning LCD interfacing at the start, as it can be very helpful later on. Because when you learn to interface sensors with 8051, you will already have the coding experience to display that sensor value.
Liquid Crystal Display Introduction
As their name suggests, LCDs are electronic devices that can display texts, custom characters, and numbers. Even though we can also display pictures on LCDs. But the results will not be comparable to those of the graphical LCDs (GLCDs). GLCDs can display images with better quality. Coming back to LCDs, they are available in different sizes and features. For example, 16×2, 20×2, and 16×1 are the different sizes available.
Types of LCD Displays
They come in two types: serial and parallel LCDs. The serial type uses serial communication, such as the UART module, to interface with the 8051. They are easier to interface with the 8051 than parallel LCDs. But they are expensive. In contrast, parallel LCDs, for example, the Hitachi HD44780, are exceptional for their use, and we can interface them with 8051 using the digital I/O pins of 8051. For instance, we can interface a Hitachi HD44780 type 16×2 LCD with an 8051 using 4–8 data lines and a few control pins of the display. In this tutorial, we will be using 16×2 parallel LCD only. Because it is the most popular choice among the 8051 community and embedded application developers.
16×2 LCD Introduction
We can use any type of LCD to interface with the 8051 microcontroller, like 16×2, 8×1, 16×4, 8×2, 16×1, 20×1, 20×2, etc. Here we will use 16×2 Liquid Crystal displays. It can display 32 characters at a time in two rows. LM016L is a 16×2 LCD module.
There are two types of pins on the whole 16×2 LCD module. Some pins send data to 16×2 LCD, and some are command pins. In other words, every pin has a role in controlling a single pixel on the display.
A 16×2 LCD has sixteen columns and two rows. That means it can display sixteen characters per row, and it has two such rows. Similarly, a 20×4 LCD has four rows and 20 columns. That means it can display 20 characters per row.
Pinout Diagram
The diagram shows the pin configuration of the 16×2 display. It has sixteen pins.
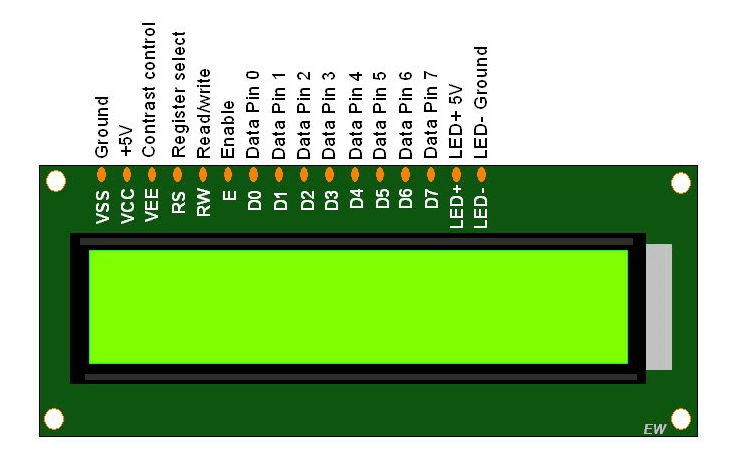
D0 – D7: Pin numbers 7–14 are data bus lines; we can use them to send data from the 8051 microcontroller to the LCD display. With these 8 data lines, we can transfer data either in an 8-bit format or in a 4-bit format. In a 4-bit format, we only require the upper four bits (D4–D7) to send data from the 8051 microcontroller to the LCD. This 4-bit format will transmit the full byte in two successive transmissions. A 4-bit LCD format requires fewer GPIO pin connections with the 8051 to transfer the data.
Contrast Select (VEE): Pin 3 will connect with power and ground through 3-pin potentiometers. It will help to control the contrast of PIXELS according to the 16×2 LCD light. We connect a 10K ohm variable resistor with the VEE pin to adjust light contrast. Variable resistor: one side connects to the 5 volts, and the other side connects to the ground. Lastly, the third terminal connects with the VEE pin.
RS: This pin is known as a register select pin. It helps to toggle the command/data register.
R/W: The signal on Pin 5 will decide whether it is going to read from the LCD or write to it.
EN: The enable pin will help transfer the instruction from the data pins and another command pin to the LCD. It acts as permission to access internal registers.
VSS: It’s a ground pin for common grounds.
VDD: The power pin will be used for voltage input to the 16×2 LCD.
16×2 LCD Registers
The EN pin is for enabling the module. A high-to-low transition at this pin will enable the LCD module. This LM016L has two built-in registers, namely:
- Data register
- Command register
Data register: It is for placing the data that is to be displayed. Data can be any character, alphabet, or number. High logic at the RS pin will select the data register. By making the RS pin high and putting data in the 8-bit data line (DB0 to DB7), the LCD module will recognize it as data to be displayed.
Command register: It is for placing the commands. There are a set of commands for LCD to perform specific tasks. Low logic at the RS pin will select the command register. By making the RS pin low and putting data on the data line, the LCD module will recognize it as a command.
16×2 LCD Commands
Some of the commands and instructions are given below:
| Code (in Hex) | Working of LCD commands |
|---|---|
| 0x01 | Clear displays |
| 0x02 | returns home |
| 0x06 | for entry mode |
| 0x80 | Force cursor to beginning of 1st line |
| 0xC0 | Force cursor to beginning of 2nd line |
| 0x90 | Force cursor to beginning of 3rd line |
| 0xD0 | Force cursor to beginning of 4th line |
| 0x08 | Display off, cursor off |
| 0x0E | Display on, cursor on |
| 0x0C | Display on, cursor off |
| 0x0F | Display on, cursor blinking |
| 0x10 | Shift cursor position to left |
| 0x14 | Shift cursor position to right |
| 0x38 | 2 lines and 5×7 matrix (8-bit mode) |
| 0x28 | 2 lines and 5×7 matrix (4-bit mode) |
R/W pin: This pin is for selecting between read and write modes. A high level at this pin enables read mode, and a low level at this pin enables write mode.
DB0 to DB7: These pins are the data pins. The data to be displayed and the commands are placed on these pins.
For glowing backlight LEDs, LED+ (the anode of the backlight LED) is connected to Vcc through a suitable series current-limiting resistor (for contrast adjustment). LED- (the cathode of the backlight LED) is connected to ground.
How to Interface 16X2 LCD with 8051 Microcontroller?
First of all, to interface an LCD with an 8051 microcontroller, we use GPIO pins. GPIO pins are general-purpose input-output pins. We send control and data signals to the LCD through these I/O pins. Therefore, you should know how to use the digital input-output pins of the 8051. To learn about GPIO pin programming, check out these tutorials:
- How to Write First Program in KEIL for 8051
- How to use input-output ports 8051 microcontroller |LED blinking
This LCD can operate in 4-bit mode (using only 4 data lines) or 8-bit mode (using all 8 data lines). Here we will use it in 8-bit mode. First of all, we will initialize the LCD, and then use it for sending data and commands. The Reset and Enable pins of the LCD connect to port 1 of the 8051 microcontroller. Now, we connect the data lines of the LCD to port 2 of the 8051 microcontroller. R/W will be connected to the ground since we only need to write data and commands (not perform read operations). By connecting this pin to the ground, we will not have to set it to low in the code.
Commands to Send Data to LCD Interfacing with 8051
To initialize the LCD with the 8051 microcontroller, the following instructions are to be executed:
| Commands | Function |
|---|---|
| 0x38 | This is used for 8-bit data initialization |
| 0x0C | display on, cursor off |
| 0x01 | for clearing screen |
| 0x80 | force cursor to move to the beginning of 1st line |
Sending Data Command
For displaying any character, whether it is a number, alphabet, or character, we will follow these steps:
- For display data, register select (RS pin) should be high, RS = 1.
- Place a data byte on the data register.
- Pulse the Enable pin (EN pin) from high to low.
- Configure the R/W to write mode. For write mode, R/W = 0.
- Repeat the above steps to send more data.
To Send Command
To instruct LCD interfacing with the 8051 microcontroller to perform a specific task, for example, displaying characters in the second row instead of the first, for this the steps are as follows:
- For command mode, register select (RS pin) should be low, RS = 0.
- Place the data byte on the command register.
- Pulse the Enable pin (EN pin) from high to low.
- Read/Write should be low (write mode), R/W = 0.
- Repeat the above steps to send another command.
Proteus Schematic
In this section, we have provided the Proteus schematic used for the simulation. This schematic diagram of LCD interfacing with the 8051 microcontroller is as follows:

Code 16×2 LCD Interfacing 8051 Microcontroller
We have provided the code used in the Proteus simulation in this section.
#include<reg51.h>

voidlcd_init(void);
voidwritecmd(int);
voidwritedata(char);

void delay(int);

sbit RS = P1 ^ 0;
sbit E = P1 ^ 1;
sbit led = P1 ^ 2;

int i = 0;

void main()
{
  P0 = 0x00; //not used
  P1 = 0x00; //output port for setting RS and EN
  P2 = 0x00; //used as data output port
  P3 = 0x00; //not used

  led = 1;
  lcd_init();

  writedata('W');
  delay(5000000);

  writedata('e');
  delay(5000000);

  writedata('l');
  delay(5000000);

  writedata('c');
  delay(5000000);

  writedata('o');
  delay(5000000);

  writedata('m');
  delay(5000000);

  writedata('e');
  delay(5000000);

  writedata(' ');
  delay(5000000);

  writedata('T');
  delay(5000000);

  writedata('o');
  delay(5000000);

  writecmd(0x01); //clear display
  writedata('w');
  writedata('w');
  writedata('w');
  writedata('.');
  writedata('m');
  writedata('i');
  writedata('c');
  writedata('r');
  writedata('o');
  writedata('c');
  writedata('o');
  writedata('n');
  writedata('t');
  writedata('r');
  writedata('o');
  writedata('l');

  writecmd(0xc0); //enter in second row
  writedata('l');
  writedata('e');
  writedata('r');
  writedata('s');
  writedata('l');
  writedata('a');
  writedata('b');
  writedata('.');
  writedata('c');
  writedata('o');
  writedata('m');

  delay(5000000);
  delay(5000000);
  delay(5000000);
  delay(5000000);
}

void lcd_init(void)
{
  writecmd(0x38); //for 8 bit mode
  writecmd(0x0C); //display on, cursor off
  writecmd(0x01); //clear display
  writecmd(0x80); //force cursor to beginning of 1st line
}

void writedata(char t) //data function
{
  RS = 1;
  P2 = t; //Data transfer

  E = 1;
  delay(150);

  E = 0;
  delay(150);
}

void writecmd(int z) //command function
{
  RS = 0;
  P2 = z; //Data transfer

  E = 1;
  delay(150);

  E = 0;
  delay(150);
}

void delay(int a) //Delay function
{
  inti;

  for (i = 0; i < a; i++){

  }
}
Code Explanation
In this section, we will explain the proper workings of this code:
#include <reg51.h>

void lcd_init(void);
void writecmd(int);
void writedata(char);
void delay(int);

sbit RS = P1 ^ 0;
sbit E = P1 ^ 1;
sbit led = P1 ^ 2;

int i = 0;
In the first line, we include a header file, <reg51.h>. This helps us deal with the 8051 microcontroller’s registers. Next, we declare 4 functions; after this, we set 8051 Port 1, pins 1, 2, and 3 to the RS, E, and LED pins of the LCD, respectively.
void main()
{
  P0 = 0x00; //not used
  P1 = 0x00; //output port for setting RS and EN
  P2 = 0x00; //used as data output port
  P3 = 0x00; //not used

  led = 1;
  lcd_init();
In the main function, we first set the Ports. We will use port 1 as the output port and port 2 as the input port. Next, we set the LED pin high and call the lcd_init() function to initialize the settings of the LCD display.
  writedata('W');
  delay(5000000);

  writedata('e');
  delay(5000000);

  writedata('l');
  delay(5000000);

  writedata('c');
  delay(5000000);

  writedata('o');
  delay(5000000);

  writedata('m');
  delay(5000000);

  writedata('e');
  delay(5000000);

  writedata(' ');
  delay(5000000);

  writedata('T');
  delay(5000000);

  writedata('o');
  delay(5000000);
Next, we print “Welcome To” by passing each character as an argument to the writedata() function, which displays these characters on the LCD display interfacing with the 8051 microcontroller.
 writecmd(0x01); //clear display
  writedata('w');
  writedata('w');
  writedata('w');
  writedata('.');
  writedata('m');
  writedata('i');
  writedata('c');
  writedata('r');
  writedata('o');
  writedata('c');
  writedata('o');
  writedata('n');
  writedata('t');
  writedata('r');
  writedata('o');
  writedata('l');

  writecmd(0xc0); //enter in second row
  writedata('l');
  writedata('e');
  writedata('r');
  writedata('s');
  writedata('l');
  writedata('a');
  writedata('b');
  writedata('.');
  writedata('c');
  writedata('o');
  writedata('m');

  delay(5000000);
  delay(5000000);
  delay(5000000);
  delay(5000000);
}
After this, we clear the display using a command and write “www.microcontrol” in the first line. Then, using the command 0xc0, we shift the cursor to the second row and print “‘erslab.com”. Lastly, we added a few delays.
void lcd_init(void)
{
  writecmd(0x38); //for 8 bit mode
  writecmd(0x0C); //display on, cursor off
  writecmd(0x01); //clear display
  writecmd(0x80); //force cursor to beginning of 1st line
}
In the lcd_init() function, we initialize the LCD display by configuring its settings using commands.
void writedata(char t) //data function
{
  RS = 1;
  P2 = t; //Data transfer

  E = 1;
  delay(150);

  E = 0;
  delay(150);
}
This function deals with displaying the characters on the LCD display. We transfer the data, and by turning enable high and then low, this prints the characters on the LCD display.
void writecmd(int z) //command function
{
  RS = 0;
  P2 = z; //Data transfer

  E = 1;
  delay(150);

  E = 0;
  delay(150);
}
The writecmd function deals with sending commands to the LCD display when interfacing with the 8051 microcontroller. In this function, we first set the RS pin to low, then transfer the data. By turning the enable pin high and low, The command is sent to the LCD display.
void delay(int a) //Delay function
{
  inti;

  for (i = 0; i < a; i++){

  }
}
Lastly, we have the delay function, which keeps the microcontroller busy performing iterations in a for loop, thereby causing a delay in the program.
Video Demonstration
Conclusion
In this article, we have discussed the following topics
- Why do we need to interface LCD with 8051?
- Introduction to LCD displays and their types.
- 16×2 LCD pinout, registers, and commands.
- Interfacing LCD display with 8051 microcontroller.
- Proteus schematic.
- 8051 LCD Interfacing Code and its Explanation
Related Articles
If you liked reading our article, we have provided links to similar articles below:
- 8051 microcontroller getting started guide.
- LCD Interfacing with TM4C123 Tiva LaunchPad – Keil uvision.
- optocoupler interfacing with avr pic and 8051 microcontroller.
- External Interrupts 8051 Microcontroller – Example.
- 8051 Microcontroller Timers: How to Generate Delay Example.
- Stepper motor interfacing with 8051 microcontroller.
This is all for today’s article, In case you face any difficulties or issues while following along with the tutorial. Let us know in the comment section below.
Thanks for the invaluable information. But I have a question for you, how much second is the delay given by delay(5000000) and delay(150)?
Thanks in advance for your feedback!
could you send me interfacing pir.gsm.buzzer with 8051 microcontroller