In this tutorial, we will see how to store data in flash memory of ESP32 using the Preferences.h library and Arduino IDE. We can use this library to read and write data on the ESP32’s flash memory permanently. Flash memory is like a long-lasting memory that remembers things, so it’s perfect for saving important information. ESP32 consists of a flash memory that is non-volatile and can retain data after a reset or a power failure. By using preferences.h, this permanent storage feature is particularly useful for applications where we have to remember the last state of a variable, store some values for runtime or save any data for future use such as network credentials, API keys, etc.
We will demonstrate the use of preferences.h library with ESP32’s flash memory. The Preferences library is already installed in Arduino IDE when you ESP32 add-on to Arduino IDE.
You will be able to learn the following by the end of this guide:
- Preferences.h Example 1: Save/Read key: value pairs
- Example 2: Save/Read Network Credentials using Preferences Library
- Connecting to WIFI with the Network Credentials saved on the Preferences
- Example 3: Remembering the Last GPIO state after a Reset
The Preferences library usually stores different data in the form of key:value pairs where a key is a unique identifier of some item of data and the value is the data itself. These key:value pairs are part of a namespace. The namespace is constricted to a maximum of fifteen characters.
Recommended Components
The following components are used in this project or are helpful for building it with the ESP32.
| Component | How it’s used in this project | Buy on Amazon |
|---|---|---|
| ESP32 Development Board (DevKit V1) | The main board that runs the project firmware. | Check Price |
| Micro USB Cable | Connects the board to your computer to upload code and power it. | Check Price |
| Breadboard | Holds the board and components together while you wire up the project. | Check Price |
| Jumper Wires | Make the connections between the board and any external parts. | Check Price |
As an Amazon Associate we earn from qualifying purchases. Prices and availability are accurate as of the date/time indicated and are subject to change.
ESP32 Saving Data through Preferences Library
- To save a particular data using the Preferences library follow the pattern as shown below.
namespace {
key:value
}- Each namespace is associated with a particular key:value pair. You can add multiple key:value pairs to a single namespace as well.
namespace {
 key1:value1
 key2:value2
 }
 Data_entry{
 First_name:John
 Last_name:Doe
 }
We have used a practical example to show you how to add a key:value pair to a namespace ‘Data_entry’ by using First name as the first key and the last name as the second key. Notice that ‘value’ consists of the exact information whereas the ‘key’ is like an identifier of the value.
- Likewise, we can use the same key in different namespaces but each key will have a unique value associated with it.
For example:
Data_entry1{
 First_name:John
 Last_name:Doe
 }
Data_entry2 {
First_name:Jane
Last_name:Bell
}
With the help of the Preferences library, the following data types can be saved permanently on our ESP32 development board.
- Char
- UChar
- Short
- UShort
- Uint
- Long
- ULong
- Long64
- ULong64
- Float
- Double
- Bool
- String
- Bytes
Similar data types should be used when reading and writing particular data.
ESP32 Preferences Library Important Functions
#include <Preferences.h>
Preferences preferences;
The above lines of code define the preferences library in Arduino IDE setup and create an instance of the library called ‘preferences.’ This instance is very vital because through it we will be able to access different methods of the Preference library.
The table shows some useful functions of the library and how to use them:
| preferences.begin(“Data_entry”, false); | The begin() method will be used to start a preference by creating a storage space for a particular namespace. It will consist of two arguments. The first will be the name of the namespace which is Data_entry in our case. The second argument will be either true/false. In our case, we have passed false which means that both the read and write mode is enabled. |
| preferences.begin(“Data_entry”,true); | In this case, the second argument is true which means that the namespace which we have defined will be in read-only mode. |
| preferences.clear(); | Through the clear() method, all the preferences for an opened namespace will get cleared. |
| preferences.remove(key); | This will remove the ‘key’ associated with the opened namespace. |
| preferences.end(); | For the opened namespace, the end() method will be used to close the preference under it. |
Saving a key value for different data types
In order to save a value of a particular data type use the methods stated below. The put() method will take in two arguments where the first will be the key and the second will be its value. By using this method, you will able to save the variable type accordingly.
| Data Type | Method |
| Char | putChar(const char* key, int8_t value) |
| Unsigned Char | putUChar(const char* key, int8_t value) |
| Short | putShort(const char* key, int16_t value) |
| Unsigned Short | putUShort(const char* key, uint16_t value) |
| Int | putInt(const char* key, int32_t value) |
| Unsigned Int | putUInt(const char* key, uint32_t value) |
| Long | putLong(const char* key, int32_t value) |
| Unsigned Long | putULong(const char* key, uint32_t value) |
| Long64 | putLong64(const char* key, int64_t value) |
| Unsigned Long64 | putULong64(const char* key, uint64_t value) |
| Float | putFloat(const char* key, const float_t value) |
| Double | putDouble(const char* key, const double_t value) |
| Bool | putBool(const char* key, const bool value) |
| String | putString(const char* key, const String value) |
| Bytes | putBytes(const char* key, const void* value, size_t len) |
Reading a key value for different data types
In order to read a value of a particular data type, we will use the methods stated below. The get() method will take in two arguments where the first will be the key and the second will be its value. By using this method, you will able to read the variable type accordingly.
| Char | getChar(const char* key, const int8_t defaultValue) |
| Unsigned Char | getUChar(const char* key, const uint8_t defaultValue) |
| Short | getShort(const char* key, const int16_t defaultValue |
| Unsigned Short | getUShort(const char* key, const uint16_t defaultValue) |
| Int | getInt(const char* key, const int32_t defaultValue) |
| Unsigned Int | getUInt(const char* key, const uint32_t defaultValue) |
| Long | getLong(const char* key, const int32_t defaultValue) |
| Unsigned Long | getULong(const char* key, const uint32_t defaultValue) |
| Long64 | getLong64(const char* key, const int64_t defaultValue) |
| Unsigned Long64 | gettULong64(const char* key, const uint64_t defaultValue) |
| Float | getFloat(const char* key, const float_t defaultValue) |
| Double | getDouble(const char* key, const double_t defaultValue) |
| Bool | getBool(const char* key, const bool defaultValue) |
| String | getString(const char* key, const String defaultValue) |
| String | getString(const char* key, char* value, const size_t maxLen) |
| Bytes | getBytes(const char* key, void * buf, size_t maxLen) |
Erasing Namespace
As we stated above, the clear() method just clears all the preferences for the opened namespace but does not delete it. So, there is no exact method to erase/remove a namespace in the Preference library. If there is a need to erase all the data and reformat the non-volatile memory of the ESP32 development board then a simple program code uploaded to it can help us resolve this issue. In your Arduino IDE, open a new file and replicate the code given below. Save it and upload it to your ESP32 module. This will reformat your ESP32 board.
ESP32 Code
#include <nvs_flash.h>

void setup() {
  nvs_flash_erase(); // reformats
  nvs_flash_init(); // initializes
  while(true);
}

void loop() {

}
ESP32 Save/Read key Value Pairs from Flash Memory
Now, let us proceed with a simple example to show you how to read/write data in your ESP32 flash memory using the Preference library. We will use an example sketch from the Arduino IDE. Open your IDE, then click File > Examples > Preferences > StartCounter. In this sample code, after each reset that occurs after every 10 seconds, the counter will increment its value.
/*
 ESP32 startup counter example with Preferences library.

 This simple example demonstrates using the Preferences library to store how many times the ESP32 module has booted.
 The Preferences library is a wrapper around the Non-volatile storage on ESP32 processor.

 Created for  rduino-esp32 09 Feb 2017 by Martin Sloup (Arcao)


*/

#include <Preferences.h>

Preferences preferences;

void setup() {
  Serial.begin(115200);
  Serial.println();

  // Open Preferences with my-app namespace. Each application module, library, etc
  // has to use a namespace name to prevent key name collisions. We will open storage in
  // RW-mode (second parameter has to be false).
  // Note: Namespace name is limited to 15 chars.
  Preferences.begin(“my-app”, false);

  // Remove all preferences under the opened namespace
  //preferences.clear();

  // Or remove the counter key only
  //preferences.remove(“counter”);

  // Get the counter value, if the key does not exist, return a default value of 0
  // Note: Key name is limited to 15 chars.
  Unsigned int counter = preferences.getUInt(“counter”, 0);

  // Increase counter by 1
  counter++;

  // Print the counter to Serial Monitor
  Serial.printf(“Current counter value: %u\n”, counter);

  // Store the counter to the Preferences
  preferences.putUInt(“counter”, counter);

  // Close the Preferences
  preferences.end();

  // Wait 10 seconds
  Serial.println(“Restarting in 10 seconds…”);
  delay(10000);

  // Restart ESP
  ESP.restart();
}

void loop() {

}
How does the Code work?
We will start by importing the Preferences library and creating its instance named ‘preferences.’
#include <Preferences.h>
Preferences preferences;
Inside the setup() function, the serial monitor will be is initialized at a baud rate of 115200 by using the begin() method. Then we will use the begin() method on the Preferences object to create a storage space for the namespace “my-app.” We will be able to both read/write this namespace as we have passed false as the second argument inside the method.
Serial.begin(115200);
preferences.begin(“my-app”, false);
Next, we will use getUInt() method to read the counter key with its value which we have initialized as 0. This gets saved in the variable ‘counter’ of data type unsigned int which will get incremented after each reset. Its current value will also get printed on the serial monitor.
Unsigned int counter = preferences.getUInt(“counter”, 0);
counter++;
Serial.printf(“Current counter value: %u\n”, counter);
Then, we will use putUInt() method to save the current counter value and then close the preference.
Preferences.putUInt(“counter”, counter);
preferences.end();
Add a delay of 10 seconds before each reset.
Serial.println(“Restarting in 10 seconds…”);
delay(10000);
Finally, we will restart the ESP32 module.
ESP.restart();Demonstration
Upload the Arduino example sketch to your ESP32 board and press the ENABLE button.

Now open your serial monitor to view the counter increasing after every 10seconds.

This shows that the ESP32 flash memory was utilized.
ESP32 Save/Read Network Credentials using Preferences Library
Often it is inconvenient to specify WIFI credentials separately for each project where they are required. By using the Preferences library, we can easily save the credentials in our ESP32’s flash memory permanently which will be accomplished by uploading the Arduino sketch given below to your module.
#include <Preferences.h>

Preferences preferences;

const char* ssid = "PTCL-BB"; //Replace with your own SSID
const char* password = "********"; //Replace with your own password

void setup() {
  Serial.begin(115200);
  Serial.println();

  preferences.begin("Credentials", false);
  preferences.putString("SSID", ssid);
  preferences.putString("Password", password);

  Serial.println("Network Credentials have been Saved");

  preferences.end();
}

void loop() {

}
How the Code Works?
We will start by importing the Preferences library and creating its instance named ‘preferences.’
#include <Preferences.h>
Preferences preferences;
Also, we will create two global variables to hold the WIFI credentials which will be SSID and the password. You will have to replace them with your network credentials which the ESP32 module will save permanently.
const char* ssid = "PTCL-BB";
const char* password = "********";
Inside the setup() function, the serial monitor will be initialized at a baud rate of 115200 by using the begin() method.
Serial.begin(115200);Then we will use the begin() method on the Preferences instance to create a storage space for the namespace “Credentials.” We will be able to both read/write this namespace as we have passed false as the second argument inside the method.
preferences.begin("Credentials", false);Next, we will create two key:value pairs one for the SSID (key) and its value (ssid) and the other for the Password (key) and its value (password) by using the putString() method.
preferences.putString("SSID", ssid);
preferences.putString("Password", password);
As an example, our credentials will be structured in the following way:
Network_credentials{
  SSID: PTCL-BB
  Password: ********
}
Demonstration
Upload this Arduino sketch to your ESP32 board and press the ENABLE button. Now, open the serial monitor to view the message saying that “Network Credentials have been Saved.”

ESP32 Connecting to WIFI with the Network Credentials saved on the Preferences
Now, we will proceed a bit further and use the network credentials which we saved on the Preferences and will use them to successfully connect to our ESP32 development board with the local network. Copy the following code in a new file and save it.
ESP32 Code
#include <Preferences.h>
#include "WiFi.h"

Preferences preferences;

String ssid;
String password;

void setup() {
  Serial.begin(115200);
  Serial.println();

  preferences.begin("Credentials", false);

  ssid = preferences.getString("SSID", "");
  password = preferences.getString("Password", "");

  if (ssid == "" || password == ""){
    Serial.println("No values saved for network credentials");
  }
  else {
    // Connect to Wi-Fi
    WiFi.mode(WIFI_STA);
    WiFi.begin(ssid.c_str(), password.c_str());
    Serial.print("Connecting to WiFi ..");
    while (WiFi.status() != WL_CONNECTED) {
      Serial.print('.');
      delay(1000);
    }
    Serial.println(WiFi.localIP());
  }
}

void loop() {
  // put your main code here, to run repeatedly:
}
How does the Code Work?
We will start by importing the Preferences library and the WiFi library because we have to connect our ESP32 board to our local network. Also, we will create the instance of the Preferences library named ‘preferences.’
#include <Preferences.h>
#include "WiFi.h"
Preferences preferences;
Inside the setup() function, the serial monitor will be initialized at a baud rate of 115200 by using the begin() method.
Serial.begin(115200);Next, we will open the ‘Credentials’ namespace which we created in the previous sketch to hold our WIFI parameters by using the begin() method on the Preferences instance.
preferences.begin("Credentials", false);Then, we will obtain the SSID and Password values that we previously saved by using the getString() method as shown. Notice, that you need to specify the correct name of the keys which you initially gave in the previous sketch when saving the values. These values will get saved in the ‘ssid’ and ‘password’ variables which we defined ahead as string data types.
ssid = preferences.getString("SSID", "");
password = preferences.getString("Password", "");
The getString() method will consist of two arguments. The first argument is the key and the second is an empty string. If we do not receive a SSID or password on the preferences that means no values were saved for the network credentials and this will get displayed on the serial monitor.
if (ssid == "" || password == ""){
    Serial.println("No values saved for network credentials");
  }
Otherwise, we will be able to connect to the WIFI through WiFi.begin() which contains the network credentials which were saved on the preferences. The IP address of the ESP32 will also get displayed on the serial monitor.
else {
  // Connect to Wi-Fi
  WiFi.mode(WIFI_STA);
  WiFi.begin(ssid.c_str(), password.c_str());
  Serial.print("Connecting to WiFi ..");
  while (WiFi.status() != WL_CONNECTED) {
    Serial.print('.');
    delay(1000);
  }
  Serial.println(WiFi.localIP());
}
Demonstration
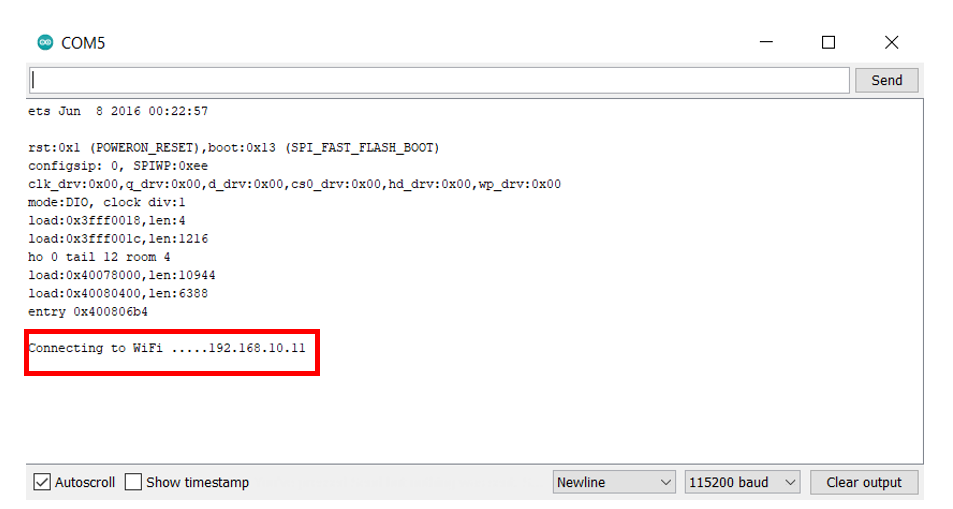
Upload this Arduino sketch to your ESP32 board after you have already uploaded the previous code. Then, press the ENABLE button on your module. Open the serial monitor to view the message “Connecting to WiFi …” and then the IP address of your development board will also be displayed beside it.
ESP32 Remembering the Last GPIO state after a Reset
In this section, we will see an example that utilizes the Preferences library to save the last state of the GPIO pins on the ESP32 board. Typically, when the ESP32 board loses power or restarts, the previous state of the output is lost. However, with the Preferences library, the ESP32 will remember and retain its last state even after being powered off or restarted. This feature ensures that the ESP32 maintains its previous output state, providing a seamless and uninterrupted experience, even during power interruptions or restarts.
Recommended reading: Push button with ESP32 – GPIO pins as digital input
For this example, we will use an LED connected to the output GPIO of the ESP32 board and a pushbutton that will control the state of the LED.
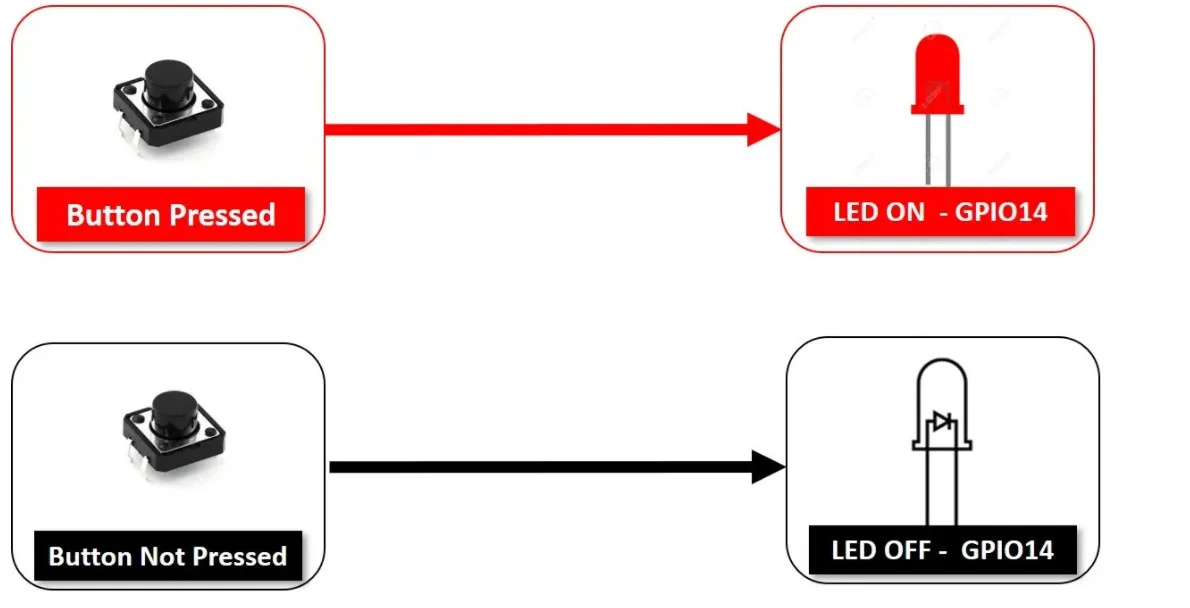
We will save the last state of the LED in the ESP32’s flash memory. The figure below shows the process.

The push-button will be pressed which will cause the LED to turn ON, logic state HIGH (1). Now we will restart the ESP32 board. Normally, after the restart the LED should be OFF but in this case, it will remember its last state and the LED will remain ON.
You will require the following components for this project:
Required Components
- ESP32 module
- One LED
- 220 ohm resistor
- 10k ohm resistor
- Breadboard
- Connecting wires
Schematic Diagram
Assemble your circuit as shown in the schematic diagram below.
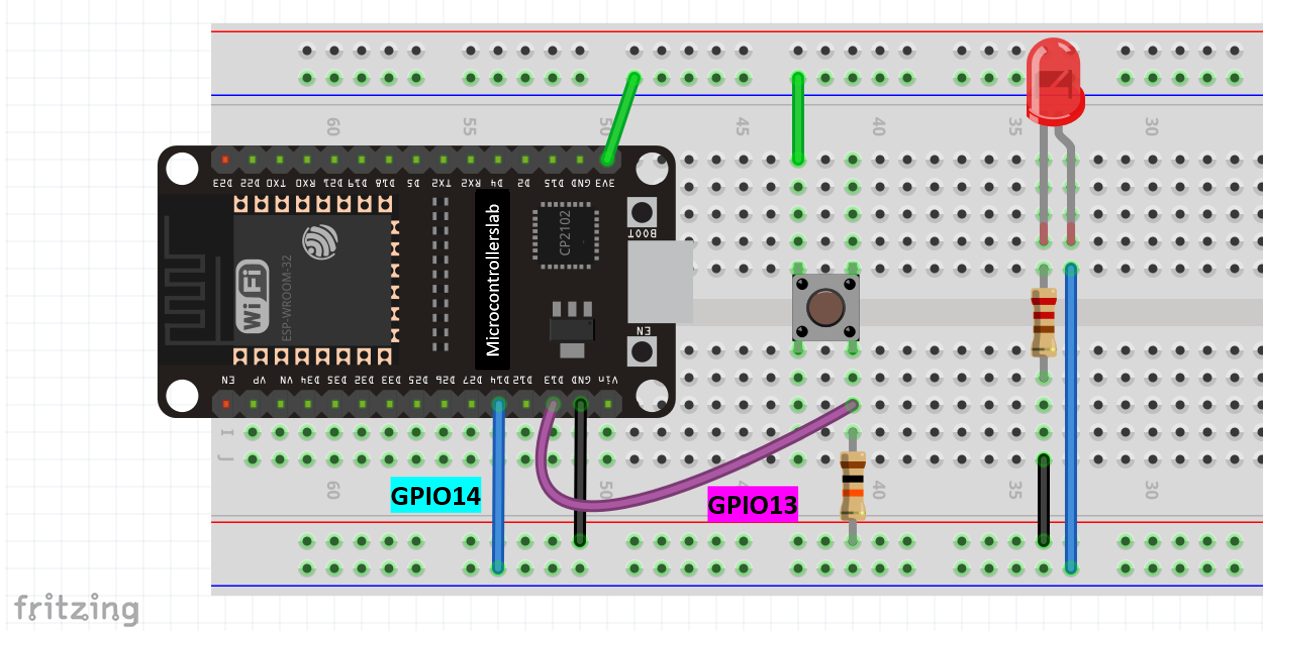
In the setup, we have GPIO 14 connected to the anode pin of an LED, and the cathode pin is linked to the common ground via a 220-ohm resistor. For the push-button, it has four terminals. One terminal is powered by 3.3 volts from the ESP32, while the second terminal connects to GPIO 13 and a 10k ohm resistor, serving as a pull-down resistor. The other end of the resistor is connected to the common ground.
The Arduino sketch given below, will toggle the LED state through the push button and also remember the last state of the GPIO output as we will save it on the Preferences consistently as it continues to change.
ESP32 Code
#include <Preferences.h>

Preferences preferences;

const int push_buttonPin = 13;
const int led_Pin = 14;

bool led_State;
bool buttonState;
int lastButtonState = LOW;

unsigned long lastDebounceTime = 0;  // the last time the output pin was toggled
unsigned long debounceDelay = 50;    // the debounce time; increase if the output flickers

void setup() {
  Serial.begin(115200);


  preferences.begin("GPIO", false);

  pinMode(push_buttonPin, INPUT);
  pinMode(led_Pin, OUTPUT);

  // read the last LED state from flash memory
  led_State = preferences.getBool("state", false);
  Serial.printf("LED state before reset: %d \n", led_State);
  // set the LED to the last stored state
  digitalWrite(led_Pin, led_State);
}

void loop() {
  int reading = digitalRead(push_buttonPin);

  if (reading != lastButtonState) {
    lastDebounceTime = millis();
  }
  if ((millis() - lastDebounceTime) > debounceDelay) {
    if (reading != buttonState) {
      buttonState = reading;
      if (buttonState == HIGH) {
        led_State = !led_State;
      }
    }
  }
  lastButtonState = reading;
  if (digitalRead(led_Pin)!= led_State) {
    Serial.println("State is changed");

    digitalWrite(led_Pin, led_State);

    // save the LED state in flash memory
    preferences.putBool("state", led_State);

    Serial.printf("State saved: %d \n", led_State);
  }
}
How does the Code Work?
The initial parts of the code are similar to the ones which we already discussed before so I will focus on the main parts of the code.
Inside, the setup() function, we will use the begin() method on the Preferences instance to create a storage space for the namespace “GPIO.” We will be able to both read/write this namespace as we have passed false as the second argument inside the method.
preferences.begin("GPIO", false);By using, the getBool() method we will acquire the GPIO state which will was saved on the Preferences and save it in the variable led_State.
led_State = preferences.getBool("state", false); The following line will print this LED state on the serial monitor.
Serial.printf("LED state before reset: %d \n", led_State);

digitalWrite(led_Pin, led_State);
In the infinite while loop, whenever there is a change in the state of the GPIO, the state key which was saved on the Preferences will keep on getting updated.
// save the LED state in flash memory
preferences.putBool("state", led_State);

Serial.printf("State saved: %d \n", led_State);
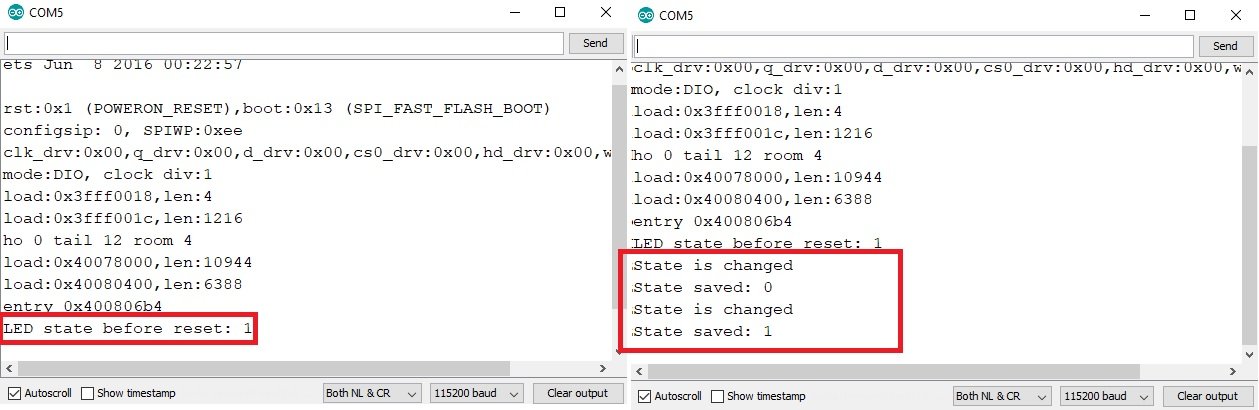
Demonstration
Upload this Arduino sketch to your ESP32 board. After that, press the ENABLE button on your module. Now, press the push button to change the state of the LED. The LED will turn ON.
Now, restart your ESP32 board. After restarting the board, the LED will turn ON again as the ESP32 remembered the last state which was saved on the Preferences.
Open the serial monitor to view the different messages as the states keep on getting updated as you press the push button and restart the board.
Conclusion
In conclusion, we learned how to store data in ESP32 Flash through the Preferences library by following three simple but useful examples. The ESP32’s flash memory is highly helpful for storing key information in permanent memory.
More ESP32 Projects:
- ESP32 WebSocket Server using Arduino IDE – Control GPIOs and Relays
- HTTP GET using ESP32 and Arduino IDE (OpenWeatherMap.org and ThingSpeak)
- ESP32 HTTP POST using Arduino IDE (ThingSpeak and IFTTT)
- ESP32/ESP8266 HTTP Authentication Web Server (Username and Password Protected)
- ESP32 Web Server with SPIFFS (SPI Flash File System)
- ESP32 Asynchronous Web Server using Arduino IDE and ESPAsyncWebServer library
Hy,
in example:
“Example 3: Remembering the Last GPIO state after a Reset”
will “preferences.end();” not executed. Is that correct? why?
thx
Hi, in the first example in the setup() function there is:
Preferences.begin(“my-app”, false);
I think it should be preferences.begin(“my-app”, false);
(start with low char)
Thanks
3 errors in the original line, so It’s: preferences.begin(“my-app”, false);