In this tutorial, we will learn about the use of loops in LabVIEW. You can use any (for or while) loop after going through this tutorial and doing the tasks assigned. A step-by-step elaboration of the program taken as an example is given in the programming section, and at the end of the tutorial, we have given an assignment exercise that is compulsory for the reader to do If he or she is willing to actually learn programming skills in LabVIEW.
Introduction to Loops in LabVIEW
Loops are used to run a specific part of code iteratively. If you are a user of any programming language, you must be familiar with loops. Some of the most commonly used loops in every programming language are for loops, while loops, and do…while loops. Loops are mostly used in programs where we need the result of a function at various data points. We can update the value of a variable, store values in arrays (we will discuss them in upcoming tutorials), plot graphs (we will discuss plotting in upcoming tutorials), and many more things iteratively. In programming languages, a loop is defined as a sequence of commands that are required to be repeated until a certain condition provided by the programmer is satisfied. After the condition is satisfied, the control flow leaves the loop and stops executing the program over and over again.
Typically, a for loop is used when the number of iterations is known, and a while loop allows the code to be executed repeatedly depending on a Boolean condition. If the condition is true, the code inside the loop is executed, and if it is false, the loop is skipped. While working with loops, one must remember that the condition given to the loop must converge to satisfaction, i.e., if the condition is never going to be satisfied, our loop will run infinitely, and ultimately our program will never stop, which is not a good programming skill.
Programs using Loops in LabVIEW
Let’s now do a simple task that includes loops. Create a program and save it by using the dropdown menu shown below or by pressing “Ctrl+S”.

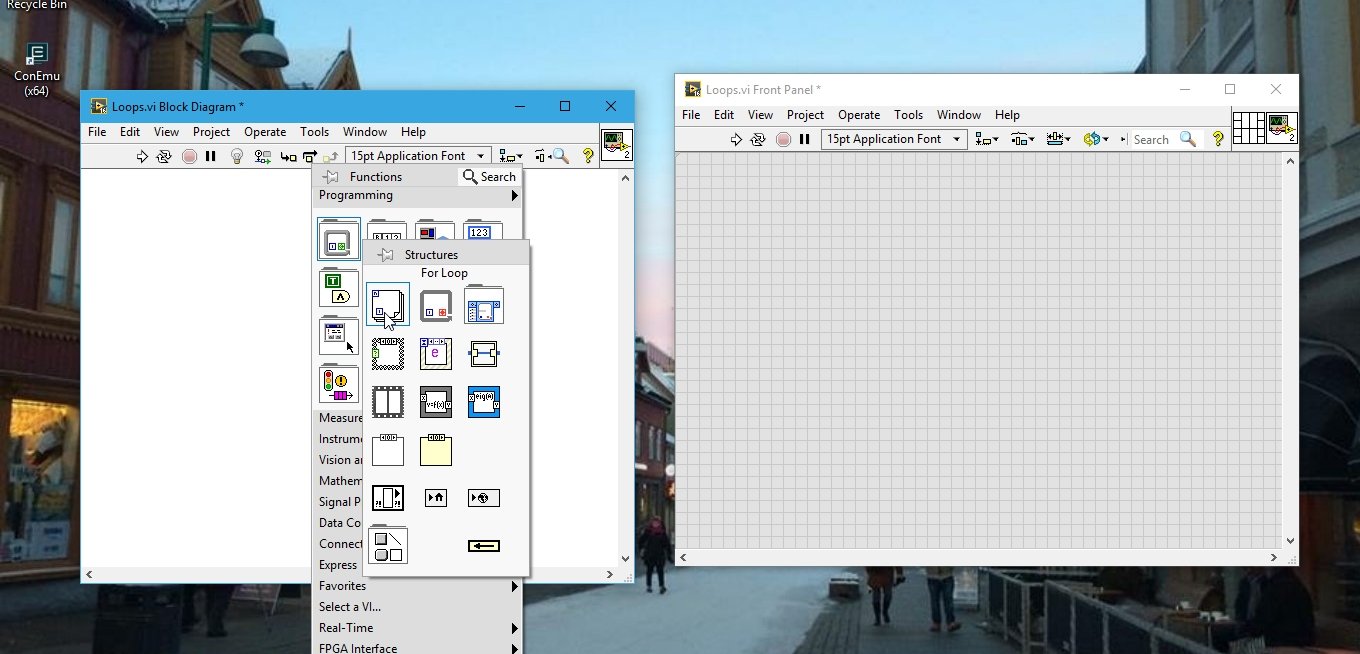
We will write a simple program that will show the iterations of the program in a loop. A for loop block is available in structures in the function palette. Right-click on the block diagram from the function palette, select Structures, and then select for loop, as shown below.
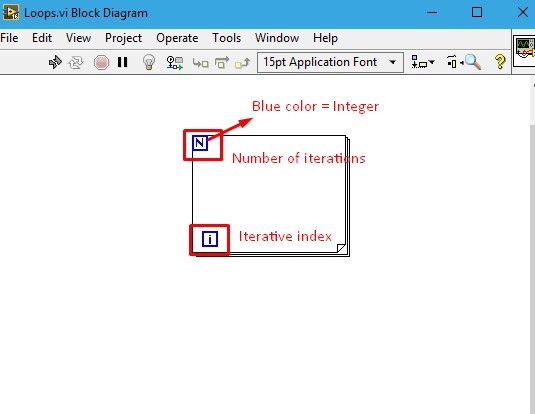
In the function block of the for loop, we can see two small blue boxes, one with the character “i” and the other with the character “N”. The color of the boxes is very important; it represents the data type of the variables. We will study the data types of variables in detail in an upcoming tutorial. The blue color here represents the integer data type of the variable. Coming back to the N and i variables, the “N” variable represents the number of iterations, and “i” is the iterative index. As shown in the figure below.
Loop examples in LabVIEW
In this section, we will provide an example of working with For Loops in LabVIEW.
Blocks and Constants Placement in LabVIEW
- Now let’s do some programming to see the functionality of a “for loop”. From the Function Palette, select Numeric, then Quotient and Remainder, and place this block inside the loop.
- Always place the block inside the for loop; this will tell LabVIEW to process the block iteratively. If the block is just providing input to the loop, then place it outside the loop, and the VI will automatically provide us with a knob to attach to the loop.
- Connect the upper terminal of the quotient and remainders block to the iterative index “i” variable. Now, place a constant value outside the loop and connect it to the loop through the N variable (this constant will provide value to the N, which is the number of iterations).

Not gate Placement in LabVIEW
Now at the second terminal of the quotient and remainder block, connect a constant and set its value to 5, so that the remainder of the block will give a 0 at multiples of 5 and a number otherwise. Now from the Function Palette, select Comparison, and then select the “Equal to 0?” block and place it inside the “for loop” of LabVIEW (VI).

Task
Do yourself: Use the help of LabView to see the working of Quotient and remainder and Equal to 0? Function block.
Test LED Placement in LabVIEW
Now connect the remainder of the quotient and remainder function block to the input of the “Equal to 0?” block. In the Control Palette, select Boolean, and then select Square LED.

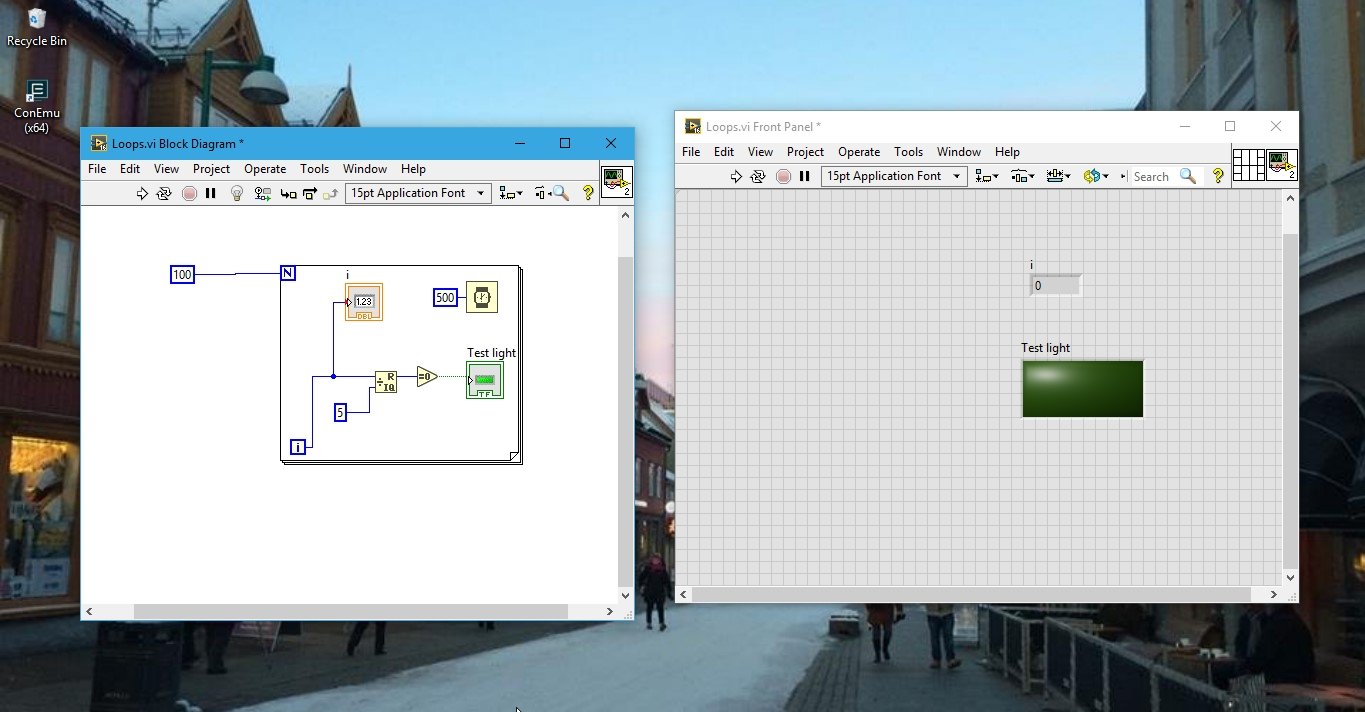
Name this LED as the test light. Connect the block associated with the test light to the output of the “equal to 0” block, and set the iteration constant to 100, as shown in the figure below.

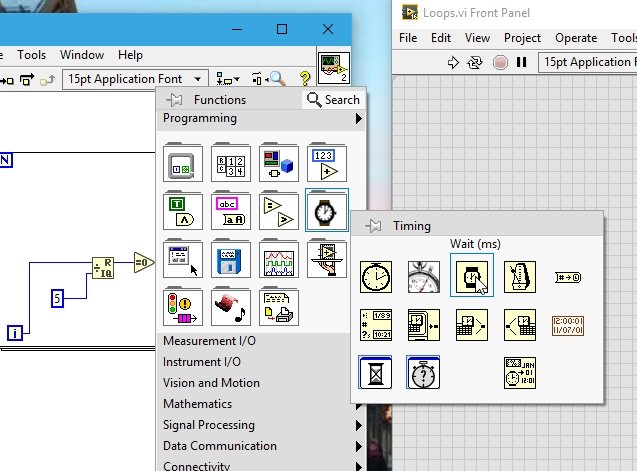
Adding Delay in For Loop LabVIEW
Now, from the Function Palette, select Timing, then Wait (ms), and place it also inside the for loop of LabVIEW (VI). At the input of this block, place a constant and set a value for it. The purpose of this block is to make iterations. Let’s suppose we set the constant value to 500, then the loop will process the code and wait for 500 ms to increment the next value of “i” to start executing the loop again.
Place a numeric indicator on the front panel and connect it to the iterative index to check the value of “i”. The complete block diagram is shown below in the figure.
Simulating Program in LabVIEW
Run the program using the run button or by pressing <Ctrl+R> in LabVIEW. The test light will blink every multiple of 5, otherwise, it will remain off. See the figure below.

And the test light is off if the iterative index is not a multiple of 5, as shown in the figure below.

Explanation
The program clarifies the use of for loops. If you are an early programmer and are wondering why the LED blinks at multiples of 5. This is because the output of the “Quotient and Remainder” function block is the remainder as well as the quotient when the two input numbers are divided. We connect an “equal to 0?” block to the remainder of this block. The remainder of this block will be 0 when the value of i is a multiple of 5, and a number otherwise.
Now let’s look at the equal to 0? block, which compares the input value to 0. If the input to this block is 0, it gives a logical 1 as output, and if the input is not equal to zero, the output is a logical 0. The LED indicator is a Boolean indicator. It blinks when the input to it is Boolean 1 and remains off if the input is 0. Summing this up in a nutshell shows that when “i” is a multiple of 5, the remainder of I divided by 5 will be zero, which when compared with 0 in the equal to 0 comparator gives a Boolean 1 that when fed to the LED, turns the LED on.
Exercise for Loops in LabVIEW
- Do the above task using a while loop?
(Hint: Instead of N (number of iterations), “while loop” contains a condition that, when satisfied, will stop executing the loop).
Conclusion
In this tutorial, we have discussed the following topics:
- Introduction to loops in LabVIEW.
- Building a Program using loop in LabVIEW.
- Explanation of Program.
- Exercise question.
Related Articles
You may also like to read
- Loop auto-indexing using LabView: tutorial 9
- How to use Loops in Simulink MATLAB: tutorial 7
- Closed Loop Control for a Brushless DC Motor to Run at the Exactly Entered Speed
- DC Motor Control with LabVIEW and Arduino – Tutorial 3
- Sum of N numbers project in labview: tutorial 34
- Difference between while and do while loop
This concludes our article for today. If you face any issues or difficulties while following this tutorial, let us know in the comment section below.