Tutorial 5 of LabVIEW covers the details of structures in LabVIEW. These structures include loops, cases, and sequence structures in LabVIEW. In our last tutorial, we saw how to form a weather station using LabVIEW and Arduino, which shows the ambient temperature and intensity of light on the front panel of LabVIEW. In previous tutorials, we worked on the basics of LabVIEW and its interfacing with Arduino. We used analog and digital read and write blocks, PWM, and controls. They were very basic functions of LabVIEW. In today’s tutorial, we will move to an advanced level and see how to use different structures. They help us iterate some code more than once. These functions give LabVIEW many extra powers as a programming language. We recommend checking out this getting started tutorial on LabVIEW.
We will discuss the following structures here in detail and get ourselves familiarized with their use and their power.
- Loop Structure
- While Loop Structure
- For Loop Structure
- Case Structure
- Sequence Structures
- Flat sequence structure
- Stacked sequence structure
While Loop Structure in LabVIEW
The While loop structure keeps running a program placed inside it until a stop condition is satisfied. We use a loop structure to keep a program running until we press or click a STOP button. The While loop structure keeps on running and generating different values until the program satisfies the STOP condition, which in this case generates a value equal to 50.
- Firstly, create a while loop as follows:

- Then, add a random number generator as shown.

- Now, place a multiply sign as follows:

- For the constant, we will put the value 100 in the block as follows:

- After this, we add a “round of to -infinity” block as shown.

- Now, we will place an “Equal to” block as follows:

- Then put the value 50 in another constant block instead of 100, as done previously.
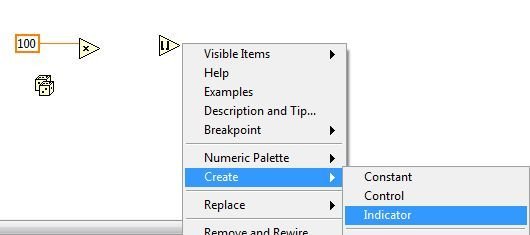
- Finally, for the last component, place an indicator for the output of “round of to -infinity” as follows:
- Lastly, wire the blocks as shown below

- Now run the program, and we will see as soon as the random number generator generates the value 50. The While loop’s condition is satisfied, and the program stops generating further values.

- We have included a “wait timer” so that you can see values being generated on the “front panel” of LABVIEW. Its value is in milliseconds. Here are 200 milliseconds. It introduces a delay of 200 seconds between iterations of the loop.
For Loop Structure in LabVIEW
A for-loop structure repeats the program a specific number of times. In the for loop, we have “N”,” which is the count terminal, and i, which is the iteration terminal. The value of “I” changes from 0 to N-1 each time the loop executes.
- For creating a for loop from structures, we will follow the same procedure as previously done for the while loop using structures.
- Firstly, add a constant number 15 to the input of N.
- Then, place an indicator for the output of iteration “i”.
- Now, create a “wait” timer as done in the while loop.

- Run the program in LabVIEW. We will see on the front panel of LabVIEW that the “current value” keeps increasing. Until it reaches N-1, which is 14 in this case.
- We can also store values of “i” in an array as shown below.
- For this, place an indicator for the output of “i” outside the for loop.
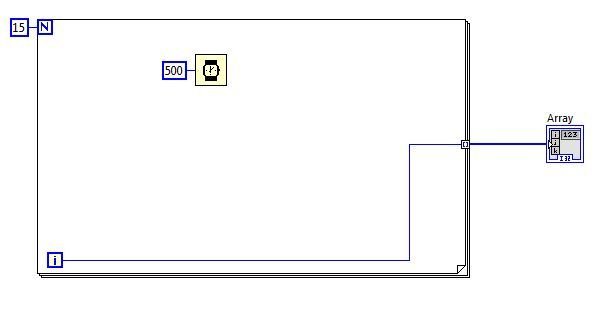
- Run the program in LabVIEW. Here we can see that as the program ends, all the values shift to an array on the front Panel of LabVIEW.

- We can also create graphs from arrays. Draw a block diagram like the one shown below. We can find any block by going to the search bar and typing the name of the block as shown on the top of the blocks, like “pi”.

- Run the program from LabVIEW and observe the graph on the front panel of LabVIEW.

Auto-Indexing a For Loop
When working with arrays, it is often useful to work with each element in the array one at a time, one after the other. LabVIEW will do this automatically whenever we wire an array to an input tunnel in a For Loop if we enable the tunnel for indexing. This is called auto-indexing the For Loop.
- When we enable indexing on the input tunnel, this sets the value of N equal to the number of elements in the array, and one array element enters the For Loop each time the loop cycles.
- When we disable indexing on the input tunnel, the value of N is not set. Thus, it generates an error if the value of N is not set in some other way, and the entire array is sent into the For Loop immediately.
- We can wire arrays with While Loop input tunnels too, but the While Loop does not auto-index.
Case Structure
In LabVIEW, case structures allow specific programming parts to run depending on the value of a variable. We can find case structure in LabVIEW’s structure palette.
- We need to draw two cases, one for true value and the other for false value. They can be selected from the menu of case structures in LabVIEW.
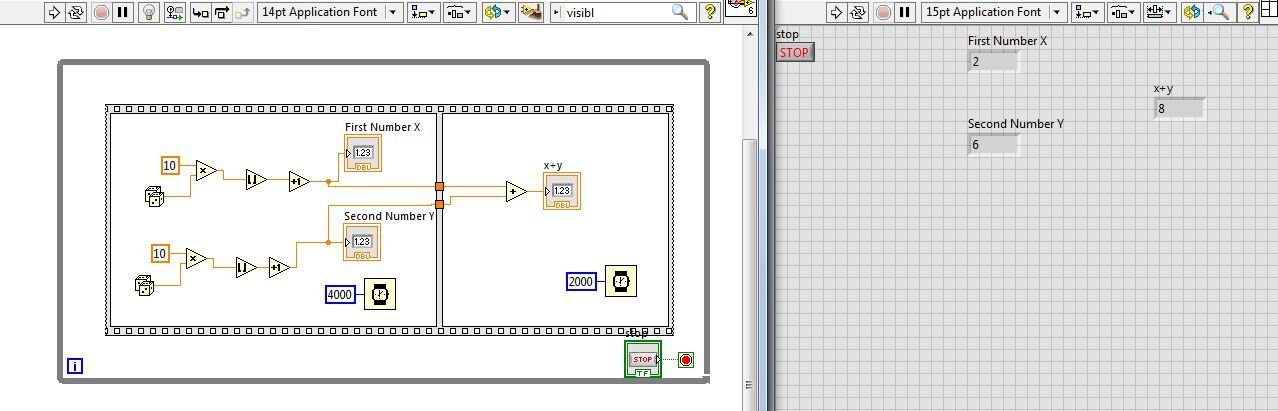
- In this example, we want to calculate the log of a number, as log is defined for only positive values, so we monitor this condition.
- True case is as follows:

- False case is shown below.

- Run the program in LabVIEW and put the value of x first as a positive value in the front panel of LabVIEW and then as a negative value in the front panel of LabVIEW.
- Make sure to run the program with a valid value. Then stop the front panel of LabVIEW (done automatically), change the value in the front panel of LabVIEW, and again run the program to observe both cases in LabVIEW.
- Result of the true case in the front panel of LabVIEW.

- Result of the false case in the front panel of LabVIEW.

Sequence Structure
A sequence structure is useful when we require the execution of some program in sequential order. In LabVIEW, we cannot always control the order of execution. When the next calculation depends on the previous one, we are sure it will occur in the correct order. But when calculations are done in parallel, we cannot control the order in which they take place. A sequence structure is used to force calculations to take place in a defined sequence.
- Form a diagram as shown below.

- Run the program and you will see result like this.
- This program generates the two random numbers for 4 seconds and then displays their addition for 2 seconds.
- In this example, we use the Flat Sequence structure. The Flat Sequence structure shows all of the frames (steps) in the block diagram but can take up a lot of space if there are several frames. The alternative is the Stacked Sequence structure. With the Stack Sequence structure, the frames are still sequential, but they stack on top of each other (like the Case structure). You use the Selector Label to choose the displayed frame.
Conclusion
In this article, we have discussed the following topics:
- Introduction to structures in LabVIEW.
- While loop structure in LabVIEW.
- For loop structure and auto-indexing in LabVIEW.
- Case structures and sequence structures in LabVIEW.
Related Articles
You may also like to read:
- DC Motor Control with LabVIEW and Arduino – Tutorial 3
- UART Communication with Pic Microcontroller( Programming in MPLAB XC8 )
- 4×1 multiplexer design in labview: tutorial 33
- ESP32 Erase Flash Memory Perform Factory Reset
- How to use Loops in Simulink MATLAB: tutorial 7
- VHDL programming if else statements and loops with examples
very useful