In this tutorial, we will learn about the different tools used in LabVIEW and how to control them from the tools palette manually and automatically. We will try to explain the use of every tool with examples and elaborate on its purpose. At the end of this tutorial, we have provided an exercise for you to do on your own, and in the next tutorials, we will assume that you have done those exercises and not explain the concept regarding them.
Introduction to Tools Palette in LabVIEW
The tool palette is available on both the front panel and the block diagram. It creates and modifies a program or VI with the use of tools located on the palette. It may also be used for debugging purposes. In automatic tool selection, the cursor automatically selects which tool to use depending on where we are hovering it. These tools can modify all the blocks on the front panel and block diagram. If the automatic selection is turned off (as discussed below), then we can also choose manually which tools to use according to our needs. On the block diagram, the tools palette is available in the address View >> Tools palette, and the same can be used for the front panel as well.
Those who are already familiar with LabVIEW must know that the mouse cursor changes shape depending on the object it is hovering over. This happens because of the automatic tool selection mode. We can also disable the automatic tool selection mode from the tools palette.

Tools Palette LabVIEW
Create a VI as discussed in Tutorial 1. Two windows will pop up: one is a block diagram, and the other is the front panel. Save the VI for future use by pressing <Ctrl+S>. In the block diagram of the front panel window, select View from the top bar and then select Tools Palette, as shown below.
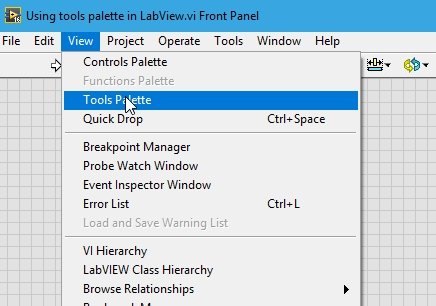
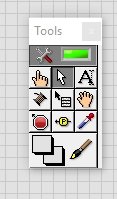
The tools palette menu is shown in the figure below.
Automatic Tools selection
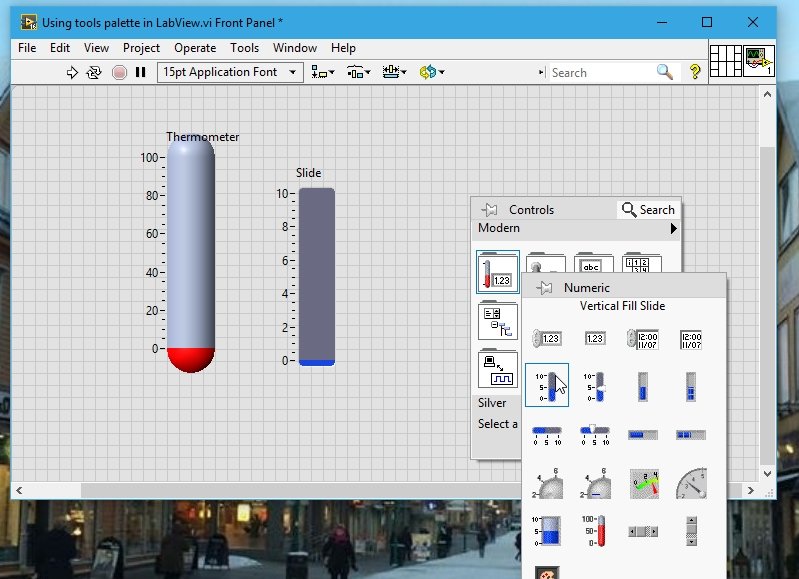
First, place a thermometer or a vertical slide fill on the front panel from the Control Palette section Numeric, as shown in the figure below.
Operate value tool
Now, if we hover over the red portion of the thermometer, the pointer of the mouse will convert to a pointer finger, as shown in the figure below.

This pointer changes the operator value of the scale we are using.
Size and position control tool
So, if we now move the pointer to the edge or corner of the thermometer, it will change to a double-headed arrow, which is used to change the size of the block or indicator. Refer to the figure below.

Selection tool
This tool is useful for changing the position or size of blocks; it is also used to select a block for performing a specific task, and when we hover the cursor on the blank screen of the front panel, LabVIEW will use this tool but with a different icon as shown.

Edit Text tool
Now if we want to change the label of a block or insert a new one, we can move the cursor of the mouse over the label, and it will automatically change the tool to edit text as shown in the figure below.
This tool is useful for editing text on our diagram, whether it is on the front panel or block diagram.
Connect wire
If we want to connect one block to another, when we hover over the block that needs to be connected, the cursor will automatically change to connect wire. Place a constant and an indicator on either of the windows and on the block diagram, hover the cursor over the block and explore this tool.

Manually control tools
From the tools palette, we can also control all these tools manually. In order to avail of this feature, one must stop the automatic tool selection first. For this, simply press the green button from the tools palette; it will stop automatic tool selection. Referring to the figure below.

- If this block is green it represents automatic selection: otherwise, if it is black it shows that the selection is manual.
- In manual selection, we have to select the tool to do an operation in order to perform the task specified for that tool. Let’s use some of the tools from the tool palette and leave some for you to learn on your own as an exercise.
- After switching from the auto selection, the cursor will not switch between tools. For this example, we will not place the cursor on its red portion; rather, we will keep it at the gray portion, and the arrowhead will not change to a finger pointer. See the figure below.

Now if we want to change the value of the thermometer we first have to select the operate tool from the tools palette, see the figure below.

- Same is the case while using, a selection tool, position or size control tool, or edit text tool.
- There are some additional tools present in the tool palette. We can use them to change the appearance of blocks and indicators. These tools can also change the background color of the front panel or make it transparent or gradient.
- Tools used for coloring purposes are get color and set color tools.
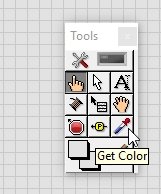
Get color tool in LabVIEW
The tools, on the tools palette, shaped like a dropper is known as a get color dropper, see the figure below,
The purpose of this tool is to pick up any color we like. If we like the color of a block or an indicator and we want to fill another button with the same color, simply place the get color button on the color of choice; it will pick that color up in its memory, and by using the set color tool, we can place it on any other object.
As an example, let’s suppose we want the red color from our thermometer on the Boolean button. For this, place the Get Color button on the red portion of the thermometer and select the color. Now change the tool from the tools palette to Set Color and paint the button you want to color red.

Set Color in LabVIEW
The Set Color tool is useful to set the color of a block, indicator, or background on the front panel.

One of its uses is shown in the example above. We can also set any color of our choice from the scale of colors shown in the figure below.

Firstly, place the tool on the button to color and click right. It will display the scale shown above. Select the desired color from the scale and close the scale.
Exercise:
- Try to explore the remaining tools from the tools palette.
Conclusion
In conclusion, the tools palette in LabVIEW is an essential feature that allows users to create, modify, and debug programs or VIs with ease. Whether it’s automatic tool selection or manual control, the tools palette provides a wide range of options to cater to various needs. From selecting and manipulating objects to editing text and connecting wires, each tool serves a specific purpose in the development process. Additionally, advanced features like the get color and set color tools offer flexibility in customizing the appearance of blocks and indicators. Through this tutorial, we have covered the basics of the tools palette, and it’s now up to you to explore the remaining tools and further enhance your LabVIEW skills.
You may also like to read:
- ESP32/ESP8266 Control Outputs with Web Server and Push Button Simultaneously
- Simulation and design of Three phase Rectifier in Simulink MATLAB
- Guess the number game in labview: tutorial 30
- ESP32 Bluetooth Classic with Arduino IDE: Getting Started Guide
- Digital encoder simulation using Pspice : tutorial 15
This concludes our article. If you face any issues or difficulties let us know in the comments below.