In this tutorial, we will learn about the functionality of sequence structures in LabView and how to place them in the function palette. At the start, we will provide a brief introduction to sequence structures, and after that, we will explain the sequence structures with the help of a VI. At the end of the tutorial, we have provided an exercise for you, and in the next tutorials, we will assume that you have done those exercises, and we will not explain the concept regarding them.
Introduction to Sequence Structures LabVIEW
We have already discussed case structure; the other structure that is used in LabView is “Sequence Structure”. Giving a predetermined order to an action event that leads it to the next event is done in a sequence structure. Any number of actions can be predefined in a sequence structure, but no action can be skipped from a sequence structure.
One or more small portions of a block diagram are included in a sequence structure, or frame of a sequence, which needs to be executed sequentially. Data dependency determines the order of execution of a sequence within each frame of a sequence structure, as in the rest of the block diagram.
Categories of Sequence Structure
LabView categorizes sequence structure into two major types:
- Flat sequence structure
- Stacked sequence structure
It is preferable to focus on data flow rather than sequence structure to control the order of data execution. We will explain data flow in detail in upcoming tutorials. It is preferable to use sequence structures sparingly because they hide the code. Whenever we use a local sequence variable, we break the left-to-right data flow paradigm with sequence structures.
Unlike case structures, there is only one data source available at the output tunnels of a sequence structure. We can take out the output from any of the frames of a sequence structure. Data at the input tunnels of a sequence structure is available to all the frames of a sequence structure, as we have done in case structures, no matter whether we are using a flat sequence or a stacked structure. We will be explain it further in the example portion.
Examples of Using Sequence Structures LabVIEW
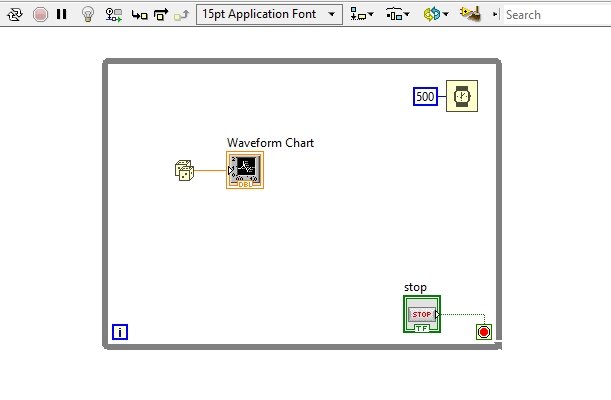
Create a new VI and save it for future use. What we want to do now is design a block diagram that will run a while loop, and at the end of the loop it will display a message that will show “Loop Completed”.
At first, we will design a while loop that will generate random numbers and plot them on a graph. We have already discussed all these things in previous tutorials; hence, we are not going to explain them again. The block diagram of the while loop is as follows:
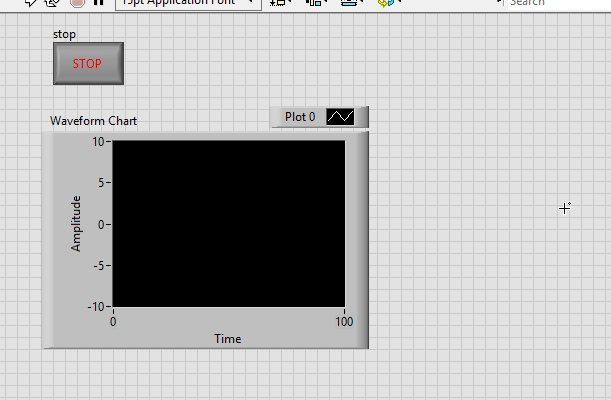
The front panel of this block diagram is shown in the figure below.
Now from the function palette in the block diagram window, select dialog and user interface, and then select one button dialog as shown in the figure below.

The function block of the one-button dialog is shown in the figure below.
On the input side of the one-button dialog, create a constant that will be a string constant by default, and inside the string, write “Loop Completed”.
We want this message to pop up when the loop completes, but when we run the VI, the message will pop up at the instant when the VI is being run, without letting the loop complete first. As shown in the figure below,

This happens because the control doesn’t know which block to run first and which later. It executes the whole block diagram at once. If we want to execute our code in a specified sequence, we must provide it with a sequence.
Flat Sequence Structure
From the function palette, select structures, and then select the flat sequence structure as shown in the figure below.

After selecting the flat sequence structure, drag the cursor over the area you want to be executed first in the block diagram, as shown in the figure below.

After inserting the first sequence, the block diagram will look like the one shown in the figure below.

What’s next? Now, we want to place the one-button dialog in the next block of the execution sequence. The execution of a flat sequence structure is always from left to right. Hence, the implementation of the next blocks to be after the loop must be placed on the right of the while loop.
On the right wall of the flat sequence, right-click and from the dropdown menu select Add frame after, as shown in the figure below.

Block Diagram
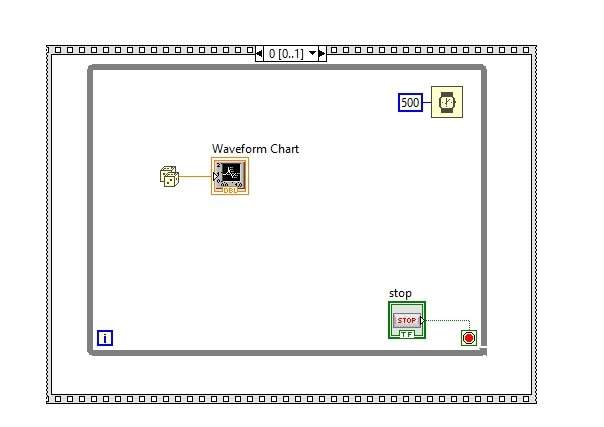
This will add a frame after the main while loop frame of the flat sequence structure. Now, place the one-button dialog inside the second sequence of the flat sequence structure, as shown in the figure below.

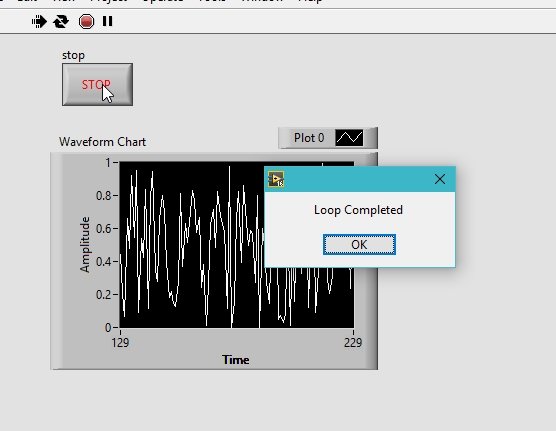
Now, when we run the VI, this will only execute the while loop and display the waveform until we press the stop button and not display the loop completion message because of its lower priority in the sequence. Refer to the figure below.

Now, if we press the stop button, the loop will come to its completion, and hence the first frame of the sequence will also complete, and the control of the VI will move to the next frame of the sequence.
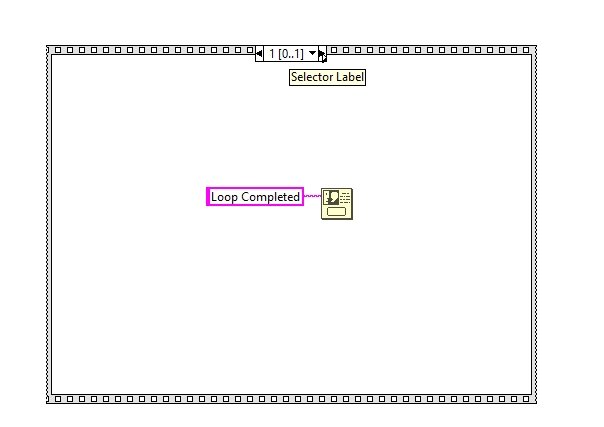
As the next frame includes the loop completion message, a message will pop up as shown in the figure below.
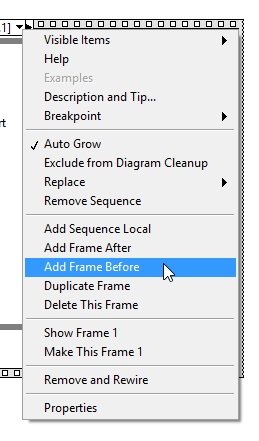
We can arrange the order of execution of as many tasks as we want. If we want to insert a block to be executed before the while loop, then right-click on the left wall of the sequence and select Add Frame Before, as shown in the figure below.

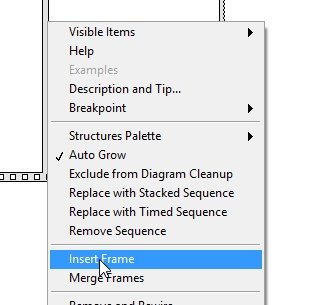
We can also insert a frame in between two already existing frames by right-clicking on the middle wall and then selecting Insert Frame, as shown in the figure below.
Stacked Sequence Structure
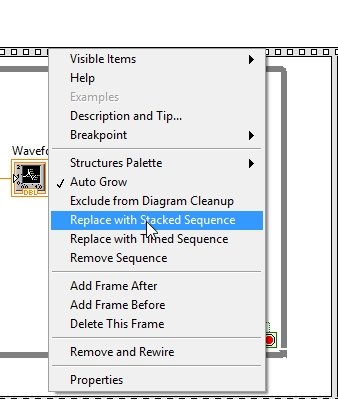
Now, let’s talk about the stacked sequence structure. It is similar to the flat sequence except that the frames are stacked over each other. Right-click on the frame of the flat sequence, and from the drop-down menu, select Replace with stacked sequence, as shown in the figure below.
The block diagram will look like the one shown in the figure below after replacing the flat sequence with a stacked sequence.
The second frame, i.e., the frame with the one-button dialog, is under frame 1, and we can see it by using the selector label as we have done in case structures.
We can also add and remove frames in the stacked sequence, as we have done in the case of the flat sequence. Refer to the figure below.
We don’t recommend “Stacked sequences”. This is because they hide the part of the code that is being executed.
Exercise
- Use time sequence and try to understand its functionality.
(Hint: Change the flat sequence to time sequence as you have change it into stacked sequence)
Conclusion
In conclusion, this tutorial has provided a comprehensive overview of sequence structures in LabVIEW and how to effectively use them in your block diagrams. We have explored the different types of sequence structures, including flat and stacked structures, and discussed their advantages and considerations. By utilizing sequence structures, you can control the order of execution of actions in your code, ensuring that each event follows a predetermined sequence. It is important to use sequence structures judiciously and consider the impact on code readability and maintainability. Additionally, an exercise has been provided to further reinforce your understanding of sequence structures. We hope this tutorial has been informative and helpful in expanding your knowledge of LabVIEW programming.
You may also like to read:
- ESP32 NTP Server-Client: Getting Current Date and Time Arduino IDE
- UART Communication with Pic Microcontroller( Programming in MPLAB XC8 )
- Telegram Control ESP32 and ESP8266 GPIOs and LEDs using Arduino IDE
- 4×4 Keypad Interfacing with TM4C123 Tiva Launchpad
- Headless Setup of Raspberry Pi without Keyboard and Monitor
This concludes today’s article. If you face any issues or difficulties, let us know in the comment section below.