In this tutorial, we will show you how to use ESP32 WiFiMulti library. This allows us to use multiple networks, whereby the ESP32 connects to the strongest WiFi network available from the list. Whenever, it losses connection, it reconnects to the next strongest network on the list. With the help of the ESP32 Arduino WiFiMulti library, we will show you how to easily accomplish this.
We will use Arduino IDE to program our ESP32 development board. Thus, you should have the latest version of Arduino IDE. Additionally, you also need to install the ESP32 plugin.
If your IDE does not have the plugin installed you can visit the link below: Installing ESP32 library in Arduino IDE and upload code.
Recommended Components
The following components are used in this project or are helpful for building it with the ESP32.
| Component | How it’s used in this project | Buy on Amazon |
|---|---|---|
| ESP32 Development Board | Uses the WiFiMulti library to connect to the strongest available Wi-Fi network. | Check Price |
| Micro USB Cable | Programs the ESP32 and powers it during testing. | Check Price |
| Breadboard | Holds the board and any test wiring without soldering. | Check Price |
| Jumper Wires | Connect the ESP32 to peripherals and power rails. | Check Price |
As an Amazon Associate we earn from qualifying purchases. Prices and availability are accurate as of the date/time indicated and are subject to change.
ESP32 WiFiMulti
In order to add multiple networks (SSIDs/passwords) in your projects, you will be required to include a few lines of code in your Arduino sketch. These are shown below:
- The first step is to include the WiFi as well as the WiFiMulti libraries in the sketch. This will allow our ESP32 board to connect with the WiFi as well as add multiple networks inside our sketch.
#include <WiFi.h>
#include <WiFiMulti.h>- The second step is to create an object of WiFiMulti
WiFiMulti wifiMulti;- The third step is to add the different WiFi networks with their SSIDs and passwords. This will be done using the addAP() method on the WiFiMulti object. Here we will specify two parameters. The first parameter is the SSID and the second parameter is the password. You can add as many networks as you want.
Remember this step will be performed inside the setup() function.
wifiMulti.addAP("SSID1", "password1");
wifiMulti.addAP("SSID2", "password2");
wifiMulti.addAP("SSID3", "password3");- The last step is to connect to the WiFi. We will use the run() method on the WiFimulti object, to connect ESP32 with the strongest WiFi connection. This returns the status of the WiFi connection.
The following lines of code will be used in the loop() function to monitor if the ESP32 is connected or not. While the connection is lost, it will print ‘WiFi not connected!’ in the serial monitor, and will try to connect to the next strongest network.
if(wifiMulti.run() != WL_CONNECTED) {
  Serial.println("WiFi not connected!);
  delay(1000);
}
ESP32 WiFiMulti Sketch
The WiFiMulti library provides an example sketch that connects the ESP32 with the strongest WiFi network.
Open Arduino IDE and go to Files > Examples > WiFi > WifiMulti. The sketch adds multiple WiFi networks for the ESP32 board to connect with. The ESP32 connects to the strongest WiFi available from the list of networks. If the connection gets lost, then it reconnects to the next strongest WiFi signal from the list.
We will modify that example sketch to include the RSSI level for each network as well. The Received Signal Strength Indicator (RSSI) of the WiFi networks will clearly show us the strongest WiFi signal. Moreover, we will also scan all the nearby networks available with their RSSI values as well. This will be done by including the example code from WiFiScan (File > Examples > WiFi > WiFiScan) inside our sketch.
#include <WiFi.h>
#include <WiFiMulti.h>

WiFiMulti wifiMulti;

const uint32_t connectTimeoutMs = 10000;

void setup(){
  Serial.begin(115200);
  delay(10);
  WiFi.mode(WIFI_STA);

  wifiMulti.addAP("ssid_from_AP_1", "your_password_for_AP_1");
  wifiMulti.addAP("ssid_from_AP_2", "your_password_for_AP_2");
  wifiMulti.addAP("ssid_from_AP_3", "your_password_for_AP_3");

  // WiFi.scanNetworks will return the number of networks found
  int n = WiFi.scanNetworks();
  Serial.println("scan done");
  if (n == 0) {
      Serial.println("no networks found");
  }
  else {
    Serial.print(n);
    Serial.println(" networks found");
    for (int i = 0; i < n; ++i) {
      Serial.print(i + 1);
      Serial.print(": ");
      Serial.print(WiFi.SSID(i));
      Serial.print(" (");
      Serial.print(WiFi.RSSI(i));
      Serial.print(")");
      Serial.println();
      delay(10);
    }
  }

  Serial.println("Connecting Wifi...");
  if(wifiMulti.run() == WL_CONNECTED) {
    Serial.println("");
    Serial.println("Wi-Fi CONNECTED!");
    Serial.println("IP address: ");
    Serial.println(WiFi.localIP());
  }
}

void loop(){
  if (wifiMulti.run(connectTimeoutMs) == WL_CONNECTED) {
    Serial.print("Connected with: ");
    Serial.print(WiFi.SSID());
    Serial.print(" ");
    Serial.println(WiFi.RSSI());
  }
  else {
    Serial.println("WiFi not connected!");
  }
  delay(1000);
}
ESP32 WiFiMulti Demonstration
Choose the correct board and COM port before uploading your code to the board.
Go to Tools > Board and select ESP32 Dev Module.

Next, go to Tools > Port and select the appropriate port through which your board is connected.

Click on the upload button to upload the code into the ESP32 development board. After you have uploaded your code to the ESP32 development board press its ENABLE button.

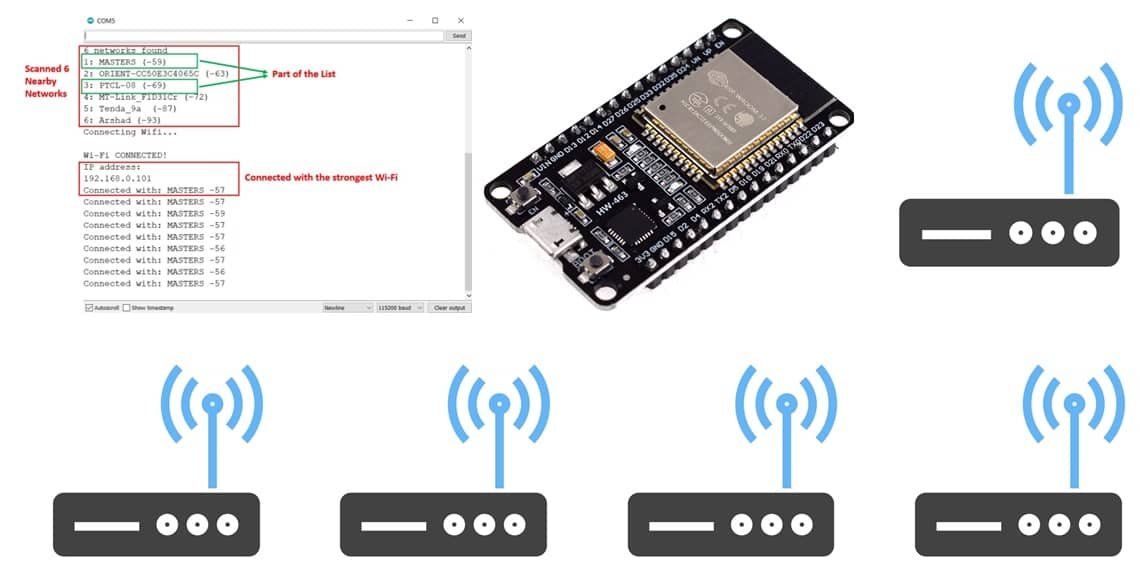
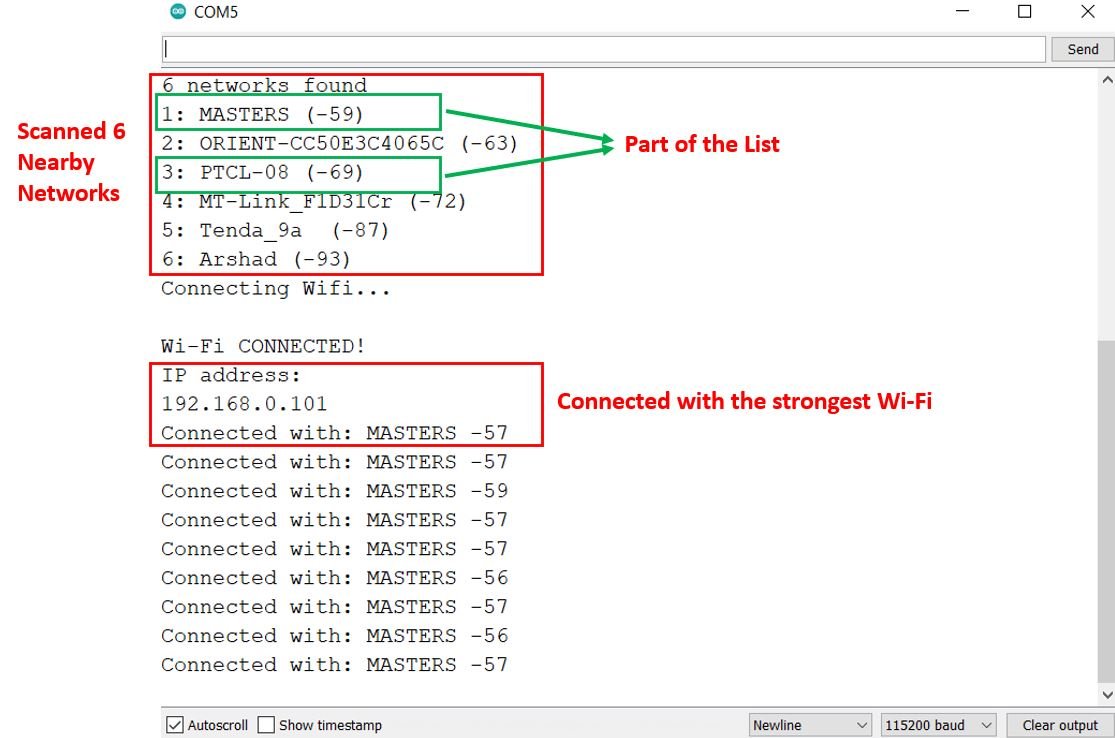
In your Arduino IDE, open up the serial monitor and set the baud rate to 115200. First, all the nearby networks will get scanned. You can view that we obtained 6 networks. The RSSI level of each network can be seen as well. After a few moments, the ESP32 connects with the strongest WiFi network from the list of networks we added in the sketch. You will be able to see the IP address of your ESP32 module after it connects to the strongest WiFi network.
You may also like to read: