In this tutorial, we will learn to use ESP32 SmartConfig for Wi-Fi Provisioning to connect to Wi-Fi network with SmartPhone App and store our Wi-Fi credentials into flash using ESP Touch protocol which works on SmartConfig technology created by Texas Instruments. It uses a mobile app to broadcast the network credentials from a smartphone, or a tablet, to an un-provisioned Wi-Fi device.

Instead of hard coding the Wi-Fi credentials in program sketches and establishing a connection between the Wi-Fi device, SmartConfig easily allows the users to set the Wi-Fi credentials without hard coding them. In order to broadcast the network credentials to the microcontroller, an application based on the ESP Touch protocol is required on your mobile phone. In this user guide we will introduce you to ESP Touch protocol, then demonstrate WiFiSmartConfig example available in Arduino IDE with EspTouch: SmartConfig Application on our mobile phone. Additionally, we will add network credentials storage and reset feature to the sketch as well.
Recommended Components
The following components are used in this project or are helpful for building it with the ESP32.
| Component | How it’s used in this project | Buy on Amazon |
|---|---|---|
| ESP32 Development Board | The main microcontroller board that runs the code for this project. | Check Price |
| Micro USB Cable | Connects the ESP32 to your computer for programming and power. | Check Price |
| Breadboard | Lets you build the circuit without soldering. | Check Price |
| Jumper Wires | Connect the ESP32 to the other components on the breadboard. | Check Price |
As an Amazon Associate we earn from qualifying purchases. Prices and availability are accurate as of the date/time indicated and are subject to change.
ESP-Touch Protocol
“Espressif Systems developed the ESP-TOUCH protocol to seamlessly configure Wi-Fi devices connecting to a router. This is particularly important to headless systems, due to their lack
of a user interface.”
It uses the Smart Config technology to connect ESP32/ESP8266 devices to a Wi-Fi network through a basic configuration on a smartphone. The smartphone needs to be connected to the same Wi-Fi network which you want the ESP module to connect to. Moreover, you will require an application that works on ESP Touch protocol to configure your device. The application asks for the SSID and password from the user, then encodes it and broadcasts the packet format of the network credentials over the air. The ESP module then obtains these data packets, decodes them and connects to the Wi-Fi network using the SSID and password that it obtained. After a successful connection is established, the ESP module notifies the application that it has connected with the Wi-Fi network. This is done by mDNS which multicasts the notification.
Prerequisites
Before we proceed further, you should make sure that you have the latest version of Arduino IDE installed on your system. Moreover, you should also install an ESP32 add-on in Arduino IDE. If your IDE does not have the plugins installed you can visit the link below:
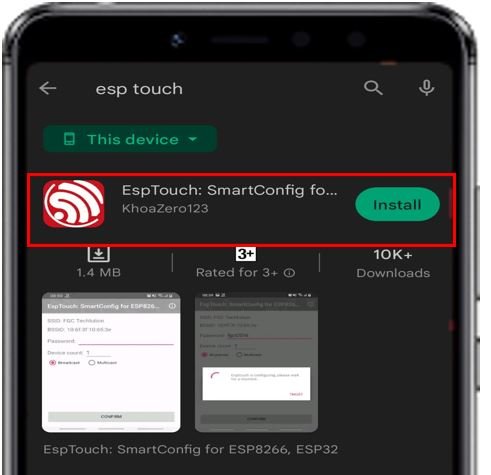
- We will use an Espressif app which uses ESP Touch protocol. ESP Touch communication protocol carries out SmartConfig on the microcontroller. Go to Google Play or Apple Store (if using an iPhone).

Search for ‘Esp Touch’ and install the application EspTouch: SmartConfig for ESP8266, ESP32.
ESP32 SmartConfig Example Code
Lets look at the basic sketch provided in Arduino IDE for SmartConfig to understand how the program works. Head over to File > Examples > WiFi > WiFiSmartConfig
The following sketch opens up.
#include "WiFi.h"

void setup() {
  Serial.begin(115200);

  //Init WiFi as Station, start SmartConfig
  WiFi.mode(WIFI_AP_STA);
  WiFi.beginSmartConfig();

  //Wait for SmartConfig packet from mobile
  Serial.println("Waiting for SmartConfig.");
  while (!WiFi.smartConfigDone()) {
    delay(500);
    Serial.print(".");
  }

  Serial.println("");
  Serial.println("SmartConfig received.");

  //Wait for WiFi to connect to AP
  Serial.println("Waiting for WiFi");
  while (WiFi.status() != WL_CONNECTED) {
    delay(500);
    Serial.print(".");
  }

  Serial.println("WiFi Connected.");

  Serial.print("IP Address: ");
  Serial.println(WiFi.localIP());
}

void loop() {
  // put your main code here, to run repeatedly:

}
How the Code Works?
Firstly, we will include the necessary libraries. As we have to connect to a wireless network and use SmartConfig app hence we need WiFi.h library for that purpose.
#include "WiFi.h"Inside the setup() function, we will open a serial connection at a baud rate of 115200.
Serial.begin(115200);Our ESP32 development board should be working in station mode, hence we will enable both Station (STA) and Access Point (AP) modes using WiFi.mode() function.
WiFi.mode(WIFI_AP_STA);To initiate SmartConfig we will use WiFi.beginStartConfig.
WiFi.beginSmartConfig();Next, we will use a while loop to check if the SmartConfig packet from the mobile app is received or not. Once the data packet is received which means the network credentials have been configured, the while loop is exited and the serial terminal prints ‘SmartConfig received.’
  Serial.println("Waiting for SmartConfig.");
  while (!WiFi.smartConfigDone()) {
    delay(500);
    Serial.print(".");
  }

  Serial.println("");
  Serial.println("SmartConfig received.");
After that we wait for the microcontroller to connect to the Wi-Fi whose credentials were just configured. When a successful connection is established, the serial monitor prints ‘WiFi connected’ message and its IP address.
Serial.println("Waiting for WiFi");
  while (WiFi.status() != WL_CONNECTED) {
    delay(500);
    Serial.print(".");
  }

  Serial.println("WiFi Connected.");

  Serial.print("IP Address: ");
  Serial.println(WiFi.localIP());
Demonstration
Choose the correct board and COM port before uploading your code to the board.
Go to Tools > Board and select ESP32 Dev Module.

Next, go to Tools > Port and select the appropriate port through which your board is connected.about:blank

Next, click on the upload button to upload the code into the ESP32 development board. After you have uploaded your code to the ESP32 development board press its ENABLE button.

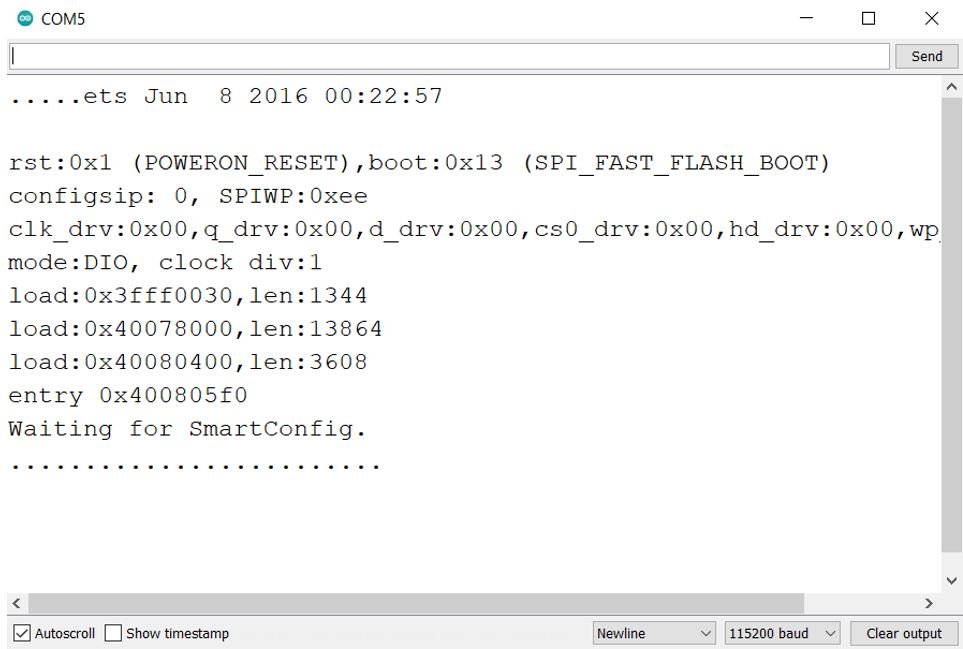
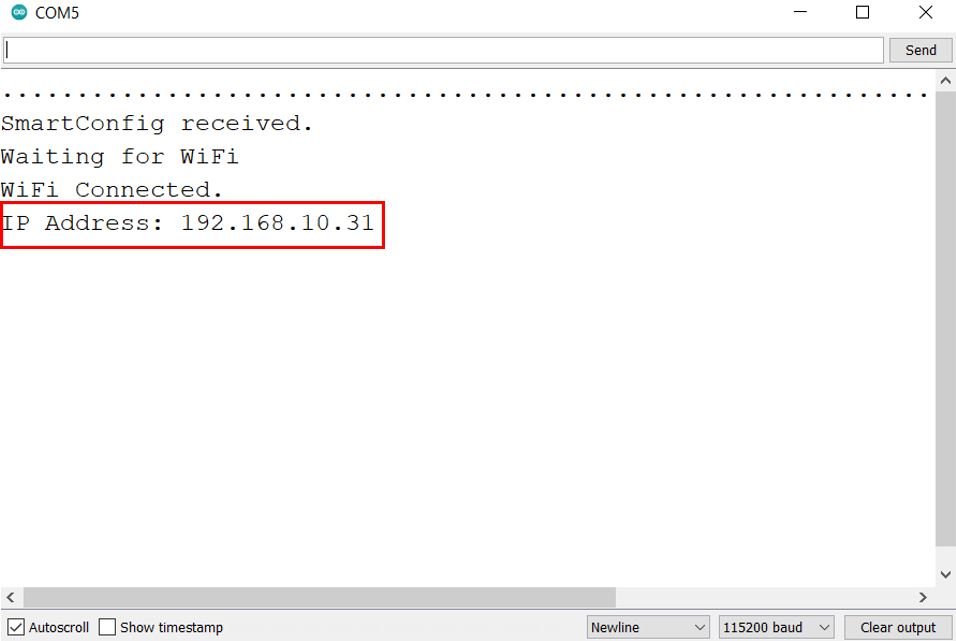
In your Arduino IDE, open up the serial monitor and you will be able to see the following message.
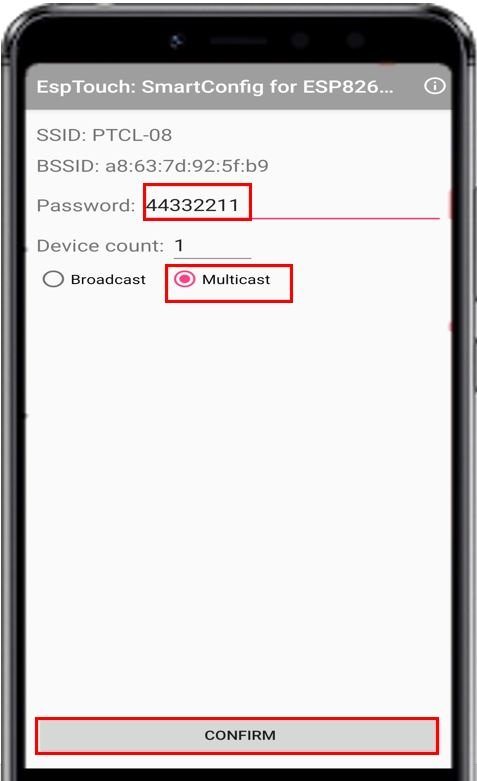
Now lets configure the network credentials by the SmartConfig App. Open the mobile application. Make sure your mobile phone is already connected to the Wi-Fi network. Moreover, turn on the location as well if you are using android.
When you open the ESP Touch app, you will be asked to enter the password of the Wi-Fi network it obtains. Type the Wi-Fi password, select Multicast and click the CONFIRM button.
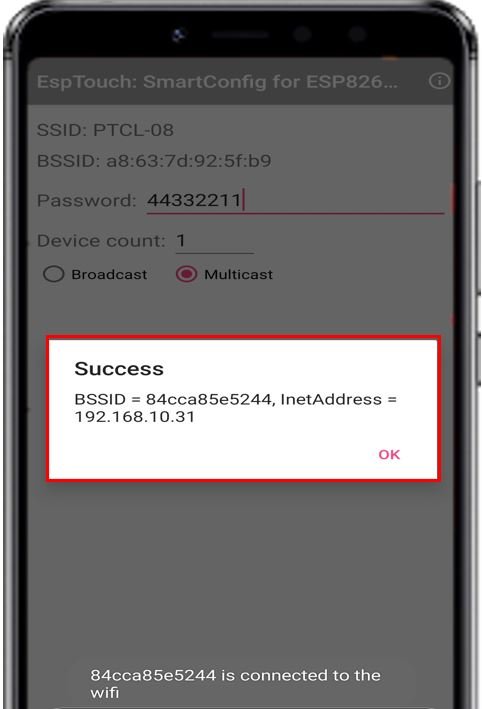
After you click the CONFIRM button, the Esptouch will start configuring.

Once successfully configured, you will be able to view the following message that shows the BSSID and the InetAddress.
The Arduino serial monitor will also display the message that SmartConfig is received. It then waits for the network to connect and upon a successful connection prints the IP address.
ESP32 SmartConfig to store Wi-Fi Credentials to Flash Storage and Reset Functionality
Every time the ESP32 board will restart, the configurations set up in the app will be reset. Therefore, we will again have to configure our device with the Wi-Fi credentials. Lets take this example sketch a step ahead and store the Wi-Fi credentials in the FLASH memory of the microcontroller whenever the device is configured. This way if the ESP32 board restarts, the configuration will still be there and we will not have to configure our device every time.
Additionally, we will setup the BOOT button of our ESP32 board as a reset button. When this button will be pressed for more than 5 seconds, then the Wi-Fi credentials will be wiped off and the board restarts and goes into SmartConfig mode.
#include "WiFi.h"
#include "EEPROM.h"

#define LENGTH(x) (strlen(x) + 1)
#define EEPROM_SIZE 200
#define WIFI_RESET 0
String ssid;
String password;
unsigned long millis_RESET;

void setup() {
  Serial.begin(115200);
  pinMode(WIFI_RESET, INPUT);
  if (!EEPROM.begin(EEPROM_SIZE)) {
    Serial.println("Failed to init EEPROM");
    delay(1000);
  }
  else
  {
    ssid = read_flash(0);
    Serial.print("SSID = ");
    Serial.println(ssid);
    password = read_flash(40);
    Serial.print("Password = ");
    Serial.println(password);
  }

  WiFi.begin(ssid.c_str(), password.c_str());

  delay(3500);

  if (WiFi.status() != WL_CONNECTED)
  {
    WiFi.mode(WIFI_AP_STA);
    WiFi.beginSmartConfig();

    Serial.println("Waiting for SmartConfig.");
    while (!WiFi.smartConfigDone()) {
      delay(500);
      Serial.print(".");
    }

    Serial.println("");
    Serial.println("SmartConfig received.");

    Serial.println("Waiting for WiFi");
    while (WiFi.status() != WL_CONNECTED) {
      delay(500);
      Serial.print(".");
    }

    Serial.println("WiFi Connected.");

    Serial.print("IP Address: ");
    Serial.println(WiFi.localIP());

    ssid = WiFi.SSID();
    password = WiFi.psk();
    Serial.print("SSID:");
    Serial.println(ssid);
    Serial.print("password:");
    Serial.println(password);
    Serial.println("Store SSID & password in Flash");
    write_flash(ssid.c_str(), 0);
    write_flash(password.c_str(), 40);
  }
  else
  {
    Serial.println("WiFi Connected");
  }
}

void loop() {
  millis_RESET = millis();
  while (digitalRead(WIFI_RESET) == LOW)
  {
  }

  if (millis() - millis_RESET >= 5000)
  {
    Serial.println("Reseting the WiFi credentials");
    write_flash("", 0);
    write_flash("", 40);
    Serial.println("Wifi credentials erased");
    Serial.println("Restarting the ESP");
    delay(500);
    ESP.restart();
  }
}


void write_flash(const char* toStore, int startAddr) {
  int i = 0;
  for (; i < LENGTH(toStore); i++) {
    EEPROM.write(startAddr + i, toStore[i]);
  }
  EEPROM.write(startAddr + i, '\0');
  EEPROM.commit();
}


String read_flash(int startAddr) {
  char in[128];
  int i = 0;
  for (; i < 128; i++) {
    in[i] = EEPROM.read(startAddr + i);
  }
  return String(in);
}
How the Code Works?
Firstly, we will include the necessary libraries. As we have to connect to a wireless network and use SmartConfig app hence we need WiFi.h library for that purpose and EEPROM.h as we have to access the ESP32 flash memory for data storage.
#include "WiFi.h"
#include "EEPROM.h"
Next we define the length of the character string, the EEPROM size and the Wi-Fi credential reset pin which is the ESP32 BOOT pin connected with GPIO0.
#define LENGTH(x) (strlen(x) + 1)
#define EEPROM_SIZE 200
#define WIFI_RESET 0
Also, we create two string variables, one to hold the ssid and another to hold the password of the Wi-Fi network. The ‘millis_RESET’ variable will be used to monitor the time the WIFI_RESET pin was pressed.
String ssid;
String password;
unsigned long millis_RESET;
setup()
Inside the setup() function, we will open a serial connection at a baud rate of 115200.
Serial.begin(115200);We will configure the WIFI_RESET pin as an input pin using the pinMode() function.
pinMode(WIFI_RESET, INPUT);Next, we initialize the EEPROM. After a successful initialization of the flash memory according to the set size, we read the SSID and password from the flash and print it on the serial monitor. The SSID is read from address 0 and the password is read from address 40.
  if (!EEPROM.begin(EEPROM_SIZE)) {
    Serial.println("Failed to init EEPROM");
    delay(1000);
  }
  else
  {
    ssid = read_flash(0);
    Serial.print("SSID = ");
    Serial.println(ssid);
    password = read_flash(40);
    Serial.print("Password = ");
    Serial.println(password);
  }
After retrieving the Wi-Fi credentials, we call WiFi.begin() function and pass the ssid and password as parameters inside it. This will connect our ESP32 to the network.
WiFi.begin(ssid.c_str(), password.c_str());If the ESP32 does not connect to the Wi-Fi, then the ESP32 development board is set in station mode, hence we will enable both Station (STA) and Access Point (AP) modes using WiFi.mode() function. To initiate SmartConfig we will use WiFi.beginStartConfig.
if (WiFi.status() != WL_CONNECTED)
  {
    WiFi.mode(WIFI_AP_STA);
    WiFi.beginSmartConfig();
Next, we will use a while loop to check if the SmartConfig packet from the mobile app is received or not. Once the data packet is received which means the network credentials have been configured, the while loop is exited and the serial terminal prints ‘SmartConfig received.’
  Serial.println("Waiting for SmartConfig.");
  while (!WiFi.smartConfigDone()) {
    delay(500);
    Serial.print(".");
  }

  Serial.println("");
  Serial.println("SmartConfig received.");
After that we wait for the microcontroller to connect to the Wi-Fi whose credentials were just configured. When a successful connection is established, the serial monitor prints ‘WiFi connected’ message and its IP address.
Serial.println("Waiting for WiFi");
  while (WiFi.status() != WL_CONNECTED) {
    delay(500);
    Serial.print(".");
  }

  Serial.println("WiFi Connected.");

  Serial.print("IP Address: ");
  Serial.println(WiFi.localIP());
When the ESP32 board successfully connects with the Wi-Fi network, we acquire its SSID and password and store them in the flash memory of the module at the said addresses.
 ssid = WiFi.SSID();
    password = WiFi.psk();
    Serial.print("SSID:");
    Serial.println(ssid);
    Serial.print("password:");
    Serial.println(password);
    Serial.println("Store SSID & password in Flash");
    write_flash(ssid.c_str(), 0);
    write_flash(password.c_str(), 40);
loop()
Inside the infinite loop function, we monitor the time and check if the WIFI_RESET button is pressed for more than 5 seconds. If it is, then we reset the Wi-Fi credentials by storing an empty string in the flash memory for both the SSID and password. The serial monitor prints the message that the Wi-Fi credentials are being reset and erased. Then the ESP module restarts and the configuration process starts again.
void loop() {
  millis_RESET = millis();
  while (digitalRead(WIFI_RESET) == LOW)
  {
  }

  if (millis() - millis_RESET >= 5000)
  {
    Serial.println("Reseting the WiFi credentials");
    write_flash("", 0);
    write_flash("", 40);
    Serial.println("Wifi credentials erased");
    Serial.println("Restarting the ESP");
    delay(500);
    ESP.restart();
  }
}
write_flash()
The write_flash() function is used to store a string in the flash memory of the microcontroller.
void write_flash(const char* toStore, int startAddr) {
  int i = 0;
  for (; i < LENGTH(toStore); i++) {
    EEPROM.write(startAddr + i, toStore[i]);
  }
  EEPROM.write(startAddr + i, '\0');
  EEPROM.commit();
}
read_flash()
The read_flash() function is used to obtain the stored string from the said address in the flash memory of the microcontroller.
String read_flash(int startAddr) {
  char in[128];
  int i = 0;
  for (; i < 128; i++) {
    in[i] = EEPROM.read(startAddr + i);
  }
  return String(in);
}
Demonstration
Choose the correct board and COM port before uploading your code to the board.
Go to Tools > Board and select ESP32 Dev Module.
Next, go to Tools > Port and select the appropriate port through which your board is connected.about:blank
Next, click on the upload button to upload the code into the ESP32 development board. After you have uploaded your code to the ESP32 development board press its ENABLE button.
In your Arduino IDE, open up the serial monitor and you will be able to see that the SSID and password have not been saved yet to the flash memory. Now lets configure the network credentials by the SmartConfig App. Open the mobile application. Enter the password of the Wi-Fi network it obtains. Type the Wi-Fi password, select Multicast and click the CONFIRM button.
The Arduino serial monitor will also display the message that SmartConfig is received. It then waits for the network to connect and upon a successful connection prints the IP address, SSID and password and stores them in the flash memory.

After that long press the BOOT button for 5 seconds and the Wi-Fi credentials are erased. The ESP32 module restarts and goes into SmartConfig mode.

You may also like to read:
(… Now lets configure the network credentials by the SmartConfig App. Open the mobile application. Make sure your mobile phone is already connected to the Wi-Fi network. Moreover, turn on the location as well if you are using android.)
Why do you need to activate the location? Did they forget to write code in the application that would record the location in their server? What idiocy…. Note that exposure by using these applications is intended to collect data in their server and sooner or later there will be use of AI or something more powerful to control/harm you in any way possible. God windows develop ESP32 to automate your solenoid valves of water, gas, power plant, electrical sockets…. etc,what idiot would expose himself through SmartConfig to automate anything other than turning an LED on or off?