This tutorial is about accessing the ESP32 web server from anywhere in the world, and it is also compatible with the ESP8266 development board. You can use the same instructions for the ESP8266 as well. When you create a web server using ESP32 or ESP8266, you usually access it using the IP address within the local area network. But what if you want to access your web server from anywhere in the world? You may be wondering whether it is possible or not to access the web server from any location using the same IP address. The answer is yes, we can access it using a third-party service that will route the ESP32 or ESP8266 IP address from the local area network to be accessible anywhere over the internet. We will show you how to do it in just a few minutes.

If you are using the ESP32 web server to monitor your home devices and other sensor data, you can only access this web server within your local network, if you are connected to the same network as the ESP32 or ESP8266. If you are outside of the home and want to access the web server, you will not be able to do so until you have implemented this guide. Without any delay, let’s now get started with this tutorial.
First of all, in this tutorial, We are not going to explain how to create a web server with ESP32. Because this tutorial is about accessing the ESP32 web server from anywhere in the world, you can check our already posted tutorials on how to make a web server with ESP32.

- Create a simple ESP32 Web Server to control LEDs from a web page
- Monitoring DHT11 and DHT22 sensor values on the Web server with ESP32
- Password-protected Web server with ESP32 in Arduino IDE
Ngrok Service Introduction
Ngrok is a service that allows you to expose a local server to the internet. To access an ESP32 web server from anywhere using Ngrok. Ngrok is a powerful, cross-platform tool that creates secure tunnels to expose local servers to the internet. It facilitates the secure transfer of data between your local development environment and the wider web, enabling you to share web applications, APIs, or any other services running on your machine with others across the globe. Ngrok achieves this by creating a public URL that acts as a gateway to your local server, eliminating the need for complex network configurations or static IP addresses. This makes it particularly useful for developers who want to demonstrate their work to clients, test webhooks, or collaborate with remote teams without deploying their projects to a public server.
How to use Ngrok Service?
Ngrok is straightforward to use. After registering for a free account and obtaining an authentication token, users can run Ngrok from the command line, specifying the local port of the server they want to expose. Ngrok then generates a temporary public URL with HTTPS support, providing a secure connection. While the free plan offers dynamic URLs that change with each Ngrok restart, paid plans offer additional features such as custom domains, reserved subdomains, and enhanced security options. Ngrok’s simplicity and versatility have made it a popular choice in the development community for temporarily sharing and testing locally hosted applications over the internet.
Accessing ESP32 web server from anywhere
Now follow these steps to make your web page accessible from any location. This method will only work if your computer is always on. But you can use a low-cost Raspberry Pi or BeagleBone board to run this software. If you want to use Raspberry, you can follow these guides to headless setup Raspberry Pi:
Now follow these steps:
- First, you need to upload the code given below to the ESP32 board and obtain the IP address of the ESP32 web server.
- Additionally, you need to change the port number to any number other than 80. This is necessary because, in all the previous ESP32 web server projects, port number 80 was used.
- To make the web server accessible from anywhere, we are using the ngrok service. However, please note that ngrok will not function properly if you use port 80. Unfortunately, I don’t know the exact reason behind this limitation. Therefore, we highly recommend using a port number other than 80. One alternative is to use port 8888. To make this change, modify the following line:
WiFiServer server(8888); // Use port number 8888 instead 80- Now copy this code and upload it to ESP32 using Arduino IDE.
#include <WiFi.h>
const char* ssid = "Replace_with_your_wifi_name";
const char* password = "Replace_with_your_wifi_password";
WiFiServer server(8888);
String header;
void setup() {
Serial.begin(115200);
Serial.print("Connecting to ");
Serial.println(ssid);
// Connect to WiFi
WiFi.begin(ssid, password);
while (WiFi.status() != WL_CONNECTED) {
delay(500);
Serial.print(".");
}
// Print local IP address and start web server
Serial.println("");
Serial.println("WiFi connected.");
Serial.println("IP address: ");
Serial.println(WiFi.localIP());
server.begin();
}
void loop() {
// Listen for incoming clients
WiFiClient client = server.available();
if (client) { // If a new client connects,
Serial.println("New Client."); // Print a message out in the serial port
String currentLine = ""; // Make a String to hold incoming data from the client
while (client.connected()) { // Loop while the client is connected
if (client.available()) { // If there are bytes to read from the client
char c = client.read(); // Read a byte
Serial.write(c); // Print it out to the serial monitor
header += c;
if (c == '\n') { // If the byte is a newline character
// If the current line is blank, you got two newline characters in a row.
// That's the end of the client HTTP request, so send a response:
if (currentLine.length() == 0) {
client.println("HTTP/1.1 200 OK");
client.println("Content-type:text/html");
client.println("Connection: close");
client.println();
client.println("<!DOCTYPE html>\n");
client.println("<html>\n");
client.println("<body>\n");
client.println("<center>\n");
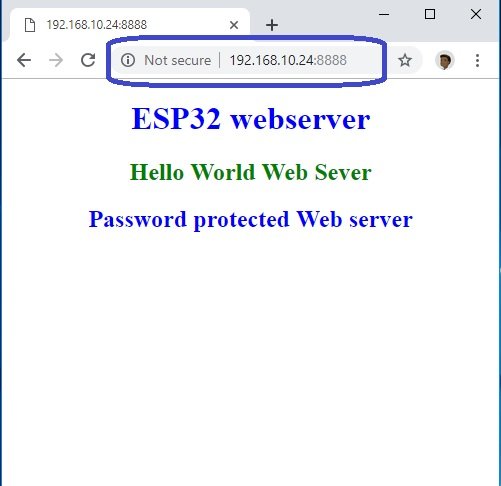
client.println("<h1 style=\"color:blue;\">ESP32 webserver</h1>\n");
client.println("<h2 style=\"color:green;\">Hello World Web Sever</h2>\n");
client.println("<h2 style=\"color:blue;\">Password protected Web server</h2>\n");
client.println("</center>\n");
client.println("</body>\n");
client.println("</html>");
break;
} else { // If you got a newline, then clear currentLine
currentLine = "";
}
} else if (c != '\r') { // If you got anything else but a carriage return character,
currentLine += c; // Add it to the end of the currentLine
}
}
}
// Clear the header variable
header = "";
// Close the connection
client.stop();
Serial.println("Client disconnected.");
Serial.println("");
}
}
- After uploading this code, get the IP address from the serial monitor.
- Now go to any web browser and type this.
http://IP_ADDRESS:8888
You will be able to access the Web server if you have entered the IP address and port number correctly.
Now let’s add the feature of worldwide accessibility.
Using Ngrok tunnel service
You can use a free service known as ngrok which is used as a tunnel to create this feature.
Go to this link and create your account using your email address. Fill in the required details and click on the signup button.

After signing up for the account, go to your email address and activate your account by clicking on the activation link.
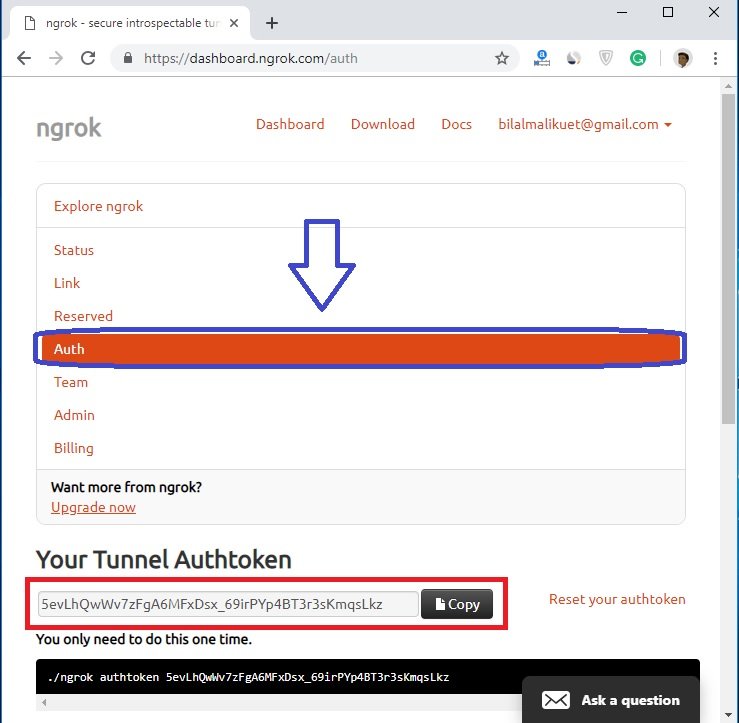
Now log in to your account and click on the ‘Auth’ button to obtain your Tunnel Authtoken as shown in the figure below. Copy this Tunnel Authtoken; we will need it later on.
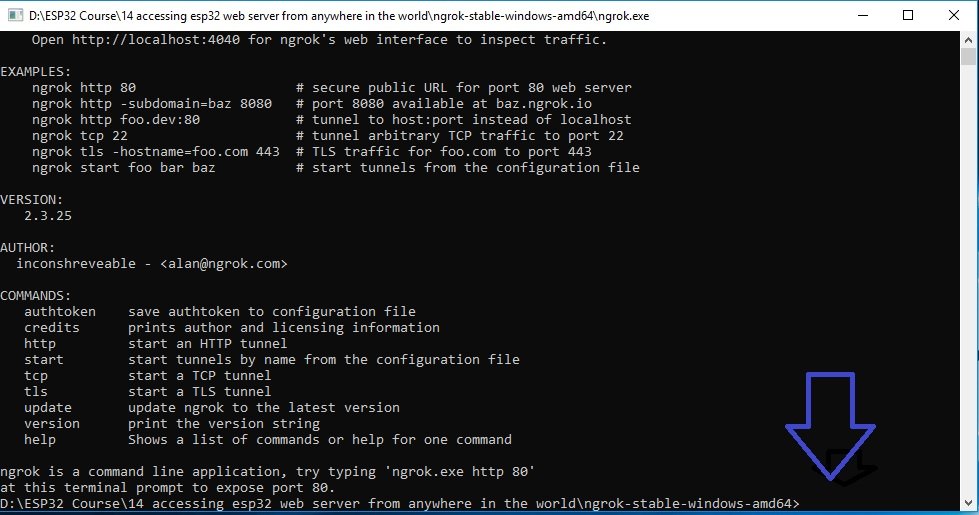
Now click on download button and download this software according to the operating system you are using. After you have done with downloading, you will get a compressed folder. UnZip it using any software. Now double click on an ngrok icon to open it.

If you are using Linux, you can type this command ./ngrok –help in Linux command line to open this software
The specific relevant content for this request, if necessary, delimited with characters: After opening this application, you will see this window’s command line:
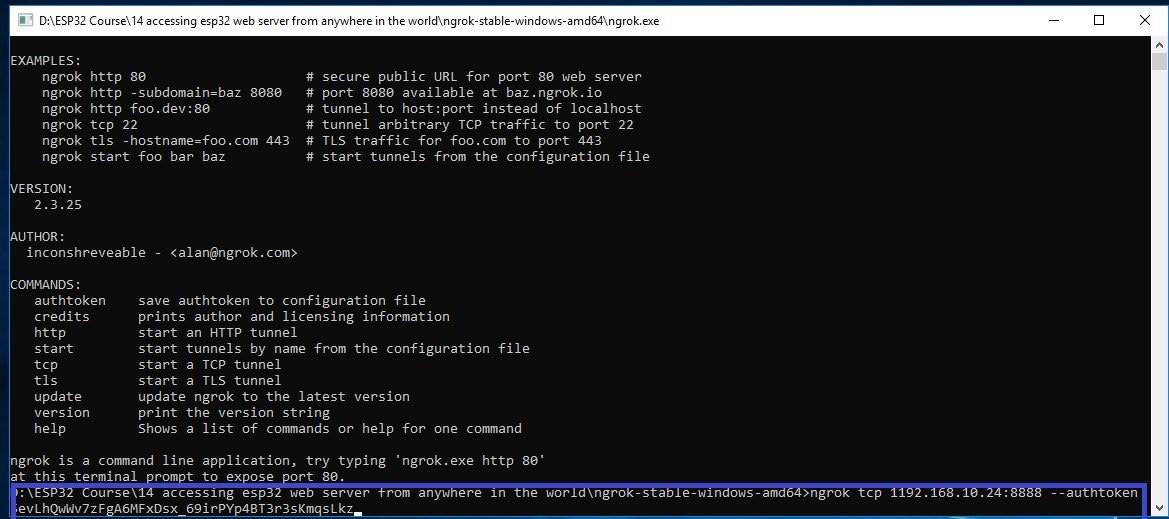
Now enter this line in windows terminal and replace IP_ADDRESS with your ESP32 IP address and TUNNEL_AUTHTOKEN with your ngrok authentication code which we noted in last steps.
ngrok tcp IP_ADDRESS:8888 --authtoken TUNNEL_AUTHTOKEN
After adding my ESP32 IP address and Tunnel token it is how it looks.
ngrok tcp 1192.168.10.24:8888 --authtoken 5evLhQwWv7zFgA6MFxDsx_69irPYp4BT3r3sKmqsLkz
The specific relevant content for this request, if necessary, delimited with characters: This is where you need to paste this command and hit enter.
After you hit the Enter button, you will see this window. This window shows the tunnel URL as highlighted in this picture. We will use this URL to access the web server instead of an IP address.
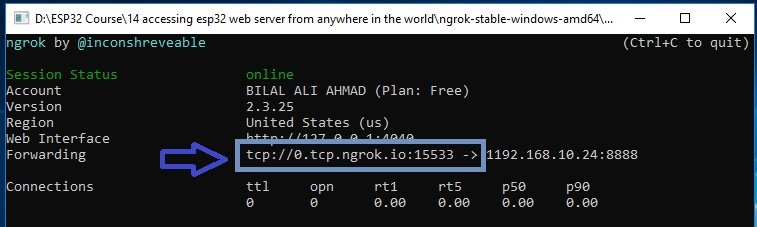
Now you can copy this URL and note it down. You can access the web server from anywhere in the world using this URL.
if you see the URL it is of TCP type tcp://0.tcp.ngrok.io:15533 but you can replace TCP with HTTP and enter the URL in any web browser, you will be able to access the web server.
How to Install Ngrok Tunnel Service on Raspberry Pi
Step 2: Download and Install Ngrok on Raspberry Pi
Open a terminal on your Raspberry Pi.
Download the Ngrok executable for Linux ARM by running the following command:
wget https://bin.equinox.io/c/4VmDzA7iaHb/ngrok-stable-linux-arm.zipUnzip the downloaded file:
unzip ngrok-stable-linux-arm.zipMake the Ngrok executable file executable:
chmod +x ngrokMove the Ngrok executable to a directory in your PATH. For example, you can move it to the /usr/local/bin directory:
sudo mv ngrok /usr/local/bin/Run the following command in the terminal to authenticate Ngrok with your account:
ngrok authtoken YOUR_AUTH_TOKENReplace YOUR_AUTH_TOKEN with the authentication token you obtained when you signed up for Ngrok.
To start a Ngrok tunnel for a local server running on your Raspberry Pi, use the following command:
ngrok http 80Replace 80 with the port number of the local server you want to expose. If your server is running on a different port, adjust the command accordingly.
I hope that you should have got a useful knowledge after reading this guide. you may want to read our other useful ESP32 related lessons.
ngrok not recognized in command window …
Hi
these instructions are for windows
Can Raspberry Pi running Ngrok service be accessed from the remote location too? What if Raspberry Pi restarts because of power outage? Is there a way to avoid using Raspberry Pi and run everything on ESP32?
Can I access two ESP 32 boards with one Authtoken ???
Fo Ngrok service, it is not possible to access without autotoken
That is of course a great solution but is there any way you could connect your ESP32 directly to ngrok or another tunnel service to access the live video feed ? Using a raspberry pi for that isn’t the most convenient solution !
Hi Yannick, I think you need to purchase your own domain and hosting to achieve this function. I will try to post an article on it as soon as possibe.
Have you post the article yet?
is that mean that’s my pc is the host in ngrok ??
what if i shutdown my pc is the server stop?
thanks
Hello. When running the command in dos I Get: ngrok not recognized in command window.
I can’t get the download file to unzip. I downloaded the file twice. I tried winrar and winzip both tell me that the archive is invalid (in so many words). I am running windows 10 64 bit.
Any ideas on what I need to do?
Thanks, Dan
Hi it didn’t let me type in ngrok I am on mac
Hi,
Please check here:
https://gist.github.com/wosephjeber/aa174fb851dfe87e644e
Hi,
When trying to access the website ngrok URL I get a blank website,
would appreciate advice regarding this thanks.
Andre
i have custom domain from ngrok i want to use it with my esp32 + rasberry pi webserver. how can i configure so that i can be able to link my esp32 ip address with domain!? thank you
Hi.
This is a nice project. Thank you so much.
I successfully repeated the project. It worked perfectly.
Could do you please improve it by making accessible from anywhere over the internet?
It could help me since it is a part of my academic project.
Thanks in advance
Hi.
Thank you for the helpful tutorial. But i have a question, what if i use https server in my esp-idf project, the port number in this case is 443 not 80.
the website still be accessed if I close ngrok? Since I close that app, the website can not accessed anymore
Hi, can you show me how to convert TCP link to http?