In this tutorial, we will learn how to add HTTP authentication to ESP32 and ESP8266 web servers using Arduino IDE build with the ESPAsyncWebServer library. In today’s interconnected world, security is paramount, and protecting access to sensitive resources on your Internet of Things (IoT) devices is essential. Whether you’re a hobbyist, a developer, or an IoT enthusiast, understanding how to implement HTTP authentication on your ESP32 and ESP8266 web server will enable you to protect your data and control access effectively. This article will walk you through the step-by-step process of creating a robust and secure web server, ensuring that only authorized users can interact with your IoT device. User can only access the web server with an IP address if he has the correct username and IP password.
HTTP Authentication Introduction
In our previous projects, we have explored the capabilities of ESP32 and ESP8266 web servers, accessible through a public IP address. However, this accessibility poses a significant security risk, as anyone can gain unauthorized access to your webpage and server. Therefore, password protection is extremely vital to make your webpage secure otherwise anyone can access your server.
If you want to make your web server confidential by adding password login information, this tutorial will help you to add the password to your web server. It will make your web server protected and will be accessible through a password and user name only.
To make our project easy to understand, we will create a simple web server to control the onboard LED of ESP32/ESP8266 in Arduino IDE. We will add password protection and logout features through HTTP authentication.
How does HTTP Authentication work?
HTTP Authentication controls access to web resources by requiring users to provide valid credentials before accessing protected content or performing certain actions on a web server. It commonly adds an additional layer of security to web applications, APIs, and IoT devices.
Here’s how HTTP Authentication works:
Client Request: When a user attempts to access a protected resource on the web server, the server responds with a “401 Unauthorized” status code, indicating that authentication is required to proceed.
Server Challenge: In response to the “401 Unauthorized” status code, the server sends an authentication challenge in the form of a “WWW-Authenticate” header in the HTTP response. This header specifies the authentication method(s) supported by the server, such as Basic, Digest, or Bearer.
User Credentials: The user’s web browser (or client application) prompts the user to enter their credentials, typically a username and password. The credentials are then encoded and sent back to the server in the “Authorization” header of the subsequent HTTP request.
Server Verification: Upon receiving the user’s credentials, the server validates them against a preconfigured user database or an authentication backend. If the credentials are valid, the server grants access to the protected resource and responds with the appropriate content (e.g., web page, API response). If the credentials are invalid, the server returns another “401 Unauthorized” status code or denies access with an appropriate error message.
Session Handling (Optional): To avoid repeatedly asking for credentials for subsequent requests, the server may use session cookies or tokens to maintain an authenticated session. This allows the user to access additional protected resources without re-entering credentials until the session expires or the user logs out.
Logout (Optional): When a user wants to end their authenticated session, they can trigger a logout action. This typically involves the server invalidating the session and possibly clearing any session-related data on the client side.
The most commonly used HTTP Authentication method is Basic Authentication, where the user’s credentials are sent as a base64-encoded string over the network. However, it is not the most secure option, especially over unencrypted HTTP connections. Other methods like Digest Authentication and Token-based Authentication offer more security and flexibility.
Overall, HTTP Authentication plays a crucial role in securing web resources and ensuring that only authorized users can access sensitive content and functionalities.
Prerequisites for this tutorial:
You should have the latest version of Arduino IDE. Additionally, you also need to install the ESP32 and the ESP8266 plugin. If your IDE does not have the plugins installed you can visit the link below:
Moreover, you can also have a look at previously uploaded tutorials regarding webservers in ESP32/ESP8266 using Arduino IDE.
ESP32 HTTP Authentication Web Server Project Overview
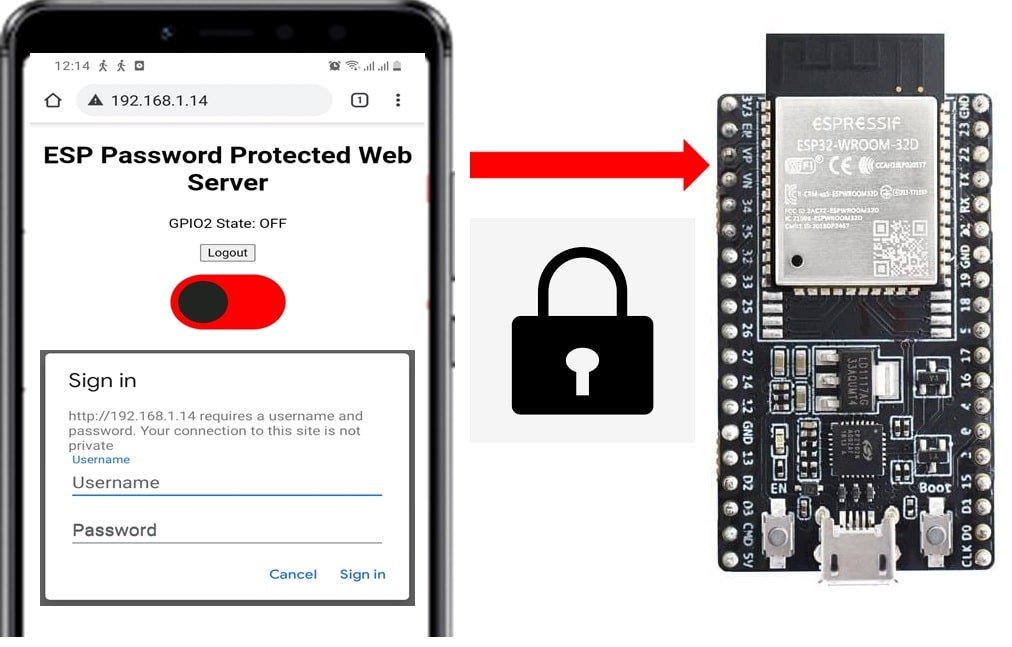
In this tutorial, we will add password protection to an asynchronous web server. The web server will consist of a title ESP WEB SERVER, a logout button, text representing the state of the onboard LED, and a sliding button to toggle the LED.

- Firstly, we will upload our Arduino sketch to our ESP board.
- Then, we will receive an IP address in our serial monitor.
- Secondly, we will copy that IP address in a web browser and press enter. Previously, without any password protection, the webserver would have loaded but not this time. This time we will receive a window that will ask for the username and password.
- Upon entering the correct credentials, we will get access to the web page.
- Inside the web page, you will also find a logout button. By clicking it you will be redirected to the logout page.
- To access the webserver again you will need to log in again.
- The web server can be accessed on multiple devices only through a correct set of usernames and passwords.

Installing ESPAsyncWebServer Library and Async TCP/ ESP Async TCP Library
We will need two libraries to build our web server.
- ESPAsyncWebServer & AsyncTCP for ESP32.
- ESPAsyncwebServer & ESPAsyncTCP for ESP8266.
The ESPAsyncWebServer library will help us in creating our web server easily. With this library, we will set up an asynchronous HTTP server. AsyncTCP (for ESP32 only) and ESPAsyncTCP (for ESP8266 only) library will also be incorporated as it a dependency for the ESPAsyncWebServer library. All of these libraries are not available in the Arduino library manager. Therefore, we will have to download and load them on our ESP32/ESP8266 board ourselves.
ESP32 & ESP8266
- To install the ESPAsyncWebServer library for free, click here to download. You will download the library as a .zip folder which you will extract and rename as ‘ESPAsyncWebServer.’ Then, transfer this folder to the installation library folder in your Arduino IDE.
ESP32 Only
- To install the Async TCP library for free, click here to download. You will download the library as a .zip folder which you will extract and rename as ‘AsyncTCP.’ Then, transfer this folder to the installation library folder in your Arduino IDE.
ESP8266 Only
- To install the ESPAsync TCP library for free, click here to download. You will download the library as a .zip folder which you will extract and rename as ‘ESPAsyncTCP.’ Then, transfer this folder to the installation library folder in your Arduino IDE.
Likewise, you can also go to Sketch > Include Library > Add .zip Library inside the IDE to add the libraries as well. After installation of the libraries, restart your IDE.
ESP32 ESP8266 Arduino Sketch HTTP Authentication Web Server
Open your Arduino IDE and go to File > New to open a new file. Copy the code given below in that file. This code will work for both ESP32 and ESP8266 development boards. You just have to replace the network credentials and have to assign the username and password.
#ifdef ESP32
  #include <WiFi.h>
  #include <AsyncTCP.h>
#else
  #include <ESP8266WiFi.h>
  #include <ESPAsyncTCP.h>
#endif
#include <ESPAsyncWebServer.h>

// Replace with your network credentials
const char* ssid = "PTCL-BB";
const char* password = "44332211";

const char* http_username = "admin";
const char* http_password = "admin";

const char* PARAM_INPUT_1 = "state";

const int output = 2;

// Create AsyncWebServer object on port 80
AsyncWebServer server(80);

const char index_html[] PROGMEM = R"rawliteral(
<!DOCTYPE HTML><html>
<head>
  <title>ESP Password Protected Web Server</title>
  <meta name="viewport" content="width=device-width, initial-scale=1">
  <style>
    html {font-family: New Times Roman; display: inline-block; text-align: center;}
    h2 {font-size: 1.8rem;}
    body {max-width: 600px; margin:0px auto; padding-bottom: 10px;}
    .switch {position: relative; display: inline-block; width: 120px; height: 68px}
    .switch input {display: none}
    .slider {position: absolute; top: 0; left: 0; right: 0; bottom: 0; background-color:  #FF0000; border-radius: 34px}
    .slider:before {position: absolute; content: ""; height: 52px; width: 52px; left: 8px; bottom: 8px; background-color: #212420; -webkit-transition: .4s; transition: .4s; border-radius: 68px}
    input:checked+.slider {background-color: #44f321}
    input:checked+.slider:before {-webkit-transform: translateX(52px); -ms-transform: translateX(52px); transform: translateX(52px)}
  </style>
</head>
<body>
  <h2>ESP Password Protected Web Server</h2>
  <p> GPIO2 State: <span id="state">%STATE%</span></p>
    <button onclick="logoutButton()">Logout</button>
  %BUTTONPLACEHOLDER%
<script>function toggleCheckbox(element) {
  var xhr = new XMLHttpRequest();
  if(element.checked){
    xhr.open("GET", "/update?state=1", true);
    document.getElementById("state").innerHTML = "ON";
  }
  else {
    xhr.open("GET", "/update?state=0", true);
    document.getElementById("state").innerHTML = "OFF";
  }
  xhr.send();
}
function logoutButton() {
  var xhr = new XMLHttpRequest();
  xhr.open("GET", "/logout", true);
  xhr.send();
  setTimeout(function(){ window.open("/logged-out","_self"); }, 1000);
}
</script>
</body>
</html>
)rawliteral";

const char logout_html[] PROGMEM = R"rawliteral(
<!DOCTYPE HTML><html>
<head>
  <meta name="viewport" content="width=device-width, initial-scale=1">
</head>
<body>
  <p>Logged out or <a href="/">return to homepage</a>.</p>
  <p><strong>Note:</strong> close all web browser tabs to complete the logout process.</p>
</body>
</html>
)rawliteral";

// Replaces placeholder with button section in your web page
String processor(const String& var){
  //Serial.println(var);
  if(var == "BUTTONPLACEHOLDER"){
    String buttons ="";
    String outputStateValue = outputState();
    buttons+= "<p><label class=\"switch\"><input type=\"checkbox\" onchange=\"toggleCheckbox(this)\" id=\"output\" " + outputStateValue + "><span class=\"slider\"></span></label></p>";
    return buttons;
  }
  if (var == "STATE"){
    if(digitalRead(output)){
      return "ON";
    }
    else {
      return "OFF";
    }
  }
  return String();
}

String outputState(){
  if(digitalRead(output)){
    return "checked";
  }
  else {
    return "";
  }
  return "";
}

void setup(){
  // Serial port for debugging purposes
  Serial.begin(115200);

  pinMode(output, OUTPUT);
  digitalWrite(output, LOW);

  // Connect to Wi-Fi
  WiFi.begin(ssid, password);
  while (WiFi.status() != WL_CONNECTED) {
    delay(1000);
    Serial.println("Connecting to WiFi..");
  }

  // Print ESP Local IP Address
  Serial.println(WiFi.localIP());

  // Route for root / web page
  server.on("/", HTTP_GET, [](AsyncWebServerRequest *request){
    if(!request->authenticate(http_username, http_password))
      return request->requestAuthentication();
    request->send_P(200, "text/html", index_html, processor);
  });

  server.on("/logout", HTTP_GET, [](AsyncWebServerRequest *request){
    request->send(401);
  });

  server.on("/logged-out", HTTP_GET, [](AsyncWebServerRequest *request){
    request->send_P(200, "text/html", logout_html, processor);
  });

  // Send a GET request to <ESP_IP>/update?state=<inputMessage>
  server.on("/update", HTTP_GET, [] (AsyncWebServerRequest *request) {
    if(!request->authenticate(http_username, http_password))
      return request->requestAuthentication();
    String inputMessage;
    String inputParam;
    // GET input1 value on <ESP_IP>/update?state=<inputMessage>
    if (request->hasParam(PARAM_INPUT_1)) {
      inputMessage = request->getParam(PARAM_INPUT_1)->value();
      inputParam = PARAM_INPUT_1;
      digitalWrite(output, inputMessage.toInt());
    }
    else {
      inputMessage = "No message sent";
      inputParam = "none";
    }
    Serial.println(inputMessage);
    request->send(200, "text/plain", "OK");
  });

  // Start server
  server.begin();
}

void loop() {

}
How does the Code Work?
We have already covered in a previous tutorial how to build an asynchronous web server with sliding buttons to control outputs of the ESP32 module. In this case, we will build an asynchronous web server with only one sliding button to control the GPIO2 of our ESP board. Thus, we will only focus on the code where we are incorporating the HTTP authentication because the rest of the parts are already covered before.
*This code is compatible with both ESP32 and ESP8266 boards except for parts where we are defining the state of the LED. For ESP8266, the onboard LED works on an opposite logic as compared to ESP32. To turn the onboard LED ON, a low signal is sent and to turn it OFF, a high signal is sent. This is the opposite in the case of ESP32.
Importing Libraries
Firstly, we will import all the necessary libraries which are required for this project. As this code is compatible with both ESP32 and ESP8266 thus both libraries ( WiFi.h and ESP8266WiFi.h) are defined. This library will help in establishing the connection between our ESP module to a wireless network. We will also import the two libraries which we installed previously, the ESPAsyncWebServer library and the ESPAsyncTCP library.
#ifdef ESP32
  #include <WiFi.h>
  #include <AsyncTCP.h>
#else
  #include <ESP8266WiFi.h>
  #include <ESPAsyncTCP.h>
#endif
#include <ESPAsyncWebServer.h>
Setting Network Credentials
Next, we will create two global variables, one for the SSID and the other for password. These will hold our network credentials which will be used to connect to our wireless network. Replace both of them with your credentials to ensure a successful connection.
const char* ssid = "ENTER_YOUR_WIFI_NAME";
const char* password = "ENTER_YOUR_WIFI_PASSWORD";
Assigning Username and Password
Then, we will assign our username and password to two global variables of type char. These two values are set by default to ‘admin’ but make sure to change them accordingly. Choose a strong password with a mixture of alphabets, numeric characters, and symbols.
const char* http_username = "admin"; //Replace with your own username
const char* http_password = "admin"; //Replace with your own password
Creating Logout Button
We will create an index_html variable to store all the HTML, CSS, and Javascript text which will be required to build our web page. One of the important features of our web server will be the presence of a logout button. We will define it inside the <html></html>tags.
<button onclick="logoutButton()">Logout</button>As you can see above, the logout button when clicked will call the logoutButton() function. Inside this function, we use the XMLHttpRequest. This will allow us to make an HTTP request in JavaScript.
function logoutButton() {
  var xhr = new XMLHttpRequest();
  xhr.open("GET", "logout", true);
  xhr.send();
  setTimeout(function(){ window.open("/logged-out","_self"); }, 1000);
To make the HTTP GET request to our ESP32/ESP8266 three steps will be followed.
- Firstly, we will create an XMLHttpRequest as follows:
var xhr = new XMLHttpRequest();- Secondly, we will initialize the request by using the xhr.open() method. Inside it, we will pass on three arguments. The first argument specifies the type of HTTP method which is GET in our case. The second argument is the URL to which are ESP32/ESP8266 will request upon. In our case, it is the string ‘logout’ (URL: /logout). The last argument is true which specifies that the request is asynchronous.
xhr.open("GET", "logout", true);- Lastly, we will use xhr.send() to open the connection. Our server (ESP32/ESP8266) will now be able to receive the HTTP GET request whenever the logout button will be clicked.
xhr.send();The following line makes sure that only after a delay of 1 second (1000ms) you will be redirected to the /logged-out URL. This will happen when the user will click the logout button.
setTimeout(function(){ window.open("/logged-out","_self"); }, 1000);Handling Requests with Authentication
Now, comes the important part where the web server will check for user authentication before processing each request. Whenever we will make a request to our ESP board to open the web server it will check for username and password which we defined in the code. The following lines of code will be added after each request.
if(!request->authenticate(http_username, http_password))
    return request->requestAuthentication();
In these lines, you can see that if the username and password are not correct then the browser will keep on prompting until the correct credentials are entered.
Handling Logout Button
Previously, we created the logout button and configured the HTTP GET request. Now, we will handle what will happen when the ESP32/ESP8266 receives the request on the /logout and the /logged-out URL.
After you click the logout button, the web page redirects to the /logout URL as you can see below. We will use the on() method on the server object to listen to the incoming HTTP requests and execute functions accordingly. The send() method will be used to return the HTTP response. The response code 401 will be sent to the client, whenever the server will receive a request on the “/logout” URL. This 401 code denotes an unauthorized client error. Thus, the webpage will log out and you will have to enter the username and password again to access the webserver.
server.on("/logout", HTTP_GET, [](AsyncWebServerRequest *request){
  request->send(401);
});
Next, we also have to deal with the /logged-out URL request which the ESP board will receive after a delay of 1 second. Now, we will use the send_P() method. The handling function will respond to the client by using the send_P() method on the request object. This method will take in four parameters. The first is 200 which is the HTTP status code for ‘ok’. The second is “text/html” which will correspond to the content type of the response. The third input is the text saved on the logout_html variable. Finally, the last parameter is the processor function which will be sent as the response. Thus, the logout page will be built when the ESP32/ESP8266 will receive the /logout request.
server.on("/logged-out", HTTP_GET, [](AsyncWebServerRequest *request){
  request->send_P(200, "text/html", logout_html, processor);
});
Demonstration
Make sure you choose the correct board and COM port before uploading your code to the board. Go to Tools > Board and select ESP32 Dev Module or ESP8266 Module.

Next, go to Tools > Port and select the appropriate port through which your board is connected.

Click on the upload button to upload the code into the ESP32/ESP8266 development board.
After you have uploaded your code to the development board, press its ENABLE button.

In your Arduino IDE, open up the serial monitor and you will be able to see the IP address of your ESP module.

Type that IP address in a web browser (Google Chrome/Firefox) and press enter. The following window will pop up asking for the username and password. Type the correct credentials which you specified in the code and click Sign in.

The following web page will open up.

Slide the button to toggle the onboard LED and the state will also update accordingly.

Click the logout button. Shortly, you will be redirected to the logout page.

You can close the window or click ‘return to homepage’. When you click the latter then you will be redirected to the authentication window.
If you are using Google Chrome as your web browser then you will have to re-enter your username and password to access the web server.
If you are using Firefox as your web browser then you will need to close all the tabs to logout successfully otherwise you will still be logged in.
Summary
In conclusion, we learned a great way to protect our web servers built using the ESPAsyncWebServer library from unauthorized users. With the help of password protection, now we can safely work with our web servers.
Related ESP32 projects and Tutorials:
- ESP32 Web Server with SPIFFS (SPI Flash File System)
- ESP32 web server control relay and 220 volt lamp
- LM35 Temperature Sensor with ESP32 – Web Server
- ESP32 BMP180 Web Server using Arduino IDE
- Getting Epoch/Unix time with ESP32 through NTP server using Arduino IDE
- ESP32 Web Server Control Servo motor with Arduino IDE
- MicroPython: BME680 Web Server with ESP32 and ESP8266
- ESP32 static/fix IP address
Related ESP8266 projects and Tutorials:
Hi? I love this ESP- series you’re doing. Lovely content.
By the way, are there any recommendations for books to learn about these ESPs?
Hi,
Thanks, we are not following any book for this. But you can check our all ESP32 posts here: http://microcontrollerslab.com/category/esp32/
It contains all tutorials starting from beginners to advance levels.
Hi! T tried to use your example and get this errors: “Uncaught ReferenceError: logoutButton is not defined” and “Uncaught ReferenceError: toggleCheckbox is not defined”, logout button and check box dont work
Hi,
Please make sure to copy the complete code.
hey they was a error messege in the code. near hear
String processor(const String& var){
//Serial.println(var);
if(var == “BUTTONPLACEHOLDER”){
String buttons =””;
String outputStateValue = outputState(); //hear was the
// error messege
buttons+= “”;
return buttons;
}
what i did i put this
if(var == “BUTTONPLACEHOLDER”){
String buttons =””;
String outputStateValue =””;//hear
buttons+= “”;
return buttons;
}
and it worked .
can you tell me why .
is it my problem or your code problem
Hi, Microcontrollers Lab
I need your help for my project but I don’t know how to contact you.
I try to make esp32 WebServer to control LED which have authentication login. Also have Admin page to change password. Here are some details .. I hope you can help.
https://forum.arduino.cc/t/esp32-webserver-with-user-and-password-authentication/1117484
Best Regards
Sasha
What kind of LOGIN is this that requires closing browser tabs?
“Note: close all web browser tabs to complete the logout process.”
D’Oh!