In this tutorial, we will learn to create a BME280 web server using ESP32 and Arduino IDE. BME280 is used to measure temperature in Celsius, the temperature in Fahrenheit, humidity, and Pressure. This web server will act as a weather station as it will show temperature, humidity, and pressure readings on the web page. The sensor readings will update automatically on a web page. Because we will build a Server-Sent Events (SSE) server with an asynchronous web server library. The ESP Async Web Server library is pretty straightforward to build asynchronous web servers.
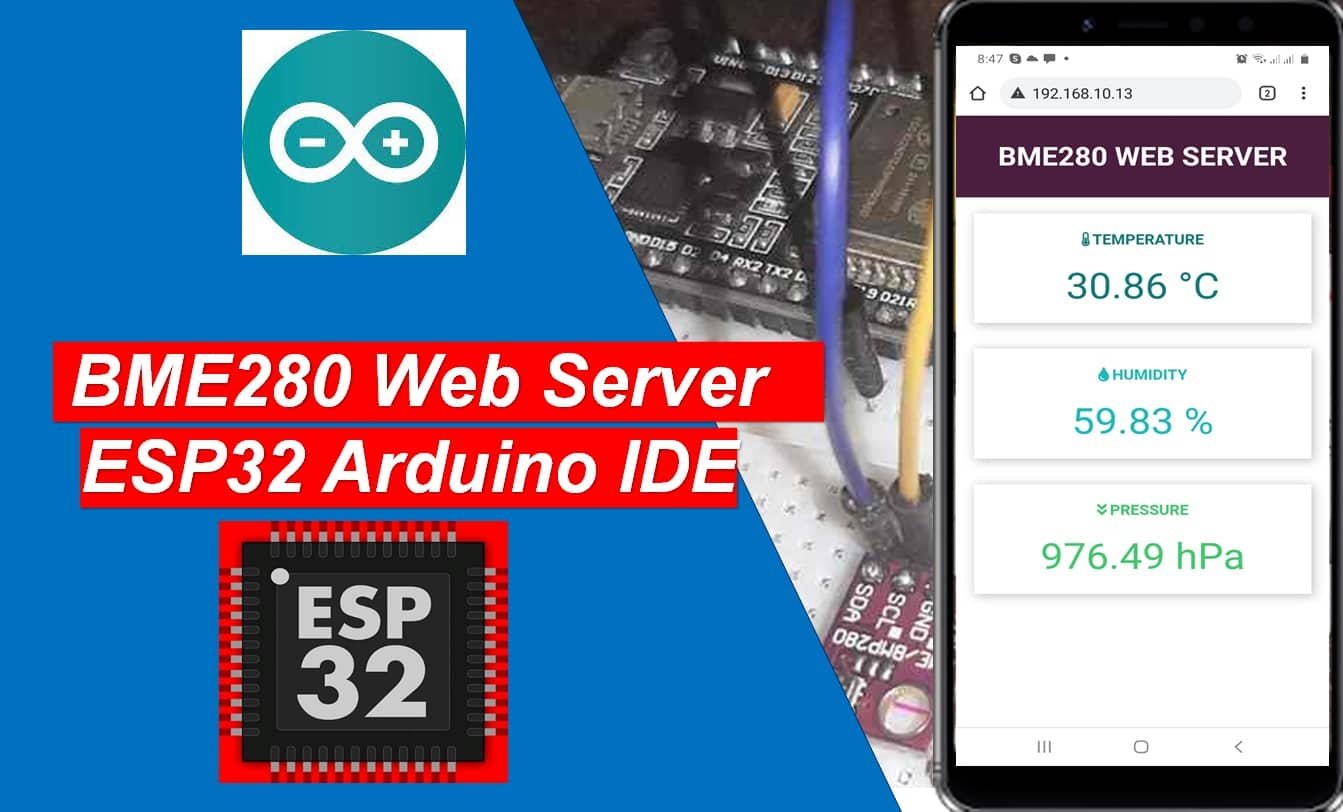
This weather station will show temperature, humidity, and pressure. We will use Arduino IDE to build a responsive EP32 web server that can be accessed through any device which has a web browser, and the ESP32 should be connected to your local area network. That means the mobile or computer should be connected to the same network to which the ESP32 board is connected.
We have a similar guide for ESP32 with MicroPython firmware:
MicroPython: BME280 Web Server with ESP32/ESP8266 (Weather Station)
Recommended Components
The following components are used in this project or are helpful for building it with the ESP32.
| Component | How it’s used in this project | Buy on Amazon |
|---|---|---|
| ESP32 Development Board (DevKit V1) | Reads the BME280 over I2C and serves the temperature, humidity and pressure web server. | Check Price |
| Micro USB Cable | Connects the ESP32 to your computer for flashing the code and powering the board. | Check Price |
| Breadboard | Lets you wire the BME280 sensor to the ESP32 without soldering. | Check Price |
| Jumper Wires | Make the I2C connections between the ESP32 and the BME280 sensor. | Check Price |
| BME280 sensor | Measures temperature, humidity and barometric pressure shown on the web server. | Check Price |
As an Amazon Associate we earn from qualifying purchases. Prices and availability are accurate as of the date/time indicated and are subject to change.
Prerequisites
Before we start this lesson make sure you are familiar with and have the latest version of Arduino IDE installed and also have ESP32 add-on installed in Arduino IDE:
Install ESP32 add-on in Arduino IDE
ESP32 BME280 Web Server Introduction
Have you ever seen a remote monitoring system where an HMI-based system displays remote sensor values? Did you ever try to make a web server that can control or display the values of different sensors on your local server?
If yes, then this tutorial is a getting started step by step guide for you. We will learn the example of interfacing BME280 with ESP32 and how to display temperature, relative humidity, and pressure readings on the web server.
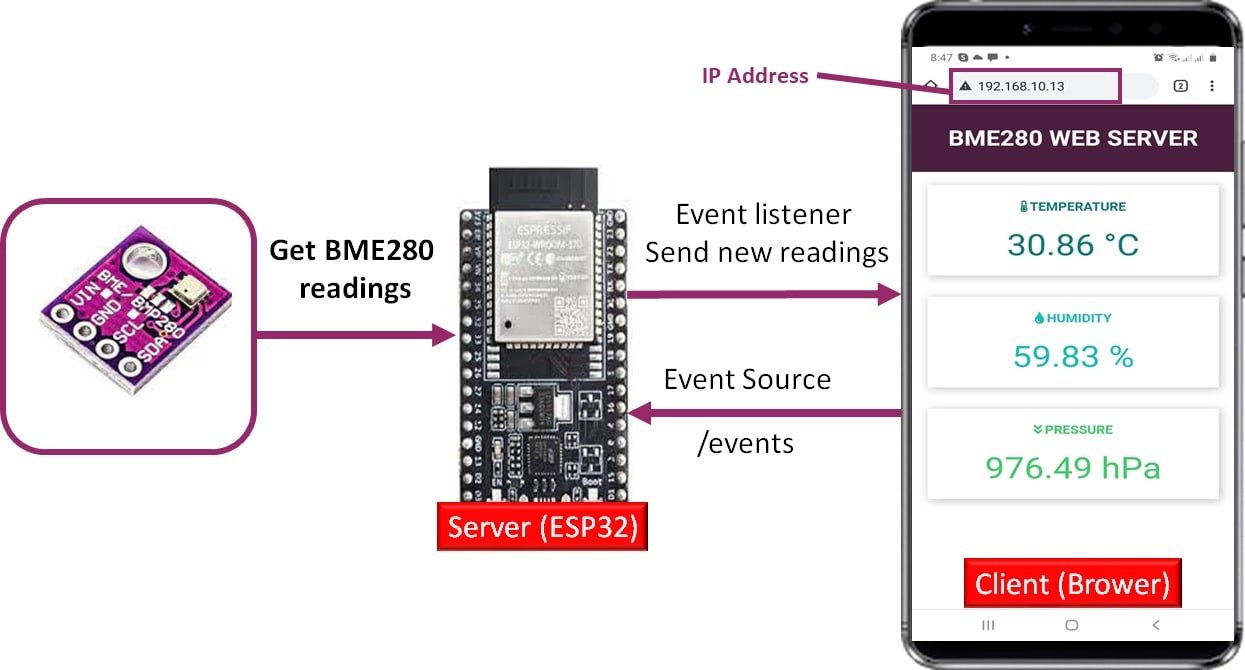
- The client starts the server-sent events connection with ESP32 server as an HTTP request. This will cause the module to send events to the web page.
- ESP32 connected with BME280 receives sensor readings after every 3 seconds.
- These readings are marked as ‘events’ of the following names: ‘temperature’, ‘pressure’ and ‘humidity’.
- These events sent by ESP32 have event listeners associated with them on the client-side. All the updated readings are received by the client on the said events.
- As in the case with SSE, only the ESP32 SERVER will be able to send events to the webpage. The web page gets updated accordingly and the process continues.
BME280 Introduction
The BME280 sensor is used to measure readings regarding ambient temperature, barometric pressure, and relative humidity. It is mostly used in web and mobile applications where low power consumption is key. This sensor uses I2C or SPI to communicate data with the micro-controllers. Although there are several different versions of BME280 available in the market, the one we will be studying uses the I2C communication protocol and SPI.
I2C means Inter-Integrated Circuit and works on the principle of the synchronous, multi-master multi-slave system. With BME280 and the ESP boards, the ESP32 acts as a master, and the BME280 sensor as a slave because it is an external device, acts as a slave. The ESP development boards communicate with the BME280 sensor through the I2C protocol to get temperature, barometric pressure, and relative humidity.
Pinout Diagram
The figure below shows the BME280 sensor and its pinout.
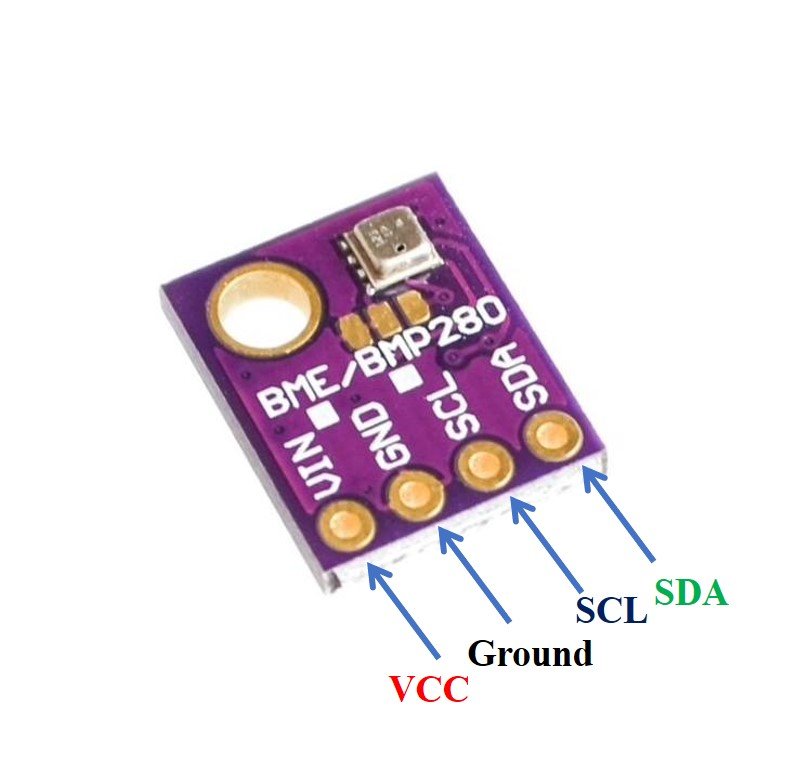
- VCC: connected with 3.3V
- SCL: used to generate the clock signal
- SDA: used in sending and receiving data
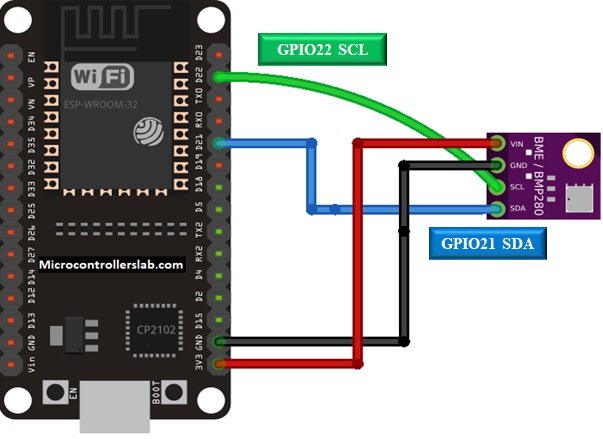
ESP32 and ESP8266 Schematic with BME280
The connection of BME280 with the ESP boards is very easy. We should connect the VCC terminal of BME280 with 3.3V of ESP32, ground with the ground (common ground), SCL of the sensor with SCL of ESP32, and SDA of the sensor with the SDA pin of the ESP module.
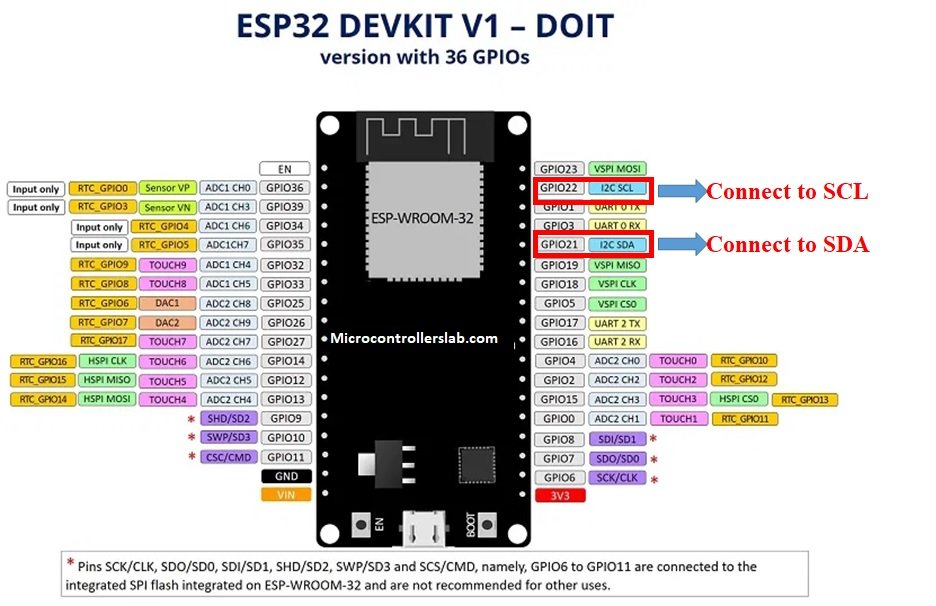
The I2C pin in ESP32 for SDA is GPIO21 and for SCL is GPIO22. The connections between the two devices can be seen below.
| ESP32 | BME280 |
|---|---|
| VCC=3.3V | Vin |
| GPIO21(I2C SDA) | SDA |
| GPIO22(I2C SCL) | SCL |
| GROUND | GROUND |
ESP32 I2C Pins
The I2C pins stated above are set in default. If we want to change the GPIO pins we have to set them in code. The diagrams below show the I2C pins of ESP32 marked with red color rectangles.
For more information on ESP32 pins, refer to the following article:
Interfacing BME280 sensor with ESP32
The connection of BME280 with the ESP32 boards is very easy. We have to connect the VCC terminal with 3.3V, ground with the ground (common ground), SCL of the sensor with SCL of the module, and SDA of the sensor with the SDA pin of the ESP module. The I2C pin in ESP32 for SDA is GPIO21 and for SCL is GPIO22.
Required Components
We will need the following components to connect our ESP32 board with the BME280 sensor.
- ESP32 board
- BME280 Sensor
- Connecting Wires
- Breadboard
Follow the schematic diagram below for the ESP32 module and connect them accordingly.
In some BME280 sensors as seen in the above connection diagram, the SCK terminal means the SCL pin and is connected with its respective GPIO pin on the ESP32. Likewise, the SDI terminal means the SDA pin and is connected with its respective GPIO pin on the board. Vin is connected with a 3.3V pin on the module and both the ESP board and the BME280 sensor are commonly grounded.

Installing BME280 Arduino Library
We will use Arduino IDE to program our ESP32 development board. Thus, you should have the latest version of Arduino IDE. Additionally, you also need to install the ESP32 plugin. If your IDE does not have the plugins installed you can visit the link below:
Installing ESP32 library in Arduino IDE and upload code.
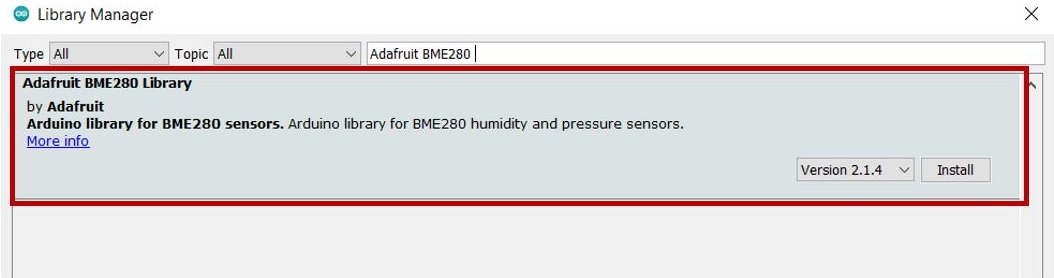
As we are connecting the BME280 sensor with ESP32 so we will have to install BME280 libraries to our module. We will require two libraries for this project:
We will use the Library Manager in our Arduino IDE to install the latest versions of the libraries. Open your Arduino IDE and go to Sketch > Include Libraries > Manage Libraries. Type Adafruit BME280 library name in the search bar and install them both.
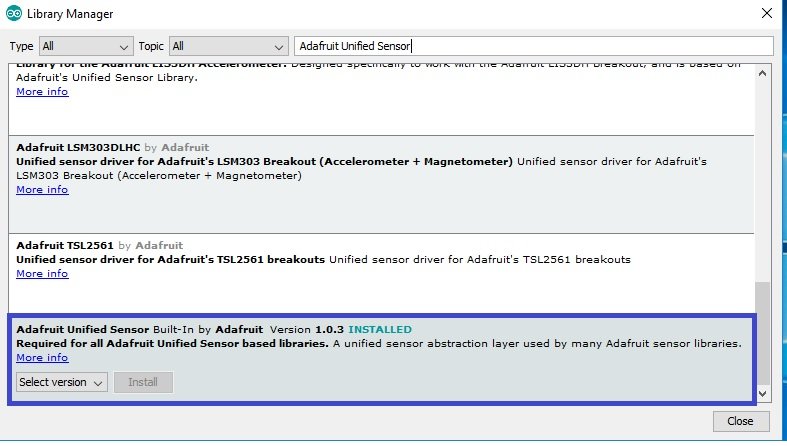
Open your Arduino IDE and go to Sketch > Include Libraries > Manage Libraries. Type Adafruit unified sensor library name in the search bar and install it.
You can learn more about ESP32 interfacing with BME280 here:
BME280 with ESP32 – Display Values on OLED ( Arduino IDE)
Installing ESPAsyncWebServer Libraries
The ESPAsyncWebServer library will help us in creating our web server easily. With this library, we will set an asynchronous HTTP server. AsyncTCP is another library that we will be incorporating as a dependency for the ESPAsyncWebServer library. This library will not be used directly inside our program code and only acts as the base for the first library.
Both of these libraries are not available in the Arduino library manager so we will have to download and load them in the IDE ourselves. We will use GitHub to download the respective libraries and then place them in the library folder of our Arduino IDE.
Click ESPAsyncWebServer library and AsyncTCP library to open the respective GitHub pages for the libraries. The webpage when you open the ESPAsyncWeb Server link will look something like this.

Click the Code button and go to the Download Zip option as highlighted in the figure. Your zip file will get downloaded to your computer right away. After the download is complete, extract the .zip file to the Arduino library folder. A similar process will apply to the installation of the AsyncTCP library as well. Make sure you rename the extracted files as ESPAsyncWebServer and AsyncTCP accordingly.
You can also go to Sketch > Include Library > Add .zip Library inside the IDE to add the libraries as well. Through this procedure now we will be able to use the functionalities of the libraries inside our Arduino IDE.
BM280 Web Server Arduino Code
Copy the following sketch and replace the wifi credentials with your own.
#include <Wire.h>
#include <SPI.h>
#include <Adafruit_Sensor.h>
#include <Adafruit_BME280.h>
#include <WiFi.h>
#include "ESPAsyncWebServer.h"
// Replace with your network credentials
const char* ssid = "Enter_Your_WiFi_Name";
const char* password = "Enter_Your_WiFi_Password";
/*#include <SPI.h> // uncomment his if you are using SPI interface
#define BME_SCK 18
#define BME_MISO 19
#define BME_MOSI 23
#define BME_CS 5*/
#define SEALEVELPRESSURE_HPA (1013.25)
Adafruit_BME280 bme; // I2C
//Adafruit_BME280 bme(BME_CS); // hardware SPI
//Adafruit_BME280 bme(BME_CS, BME_MOSI, BME_MISO, BME_SCK); // software SPI
float temperature;
float humidity;
float pressure;
AsyncWebServer server(80);
AsyncEventSource events("/events");
unsigned long lastTime = 0;
unsigned long timerDelay = 30000; // send readings timer
void getBME280Readings(){
temperature = bme.readTemperature();
pressure = bme.readPressure() / 100.0F;
humidity = bme.readHumidity();
}
String processor(const String& var){
getBME280Readings();
//Serial.println(var);
if(var == "TEMPERATURE"){
return String(temperature);
}
else if(var == "HUMIDITY"){
return String(humidity);
}
else if(var == "PRESSURE"){
return String(pressure);
}
}
const char index_html[] PROGMEM = R"rawliteral(
<!DOCTYPE HTML><html>
<head>
<title>BME280 Web Server</title>
<meta name="viewport" content="width=device-width, initial-scale=1">
<link rel="stylesheet" href="https://use.fontawesome.com/releases/v5.7.2/css/all.css" integrity="sha384-fnmOCqbTlWIlj8LyTjo7mOUStjsKC4pOpQbqyi7RrhN7udi9RwhKkMHpvLbHG9Sr" crossorigin="anonymous">
<link rel="icon" href="data:,">
<style>
html {font-family: Arial; display: inline-block; text-align: center;}
p { font-size: 1.2rem;}
body { margin: 0;}
.topnav { overflow: hidden; background-color: #4B1D3F; color: white; font-size: 1.7rem; }
.content { padding: 20px; }
.card { background-color: white; box-shadow: 2px 2px 12px 1px rgba(140,140,140,.5); }
.cards { max-width: 700px; margin: 0 auto; display: grid; grid-gap: 2rem; grid-template-columns: repeat(auto-fit, minmax(300px, 1fr)); }
.reading { font-size: 2.8rem; }
.card.temperature { color: #0e7c7b; }
.card.humidity { color: #17bebb; }
.card.pressure { color: #3fca6b; }
.card.gas { color: #d62246; }
</style>
</head>
<body>
<div class="topnav">
<h3>BME280 WEB SERVER</h3>
</div>
<div class="content">
<div class="cards">
<div class="card temperature">
<h4><i class="fas fa-thermometer-half"></i> TEMPERATURE</h4><p><span class="reading"><span id="temp">%TEMPERATURE%</span> °C</span></p>
</div>
<div class="card humidity">
<h4><i class="fas fa-tint"></i> HUMIDITY</h4><p><span class="reading"><span id="hum">%HUMIDITY%</span> %</span></p>
</div>
<div class="card pressure">
<h4><i class="fas fa-angle-double-down"></i> PRESSURE</h4><p><span class="reading"><span id="pres">%PRESSURE%</span> hPa</span></p>
</div>
</div>
</div>
<script>
if (!!window.EventSource) {
var source = new EventSource('/events');
source.addEventListener('open', function(e) {
console.log("Events Connected");
}, false);
source.addEventListener('error', function(e) {
if (e.target.readyState != EventSource.OPEN) {
console.log("Events Disconnected");
}
}, false);
source.addEventListener('message', function(e) {
console.log("message", e.data);
}, false);
source.addEventListener('temperature', function(e) {
console.log("temperature", e.data);
document.getElementById("temp").innerHTML = e.data;
}, false);
source.addEventListener('humidity', function(e) {
console.log("humidity", e.data);
document.getElementById("hum").innerHTML = e.data;
}, false);
source.addEventListener('pressure', function(e) {
console.log("pressure", e.data);
document.getElementById("pres").innerHTML = e.data;
}, false);
}
</script>
</body>
</html>)rawliteral";
void setup() {
Serial.begin(115200);
// Set the device as a Station and Soft Access Point simultaneously
//WiFi.mode(WIFI_AP_STA);
// Set device as a Wi-Fi Station
WiFi.begin(ssid, password);
while (WiFi.status() != WL_CONNECTED) {
delay(1000);
Serial.println("Setting as a Wi-Fi Station..");
}
Serial.print("Station IP Address: ");
Serial.println(WiFi.localIP());
Serial.println();
bool status;
// default settings
// (you can also pass in a Wire library object like &Wire2)
status = bme.begin(0x76);
if (!status) {
Serial.println("Could not detect a BME280 sensor, Fix wiring Connections!");
while (1);
}
// Handle Web Server
server.on("/", HTTP_GET, [](AsyncWebServerRequest *request){
request->send_P(200, "text/html", index_html, processor);
});
// Handle Web Server Events
events.onConnect([](AsyncEventSourceClient *client){
if(client->lastId()){
Serial.printf("Client reconnected! Last message ID that it got is: %u\n", client->lastId());
}
// send event with message "hello!", id current millis
// and set reconnect delay to 1 second
client->send("hello!", NULL, millis(), 10000);
});
server.addHandler(&events);
server.begin();
}
void loop() {
if ((millis() - lastTime) > timerDelay) {
getBME280Readings();
Serial.printf("Temperature = %.2f ºC \n", temperature);
Serial.printf("Humidity = %.2f % \n", humidity);
Serial.printf("Pressure = %.2f hPa \n", pressure);
Serial.println();
// Send Events to the Web Server with the Sensor Readings
events.send("ping",NULL,millis());
events.send(String(temperature).c_str(),"temperature",millis());
events.send(String(humidity).c_str(),"humidity",millis());
events.send(String(pressure).c_str(),"pressure",millis());
lastTime = millis();
}
}How does the Code Works?
We will include all the necessary libraries e.g., Wire, SPI, Adaruit_BME280, and Adafruit_Sensor. Additionally, the WiFi and the ESPAsyncWebServer libraries are included to connect to router and create an asynchronous web server, respectively.
#include <Wire.h>
#include <SPI.h>
#include <Adafruit_Sensor.h>
#include "Adafruit_BME280.h"
#include <WiFi.h>
#include "ESPAsyncWebServer.h"
We will specify our network credentials through which ESP32 will connect to WiFi router. The WiFi name and password will be saved in character variables named ssid and password. Make sure to replace the credentials with the ones for your router local network.
// Change according to your network credentials
const char* ssid = "Enter your WiFi name here";
const char* password = "Enter your WiFi password";
Then, we will define the Adafruit_BME280 object named bme by setting it on the default I2C GPIO pins of ESP32. If using SPI protocol instead, make sure to comment the I2C initalization lines and uncomment the lines which are initializing the SPI pins.
/*#include <SPI.h>  // uncomment his if you are using SPI interface
#define BME_SCK 18
#define BME_MISO 19
#define BME_MOSI 23
#define BME_CS 5*/

#define SEALEVELPRESSURE_HPA (1013.25)

Adafruit_BME280 bme; // I2C
//Adafruit_BME280 bme(BME_CS); // hardware SPI
//Adafruit_BME280 bme(BME_CS, BME_MOSI, BME_MISO, BME_SCK); // software SPI
Next, we will declare variables to hold BME280 sensor readings such as temperature, pressure, and humidity. These are declared as floating types because we will be dealing with numerical values which could have floating decimal points. In other words, the values returned by BME280 sensor are floating point values
float temp;
float hum;
float pressure;
Here, we define two variable lastTime and timerDelay. We will include a delay of 3000ms or 3 seconds before updating the sensor readings to the BME280 web server page. The updating time is being stored in the variable ‘timerDelay.’
unsigned long lastTime = 0;
unsigned long timerDelay = 3000;  // send readings timer
Create Server Sent Event Source
After that, we will create an object of the class AsyncWebServer. This will help us in the setup of the server routes. We have assigned it a port 80 which is the HTTP default port.
AsyncWebServer server(80);As mentioned earlier, We will use Server-Sent Events known as SSE to update new sensor readings automatically from the BME280 web server and display them on the web page. We will create a new event source on /events. The Server-Sent Events (SSE) will update sensor reading automatically whenever a new reading is available without the need to refresh web browser page.
AsyncEventSource events("/events");Get BME280 Sensor Readings
Next, we will use obtain the sensor data for temperature, humidity, and pressure by using the getBME280Readings () function.
void getBME280Readings(){

  temperature = bme.readTemperature();
  pressure = bme.readPressure() / 100.0F;
  humidity = bme.readHumidity();
}
HTML Placeholders Replacement Function
We will also create a processor() function. This function will take care of the placeholders inside the HTML text by setting them up for the current sensor readings. Until the next set of readings come up, the current sensor readings will be displayed on the web page through this function.
String processor(const String& var){
  getBME280Readings();
  //Serial.println(var);
  if(var == "TEMPERATURE"){
    return String(temperature);
  }
  else if(var == "HUMIDITY"){
    return String(humidity);
  }
  else if(var == "PRESSURE"){
    return String(pressure);
  }
}
HTML and CSS File
In this HTML document, we use cards, paragraphs, links, icons, headings, and title tags to create a web page. This web page displays temperature, humidity, gas (VOC) or Indoor air quality (IAQ), and pressure readings of the BME280 sensor.
On a web page, we display icons of temperature, humidity, pressure, and gas by icons from the Font Awesome Icons website. To create a font, we will use the fontawesome.com website. Go to this link (fontawesome). You should include the following line in your HTML document to use icons from fontawesome:
<link rel="stylesheet" href="https://use.fontawesome.com/releases/v5.7.2/css/all.css" integrity="sha384-fnmOCqbTlWIlj8LyTjo7mOUStjsKC4pOpQbqyi7RrhN7udi9RwhKkMHpvLbHG9Sr" crossorigin="anonymous">To create the web page, we will use index_html. To handle the events sent by the web browser client, we will use the following code for each sensor reading. Below is the example code for the line which displays the humidity readings.
<h4><i class="fas fa-tint"></i> HUMIDITY</h4><p><span class="reading"><span id="hum">%HUMIDITY%</span> %</span></p>In this case, we are using the id hum to update new sensor readings regarding humidity. For other sensor variables, we are using the id pres, gas, and temp. This id describes which CSS style to apply to each reading and also JavaScript code uses this id to access and change elements related to that id.
Handle Server Events
To handle events, we will initialize a new object of EventSource called /events.
if (!!window.EventSource) {
 var source = new EventSource('/events');
After initializing the server events, we will listen to all the messages received from the server through addEventListener(). In this block of code, we are creating addEventListener for open, error, and message. These event listeners are set in default as mentioned in the AsyncWebServer documentation.
source.addEventListener('open', function(e) {
  console.log("Events Connected");
 }, false);
 source.addEventListener('error', function(e) {
  if (e.target.readyState != EventSource.OPEN) {
    console.log("Events Disconnected");
  }
 }, false);

 source.addEventListener('message', function(e) {
  console.log("message", e.data);
 }, false);
Now, to create an addEventListener for the sensor readings. For example, for humidity, we will add the event listener with the name of humidity. This will send this event to the web page whenever a new reading will be accessible.
source.addEventListener('humidity', function(e)Inside the function, the following lines send the new humidity readings event to the web browser client whenever the new value of humidity is available. This humidity reading is related to the id hum.
 {
  console.log("humidity", e.data);
  document.getElementById("hum").innerHTML = e.data;
 }, false);
Likewise, the same addEventListener() function will be defined for pressure and temperature, with their respective IDs.
 source.addEventListener('temperature', function(e) {
  console.log("temperature", e.data);
  document.getElementById("temp").innerHTML = e.data;
 }, false);

 source.addEventListener('humidity', function(e) {
  console.log("humidity", e.data);
  document.getElementById("hum").innerHTML = e.data;
 }, false);

 source.addEventListener('pressure', function(e) {
  console.log("pressure", e.data);
  document.getElementById("pres").innerHTML = e.data;
 }, false);
}
setup() Function
In the setup() function, we will first initiate the serial communication with the serial monitor with a baud rate of 115200 by using the begin() function.
Serial.begin(115200);By using the WiFi.begin() function, the ESP32 will connect to the local network with the given network credentials as parameters. This will then print the IP address which is assigned to ESP32 and we will use this IP address to access the web server later.
  // Set the device as a Station and Soft Access Point simultaneously
  WiFi.mode(WIFI_AP_STA);

  // Set device as a Wi-Fi Station
  WiFi.begin(ssid, password);
  while (WiFi.status() != WL_CONNECTED) {
    delay(1000);
    Serial.println("Setting as a Wi-Fi Station..");
  }
  Serial.print("Station IP Address: ");
  Serial.println(WiFi.localIP());
  Serial.println();
Handle Clients Requests
When a user accesses the web page with an ESP32 IP address on the root / URL ESP32 serve will respond with the data stored inside index_html. The processor will be one of the arguments so that new sensor readings are updated and replaced with placeholders.
// Handle Web Server
  server.on("/", HTTP_GET, [](AsyncWebServerRequest *request){
    request->send_P(200, "text/html", index_html, processor);
  });
Server Event Source
This block of code will create the event source on the server.
// Handle Web Server Events
  events.onConnect([](AsyncEventSourceClient *client){
    if(client->lastId()){
      Serial.printf("Client reconnected! Last message ID that it got is: %u\n", client->lastId());
    }
    // send event with message "hello!", id current millis
    // and set reconnect delay to 1 second
    client->send("hello!", NULL, millis(), 10000);
  });
  server.addHandler(&events);
By using the server.begin() function, we will start the server.
server.begin();In loop(), we will obtain the new readings from the BME280 sensor by using the getBME280Readings () function. These will then be displayed in the serial monitor through their respective variables.
getBME280Readings();
Serial.printf("Temperature = %.2f ºC \n", temperature);
Serial.printf("Humidity = %.2f % \n", humidity);
Serial.printf("Pressure = %.2f hPa \n", pressure);
Serial.println();
These updated readings will be sent to the web page through events.send
 // Send Events to the Web Server with the Sensor Readings
    events.send("ping",NULL,millis());
    events.send(String(temperature).c_str(),"temperature",millis());
    events.send(String(humidity).c_str(),"humidity",millis());
    events.send(String(pressure).c_str(),"pressure",millis());
Demonstration
Copy the above code to Arduino IDE. Choose the correct board and COM port before uploading your code to the ESP32 board. Go to Tools > Board and select ESP32 Dev Module.

Next, go to Tools > Port and select the appropriate port through which your board is connected.

Now click on the upload button to upload code to ESP32. After that open the Arduino serial monitor and press the enable button on ESP32:

You will receive the IP address of the ESP32 development board printed on your serial monitor. Copy that address and paste it into a new browser window. Press Enter. The web server will display sensor readings for temperature, pressure, humidity, and gas which will be updated by new ones after every 3 seconds.
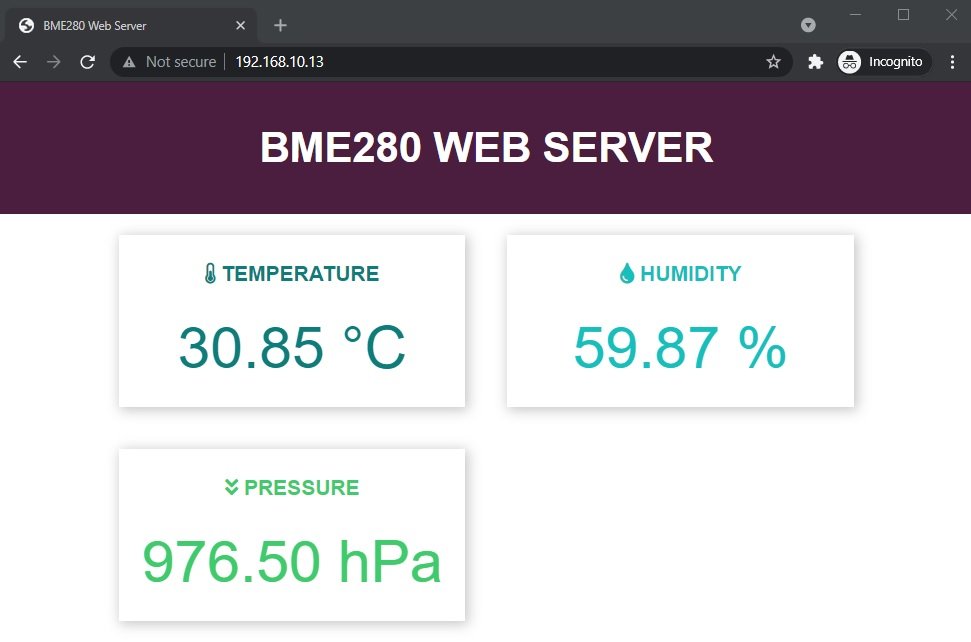
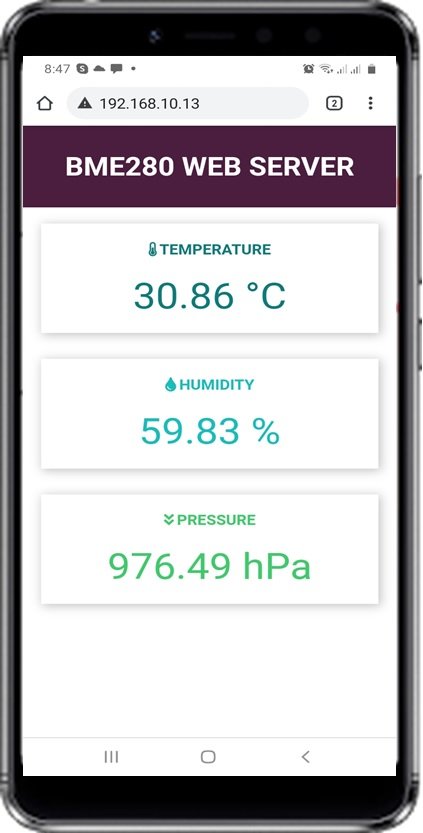
If you access the web server from your mobile device, you will see the BME280 reading as follows:
In this guide, we have learned how to build a BME280 web server with ESP32 and Arduino IDE and how to display the sensor readings on a web page using an asynchronous server sent events web server. Additionally, new sensor readings will be updated automatically.
You may like to read ESP32 web server tutorials with other sensors:
- Plot Sensor Readings in Real Time Charts with ESP32 and ESP8266 Web Server
- ESP32/ESP8266 Thermostat Web Server
- MicroPython: BME680 Web Server with ESP32
- LM35 Temperature Sensor with ESP32 – Web Server
- MicroPython: BME280 Web Server with ESP32/ESP8266
- ESP32 BMP180 Web Server using Arduino IDE
- MicroPython: DS18B20 Web Server with ESP32/ESP8266
- Interface DHT11/DHT22 with ESP32 and display values on Web Server
- MicroPython: DHT11/DHT22 Web Server with ESP32/ESP8266
To use degrees F, what code changes are necessary?
I can’t open my esp32 ip adress through the phone
The measurement accuracy is +/-3% for humidity and +/-1% for temperature and pressure. So what is the point of displaying two decimal places?