In this tutorial, we will learn to interface the BMP180 barometric sensor with ESP32 and display sensor values on a web page using a web server. In other words, we will create a web server to display sensor values. The BMP180 sensor can be used to measure temperature, pressure, and altitude. We can also measure pressure at sea level and the real altitude with this sensor.

We will discuss the following points in this lesson:
- Connection diagram of BMP180 with ESP32.
- How to install the library of BMP180 in Arduino IDE?
- How to measure temperature, pressure, and altitude?
- How to display sensor values on a web server?
Introduction to BMP180 Barometric Sensor
- This digital pressure sensor is used to measure the pressure of air in the range of 300-1100 hPa.
- It also has a temperature measurement feature.
- It can operate at a wide range of voltages between 1.8 to 3.6 volts.
- It has very low noise and low power consumption of about 5µA at 1 sample / sec. in standard mode.
- It can be interfaced with any microcontroller through I2C communication.
You can check further details in introduction to BMP180 digital pressure sensor article.
Following is a module of BMP180 digital pressure sensor:
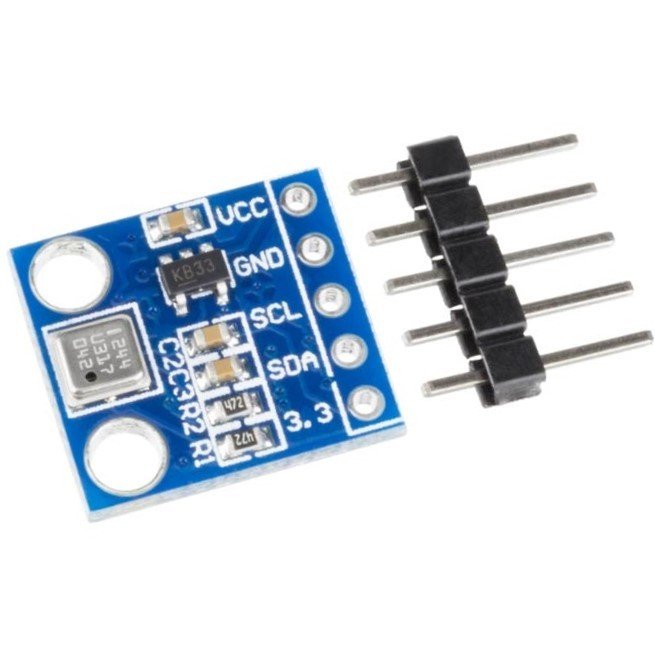
Pinout
The image above displays the pinout diagram of the sensor. This sensor utilizes the I2C communication protocol for data transmission. It is equipped with four pins, as illustrated in the table below:
| Pins | Function |
|---|---|
| Vin ( Power supply pin ) | Connect 3.3 volts to this pin |
| GND | GND pin of power supply |
| SCL ( I2C clock pin ) | Connect with SCL pin of any microcontroller |
| SDA (I2C data pin ) | Connect with SDA pin of any microcontroller |
BMP180 Connection Diagram with ESP32
To set up the connection between the BMP180 sensor and the ESP32, follow the layout provided below.
Connect the ground pin of the ESP32 to the ground pin of the BMP180 sensor, and connect the 3.3 volts pin of the ESP32 to the Vin (power input) pin of the BMP180.
The ESP32 supports I2C communication, and for this purpose, GPIO22 and GPIO21 are dedicated I2C pins. Please refer to the ESP32 pinout documentation for more detailed information.
On the DEVKIT DOIT board, GPIO22 serves as the SCL (Serial Clock) pin, and GPIO21 serves as the SDA (Serial Data) pin. However, note that the pin locations may differ for other types of boards. Therefore, it is crucial to verify the pinout of your specific ESP32 board to ensure correct connections. Double-checking the pinout will prevent any potential errors during the project implementation.

You can refer to the ESP32 pinout reference:
Installing BMP180 Arduino Library
We are using Arduino IDE to program the ESP32. The following is the background knowledge for this lesson:
As mentioned earlier, we can read temperature and pressure from the BMP180 through the I2C communication protocol. ESP32 has an I2C communication module. We can use the BMP180 pressure sensor library in the Arduino IDE to read temperature and pressure values.
Follow these steps to install this library:
- Click on the above button to download library.
- After downloading library, you will get a compressed folder.
- Uncompressed this folder using any Unzip software. you will get Adafruit-BMP085-Library-master folder
- Now change the name of folder from
Adafruit-BMP085-Library-masterto Adafruit-BMP085-Library. - Move this folder inside the Arduino libraries folder where you have installed Arduino IDE.
- You have successfully installed the library for this digital pressure sensor.
ESP32 BM180 web server code
Till now, you have accomplished all the required steps to measure sensor over on the web page. Now, let’s see the code. The sketch given below reads pressure, temperature, and altitude values and displays them on the web server whenever a web client tries to access the web page using the IP address of the web server.
- Copy this code to your Arduino IDE and upload this code to ESP32 board.
- Before you upload the code, you need to change the WiFi name and password with your network credentials.
This code creates a web server on the ESP32, retrieves temperature, pressure, and altitude data from the BMP180 sensor, and displays the data on a web page when accessed through a web browser. The client’s web page will automatically refresh the data every 500 milliseconds.
#include <WiFi.h>
#include <Wire.h>
#include <Adafruit_BMP085.h>

Adafruit_BMP085 bmp;
const char* ssid = "PTCL-BB";
const char* password = "5387c614";

WiFiServer server(80);

String header;

void setup()
{
Serial.begin(9600);
if (!bmp.begin())
{
Serial.println("Not connected with BMP180/BMP085 sensor, check connections ");
while (1) {}
}

Serial.print("Connecting to Wifi Network");
Serial.println(ssid);
WiFi.begin(ssid, password);
while (WiFi.status() != WL_CONNECTED) {
delay(500);
Serial.print(".");
}
Serial.println("");
Serial.println("Successfully connected to WiFi.");
Serial.println("IP address of ESP32 is : ");
Serial.println(WiFi.localIP());
server.begin();
Serial.println("Server started");
}

void loop() {
Serial.print("Temp = ");
Serial.print(bmp.readTemperature());
Serial.println(" *C");

Serial.print("Pressure = ");
Serial.print(bmp.readPressure());
Serial.println(" Pa");


Serial.print("Altitude = ");
Serial.print(bmp.readAltitude());
Serial.println(" meters");


Serial.println();
delay(500);
WiFiClient client = server.available();

if (client)
{
Serial.println("Web Client connected ");
String request = client.readStringUntil('\r');
client.println("HTTP/1.1 200 OK");
client.println("Content-type:text/html");
client.println("Connection: close");
client.println();
client.println("<!DOCTYPE html><html>");
client.println("<head><meta name=\"viewport\" content=\"width=device-width, initial-scale=1\">");
client.println("<link rel=\"icon\" href=\"data:,\">");
client.println("</style></head><body><h1>ESP32 Web Server BMP180</h1>");
client.println("<h2>BMP180 Barometic sensor</h2>");
client.println("<table><tr><th>MEASUREMENT</th><th>VALUE</th></tr>");
client.println("<tr><td>Temp. Celsius</td><td><span class=\"sensor\">");
client.println(bmp.readTemperature());
client.println(" *C</span></td></tr>");
client.println("<tr><td>Pressure</td><td><span class=\"sensor\">");
client.println(bmp.readPressure());
client.println(" pa</span></td></tr>");
client.println("<tr><td>Altitude</td><td><span class=\"sensor\">");
client.println(bmp.readAltitude());
client.println(" meters</span></td></tr>");
client.println("</body></html>");
client.println();
Serial.println("Client disconnected.");
Serial.println("");
}
}- After uploading code, click on the serial monitor button to open the serial monitor.
- Select a baud rate of 9600.
- Click on the Reboot button on the ESP32 board.
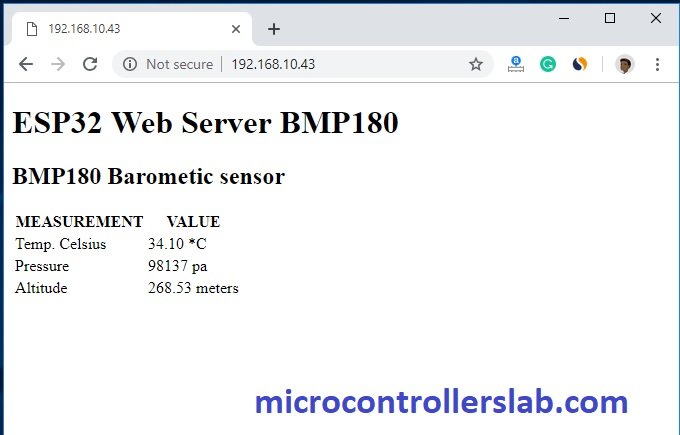
You will see this message on your serial monitor, which contains the IP address of the web server and pressure, temperature, and altitude values.

Now go to any web browser and type this IP address. You will notice the values of pressure and temperature on web page as shown there.
Code explanation
These lines add the library for WiFi and BMP180 in the code.
#include <WiFi.h>
#include <Wire.h>
#include <Adafruit_BMP085.h>
This line creates an object for a pressure sensor. If you want to interface with multiple sensors, you have to create multiple objects with different names.
Adafruit_BMP085 bmp; // here bmp is a objectEnter your WiFi credentials in double quotes.
const char* ssid = "WiFi Name";
const char* password = "WiFi password";
WiFiServer server(80);   // start the server at default port number that is 80
These lines check if the sensor is properly connected with the ESP32 or not. If the sensor is connected correctly, it will display the message “Not connected with BMP180/BMP085 sensor, check connections” on the serial monitor and will be stuck in the while loop.
(!bmp.begin())
{
Serial.println("Not connected with BMP180/BMP085 sensor, check connections ");
while (1) {}
}
After that, we use WiFi connection with ESP32. This part of the sketch is used to connect the board with the WiFi network and display the assigned IP address to the development board. We use this IP address to access the web page over any web browser.
 Serial.print("Connecting to Wifi Network");
Serial.println(ssid);
WiFi.begin(ssid, password);
while (WiFi.status() != WL_CONNECTED) {
delay(500);
Serial.print(".");
}
Serial.println("");
Serial.println("Successfully connected to WiFi.");
Serial.println("IP address of ESP32 is : ");
Serial.println(WiFi.localIP());
server.begin();
Serial.println("Server started");
Inside the loop function, these commands read values of temperature, pressure, and altitude and display these values on the serial monitor.
// read temperature values
Serial.print("Temp = ");
Serial.print(bmp.readTemperature());
Serial.println(" *C");
// read air pressure values
Serial.print("Pressure = ");
Serial.print(bmp.readPressure());
Serial.println(" Pa");
// read altitude in meters
Serial.print("Altitude = ");
Serial.print(bmp.readAltitude());
Serial.println(" meters");
This part of the code sends sensor values on the web page. It executes when a web client makes a request to the ESP32 web server.
if (client)
{
Serial.println("Web Client connected ");
String request = client.readStringUntil('\r');
client.println("HTTP/1.1 200 OK");
client.println("Content-type:text/html");
client.println("Connection: close");
client.println();
client.println("<!DOCTYPE html><html>");
client.println("<head><meta name=\"viewport\" content=\"width=device-width, initial-scale=1\">");
client.println("<link rel=\"icon\" href=\"data:,\">");
client.println("</style></head><body><h1>ESP32 Web Server BMP180</h1>");
client.println("<h2>BMP180 Barometic sensor</h2>");
client.println("<table><tr><th>MEASUREMENT</th><th>VALUE</th></tr>");
client.println("<tr><td>Temp. Celsius</td><td><span class=\"sensor\">");
client.println(bmp.readTemperature());
client.println(" *C</span></td></tr>");
client.println("<tr><td>Pressure</td><td><span class=\"sensor\">");
client.println(bmp.readPressure());
client.println(" pa</span></td></tr>");
client.println("<tr><td>Altitude</td><td><span class=\"sensor\">");
client.println(bmp.readAltitude());
client.println(" meters</span></td></tr>");
client.println("</body></html>");
client.println();
Serial.println("Client disconnected.");
Serial.println("");
}
if (client): This line checks if a client is connected to the web server. The client variable represents the connection established with the web client. If a client is connected, the condition evaluates to true, and the code inside the curly braces {} will be executed.
Serial.println("Web Client connected "): This line prints a message to the Serial monitor indicating that a web client has connected to the server. It is mainly for debugging purposes to monitor client connections.
String request = client.readStringUntil('\r'): This line reads the incoming request from the web client until it encounters a carriage return character (‘\r’). The request sent by the client typically contains information about the requested resource, such as the web page or data.
client.println("HTTP/1.1 200 OK"): This line sends an HTTP response status to the client, indicating that the request was successful (status code 200). This status tells the client that the server is processing the request and will send the requested data in the response.
client.println("Content-type:text/html"): This line specifies the content type of the response to be sent back to the client, which is HTML in this case. It informs the client’s browser how to interpret the data received.
client.println("Connection: close"): This line informs the client that the connection will be closed after sending the response. It means that the server is handling a single request-response cycle, and once the response is sent, the connection will be terminated.
client.println(): This line sends an empty line to the client, which acts as a delimiter between the HTTP response headers and the actual content (HTML data).
The following lines send HTML content back to the client, which will be displayed on the client’s web browser. The content is structured to create an HTML web page that shows the measurements obtained from the BMP180 sensor (temperature, pressure, and altitude).
client.println(bmp.readTemperature());, client.println(bmp.readPressure());, and client.println(bmp.readAltitude()): These lines read the temperature, pressure, and altitude values from the BMP180 sensor using the bmp.readTemperature(), bmp.readPressure(), and bmp.readAltitude() functions, respectively. The values are then sent to the client’s web browser as part of the HTML content.
client.println(): This line sends an empty line to separate different parts of the HTML content.
Serial.println("Client disconnected."): This line prints a message to the Serial monitor indicating that the client has been disconnected after receiving the response. The server has completed processing the client’s request, and the connection is terminated.
Serial.println(""): This line prints an empty line to the Serial monitor to add a blank line between different logs for better readability.
Video demonstration
In summary:
In this tutorial, we have learned to create a web server using ESP32 and BMP180 sensor with Arduino IDE. We have also seen a step-by-step process of setting up a web server to monitor temperature and pressure data using the BMP180 sensor. Discover how to interface ESP32 with the sensor and display real-time readings on a web page, making it an ideal project for IoT enthusiasts and Arduino developers.
For more information about the web page part, you can check ESP32 web server tutorial. I hope you like this project, you might be looking for more esp32 projects: