In this tutorial, we will learn to create a MQTT client with ESP32 to publish sensor readings and to subscribe to different topics using HiveMQ. Our aim is to create an MQTT client that will be able to subscribe to MQTT topics and publish sensor readings on MQTT topics. We will use the PubSubClient library to connect our ESP32 development board with the HiveMQ MQTT broker. PubSubClient library provides useful functions to easily connect with MQTT brokers. After the ESP32 successfully connects with the MQTT broker, we will publish sensor data and also learn to subscribe to a particular topic. Any appropriate sensor can be used but for this article, we will use a BME280 sensor which is used to measure temperature, pressure, and humidity.

Recommended Components
The following components are used in this project or are helpful for building it with the ESP32.
| Component | How it’s used in this project | Buy on Amazon |
|---|---|---|
| ESP32 Development Board (DevKit V1) | Reads the BME280 over I2C and publishes the readings to HiveMQ over MQTT. | Check Price |
| Micro USB Cable | Connects the ESP32 to your computer for flashing the code and powering the board. | Check Price |
| Breadboard | Lets you wire the BME280 sensor to the ESP32 without soldering. | Check Price |
| Jumper Wires | Make the I2C connections between the ESP32 and the BME280 sensor. | Check Price |
| BME280 sensor | Measures temperature, humidity and pressure that are published to the MQTT broker. | Check Price |
As an Amazon Associate we earn from qualifying purchases. Prices and availability are accurate as of the date/time indicated and are subject to change.
This guide covers the following topics:
- Brief introduction to MQTT protocol
- BME280 sensor and its connection with the ESP32 board
- Developing an ESP32 MQTT client
- Using MQTT topic to publish sensor data acquired from BME280 sensor
- Connecting ESP32 with MQTT broker (HiveMQ)
- Receiving messages on ESP32 by subscribing to MQTT topic
- Publishing MQTT messages from the ESP32 board to MQTT broker
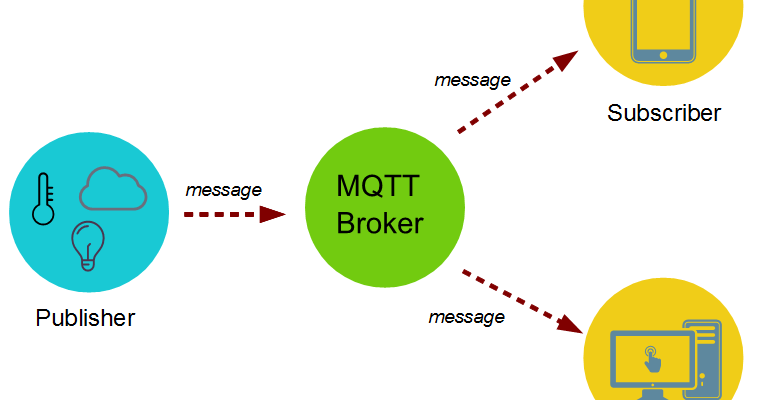
MQTT Protocol Introduction
- MQTT is known as Message Queuing Telemetry Transport protocol.
- It is a lightweight messaging protocol and helps resource constrained network clients with a simple communication mechanism.
- Unlike, most messaging system, we don’t have to assign addresses to MQTT clients.
- MQTT uses simple publish/subscribe communication based on a topic.
- This protocol runs on top of TCP / IP in order to provide reliable data delivery.
For a detailed tutorial regarding MQTT, its main components, MQTT broker and working follow the link: What is MQTT and How MQTT Works?
Introducting BME280 sensor
The BME280 sensor is used to measure readings regarding ambient temperature, barometric pressure, and relative humidity. It is mostly used in web and mobile applications where low power consumption is key. This sensor uses I2C or SPI to communicate data with the micro-controllers. Although there are several different versions of BME280 available in the market, the one we will be studying uses the I2C communication protocol and SPI.
Connecting BME280 sensor with ESP32
The connection of BME280 with the ESP32 board is very easy. We have to connect the VCC terminal with 3.3V, ground with the ground (common ground), SCL of the sensor with SCL of the module, and SDA of the sensor with the SDA pin of the ESP modules.
The I2C pin in ESP32 for SDA is GPIO21 and for SCL is GPIO22
Required Components
We will need the following components to connect our ESP32 board with the BME280 sensor.
- ESP32 board
- BME280 Sensor
- Connecting Wires
- Breadboard
Schematic Diagram
Connect the ESP32 device with BME280 as shown in the schematic diagram below:
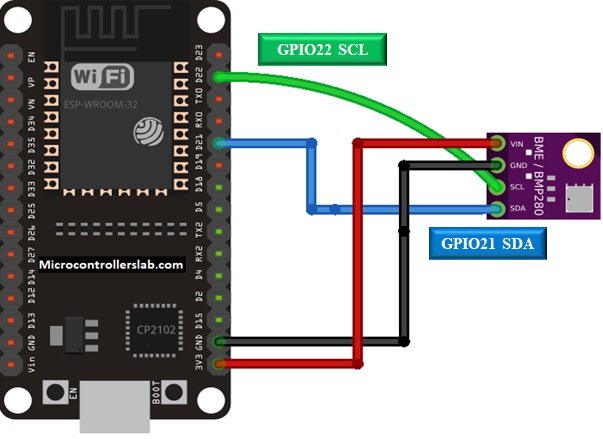
Vin is connected with a 3.3V pin on the module and both the ESP32 board and the sensor is commonly grounded.
In some BME280 sensors, the SCK terminal means the SCL pin and is connected with its respective GPIO pin on the ESP32 board. Likewise, the SDI terminal means the SDA pin and is connected with its respective GPIO pin on the board.
You may like to read these BME280 tutorials:
- BME280 with ESP32 – Display Values on OLED ( Arduino IDE)
- ESP32 Send Sensor Readings to ThingSpeak using Arduino IDE (BME280)
- MicroPython: BME280 with ESP32
- MicroPython: BME280 Web Server with ESP32/ESP8266
Setting up Arduino IDE
Before we proceed further, you should make sure that you have the latest version of Arduino IDE installed on your system. Moreover, you should also install an ESP32 add-on in Arduino IDE. f your IDE does not have the plugin installed you can visit the link below:
Installing ESP32 library in Arduino IDE and upload code
For this project, we will have to install libraries for the BME280 sensor and the PubSubClient library.
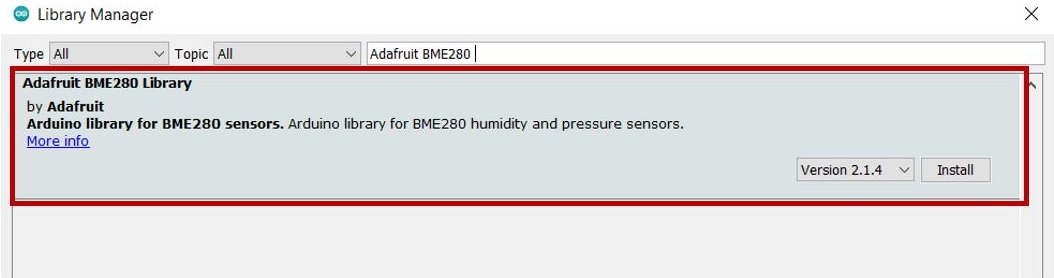
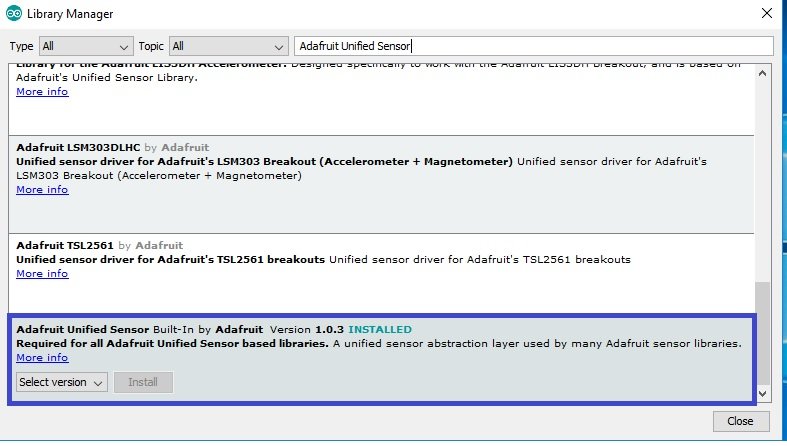
Installing BME280 Libraries
As we are connecting the BME280 sensor with ESP32 so we will have to install BME280 libraries to our module. We will require two libraries for this project:
- Adafruit_BME280 library
- Adafruit_Sensor library
We will use the Library Manager in our Arduino IDE to install the latest versions of the libraries. Open your Arduino IDE and go to Sketch > Include Libraries > Manage Libraries. Type each library name in the search bar and install them both.
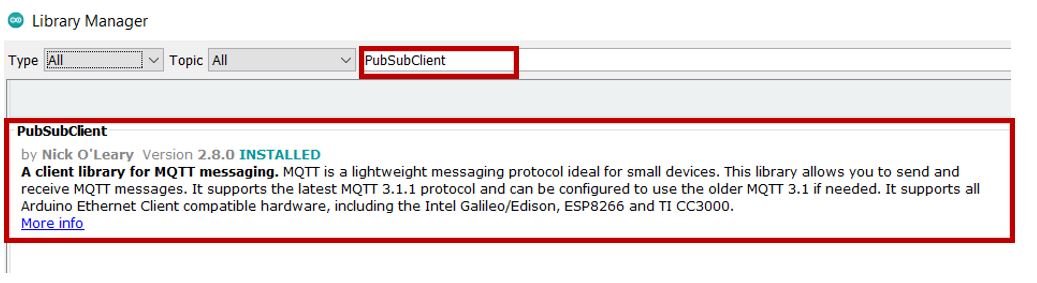
Installing PubSubClient Library
As we will be using MQTT protocol to send and receive sensor data that is why we need this library. We will use the Library Manager in our Arduino IDE to install the latest version of this library. Open your Arduino IDE and go to Sketch > Include Libraries > Manage Libraries. Type PubSubClient in the search bar and press enter. Install it as well.
ESP32 MQTT Client Arduino Sketch
Open your Arduino IDE and go to File > New to open a new file. Copy the code given below in that file and save it. You need to enter your network credentials. This sketch will develop an ESP32 MQTT client by following the steps given below:
- Connecting the ESP32 board with the local network
- Setting up the ESP32 Client and the BME280 sensor
- Connecting the ESP32 to an MQTT broker
- Publishing the sensor readings to the MQTT topics
- Subscribing to the MQTT messages in order to receive them
#include <Arduino.h>
#include <WiFi.h>
#include <PubSubClient.h>
#include <Adafruit_BME280.h>
#include <Adafruit_Sensor.h>

WiFiClient wifiClient;
PubSubClient mqttClient(wifiClient);
Adafruit_BME280 bme;

const char* ssid = "Your_SSID";
const char* password = "Your_Password";

char *mqttServer = "broker.hivemq.com";
int mqttPort = 1883;

void setupMQTT() {
  mqttClient.setServer(mqttServer, mqttPort);
  mqttClient.setCallback(callback);
}

void reconnect() {
  Serial.println("Connecting to MQTT Broker...");
  while (!mqttClient.connected()) {
      Serial.println("Reconnecting to MQTT Broker..");
      String clientId = "ESP32Client-";
      clientId += String(random(0xffff), HEX);

      if (mqttClient.connect(clientId.c_str())) {
        Serial.println("Connected.");
        // subscribe to topic
        mqttClient.subscribe("esp32/message");
      }
  }
}

void setup() {
  Serial.begin(115200);
  WiFi.begin(ssid, password);
    while (WiFi.status() != WL_CONNECTED) {
      delay(500);
      Serial.print(".");
    }
    Serial.println("");
     Serial.println("Connected to Wi-Fi");

  if (!bme.begin(0x76)) {
    Serial.println("Check BME280 connections!");
  }
  setupMQTT();
}


void loop() {
  if (!mqttClient.connected())
    reconnect();
  mqttClient.loop();
  long now = millis();
  long previous_time = 0;

  if (now - previous_time > 1000) {
    previous_time = now;

    float temperature = bme.readTemperature();
    char tempString[8];
    dtostrf(temperature, 1, 2, tempString);
    Serial.print("Temperature: ");
    Serial.println(tempString);
    mqttClient.publish("esp32/temperature", tempString);

    float humidity = bme.readHumidity();
    char humString[8];
    dtostrf(humidity, 1, 2, humString);
    Serial.print("Humidity: ");
    Serial.println(humString);
    mqttClient.publish("esp32/humidity", humString);

    float pressure = bme.readPressure() / 100;
    char pressString[8];
    dtostrf(pressure, 1, 2, pressString);
    Serial.print("Pressure: ");
    Serial.println(pressString);
    mqttClient.publish("esp32/pressure", pressString);

  }
}
  void callback(char* topic, byte* message, unsigned int length) {
  Serial.print("Callback - ");
  Serial.print("Message:");
  for (int i = 0; i < length; i++) {
    Serial.print((char)message[i]);
  }
}
How the Code Works?
Let us understand how each part works to develop a successful ESP32 MQTT client.
Installing Libraries
The code starts with including all the necessary libraries which are needed for the proper functionality of the code. The WiFi.h library will help in establishing the connection between our ESP32 module to a wireless network. The Adafruit_Sensor and the Adafruit_BME280 libraries which we installed earlier are also included as they are necessary as we have to interface the sensor with the ESP32. Additionally, the PubSubClient library will be needed for MQTT protocol.
#include <Arduino.h>
#include <WiFi.h>
#include <PubSubClient.h>
#include <Adafruit_BME280.h>
#include <Adafruit_Sensor.h>
Creating Objects
Next, we will create an object of WiFiClient called wifiClient which we will pass as a parameter inside PubSubClient mqttcllient (). Moreover, we will also define the Adafruit_BME280 object named bme by setting it on the default I2C GPIO pins.
WiFiClient wifiClient;
PubSubClient mqttClient(wifiClient);
Adafruit_BME280 bme;
Setting Network Credentials
Next, we will create two global variables, one for the SSID and the other for the password. These will hold our network credentials which will be used to connect to our wireless network. Replace both of them with your credentials to ensure a successful connection.
const char* ssid = "Your_SSID";
const char* password = "Your_Password";
Specifying Broker Parameters
Next, we will define the MQTT server and port. As we are using HiveMQ as the MQTT broker so we have defined the server as “broker.hivemq.com.” You can use any other broker as well. Just replace the mqttServer variable appropriately.
char *mqttServer = "broker.hivemq.com";
int mqttPort = 1883;
void setupMQTT()
In the setupMQTT() function, we will initialize the MQTT broker by using mqttClient.setServer(). We have specified the broker’s server and its port as parameters inside it. Additionally, we will also register a call-back function by using mqttClient.setCallback(). We will define the callback() function shortly.
void setupMQTT() {
  mqttClient.setServer(mqttServer, mqttPort);
  mqttClient.setCallback(callback);
}
void reconnect()
This function will be called in the process of reconnecting the MQTT broker. This is a void function which also takes in no arguments. Inside the function, we are connecting our ESP32 client with the MQTT broker by using a random client ID which will be associated with our client. In case, the connection is successfully made then the ESP32 client will subscribe to the message “esp32/message” by using mqttClient.subscribe(). This will be used to receive messages from the MQTT broker.
This function will be called in the loop() function to reconnect the client with the MQTT broker if a successful connection was not made already.
void reconnect() {
  Serial.println("Connecting to MQTT Broker...");
  while (!mqttClient.connected()) {
      Serial.println("Reconnecting to MQTT Broker..");
      String clientId = "ESP32Client-";
      clientId += String(random(0xffff), HEX);

      if (mqttClient.connect(clientId.c_str())) {
        Serial.println("Connected.");
        mqttClient.subscribe("esp32/message");
      }
  }
}
void callback()
We will use the callback() function to subscribe to MQTT topics so that our ESP32 board will be able to receive messages of that topic. In the reconnect() function, we had subscribed our ESP32 board to the “esp32/message” topic. In the callback() function, the client will receive the messages of the subscribed topic. These will get displayed in the serial monitor.
void callback(char* topic, byte* message, unsigned int length) {
  Serial.print("Callback - ");
  Serial.print("Message:");
  for (int i = 0; i < length; i++) {
    Serial.print((char)message[i]);
  }
}
setup()
Inside the setup() function, we will connect our ESP32 board with the Wi-Fi and initialize the BME280 sensor as well as set up the MQTT broker.
Firstly, we will open a serial connection at a baud rate of 115200.
Serial.begin(115200);The following section of code will connect our ESP32 board with the local network whose network credentials we already specified above. We will use the WiFi.begin() function. The arguments will be the SSID and the password which we defined earlier in the code. After a successful connection is established, “Connected to Wi-Fi” will get displayed on the serial monitor.
WiFi.begin(ssid, password);
    while (WiFi.status() != WL_CONNECTED) {
      delay(500);
      Serial.print(".");
    }
    Serial.println("");
     Serial.println("Connected to Wi-Fi");
Next, the BME280 sensor will get initialized and in case of failure, an error message will be printed on the serial monitor.
if (!bme.begin(0x76)) {
    Serial.println("Check BME280 connections!");
  }
Moreover, we will also call the setupMQTT() function to configure the MQTT broker which will also set up the call-back function.
setupMQTT();loop()
Inside the loop() function we will connect our ESP32 board with the MQTT broker. If the connection is unsuccessful, we will call the reconnect() function which we previously defined. After successfully connecting our client with the MQTT broker, we are ready to send sensor data and receive messages.
if (!mqttClient.connected())
    reconnect();
  mqttClient.loop();
Now we will learn how to publish sensor data to MQTT topics. This is being achieved by using the PubSubClient library. After every second, we will take BME280 sensor readings by using bme.readTemperature(), bme.readPressure() and bme.readHumidity().These functions measure ambient temperature, barometric pressure and relative humidity respectively. These readings will get saved in their respective variables called temperature, pressure and humidity. Then we will convert each float variable to a char array. This will help us in publishing the sensor data to its respective topic.
- For temperature readings, the topic is: “esp32/temperature”
- For humidity readings, the topic is: “esp32/humidity”
- And for pressure readings, the topic is: “esp32/pressure”
You can use any other topic names as well. To publish the sensor data to its respective topic we will use mqttCleint.publish() and pass the topic as the first parameter and the data as the second parameter. This is done for all three topics.
    float temperature = bme.readTemperature();
    char tempString[8];
    dtostrf(temperature, 1, 2, tempString);
    Serial.print("Temperature: ");
    Serial.println(tempString);
    mqttClient.publish("esp32/temperature", tempString);

    float humidity = bme.readHumidity();
    char humString[8];
    dtostrf(humidity, 1, 2, humString);
    Serial.print("Humidity: ");
    Serial.println(humString);
    mqttClient.publish("esp32/humidity", humString);


    float pressure = bme.readPressure() / 100;
    char pressString[8];
    dtostrf(pressure, 1, 2, pressString);
    Serial.print("Pressure: ");
    Serial.println(pressString);
    mqttClient.publish("esp32/pressure", pressString);
Demonstration
Before uploading the code to our ESP32 board we will choose the correct board and COM port. Go to Tools > Board and select ESP32 Dev Module.

Next, go to Tools > Port and select the appropriate port through which your board is connected.

Click on the upload button to upload the code into the ESP32 board. After you have uploaded your code to the board press its ENABLE button.

Open your Serial Monitor to view the progress of the project. You will be able to view if the Wi-Fi is connected or not and a successful connection formed between the client and the broker.

Setting HIVEMQ as MQTT Broker
Open HiveMQ by following this link. Click the ‘Connect’ button.

Publishing messages
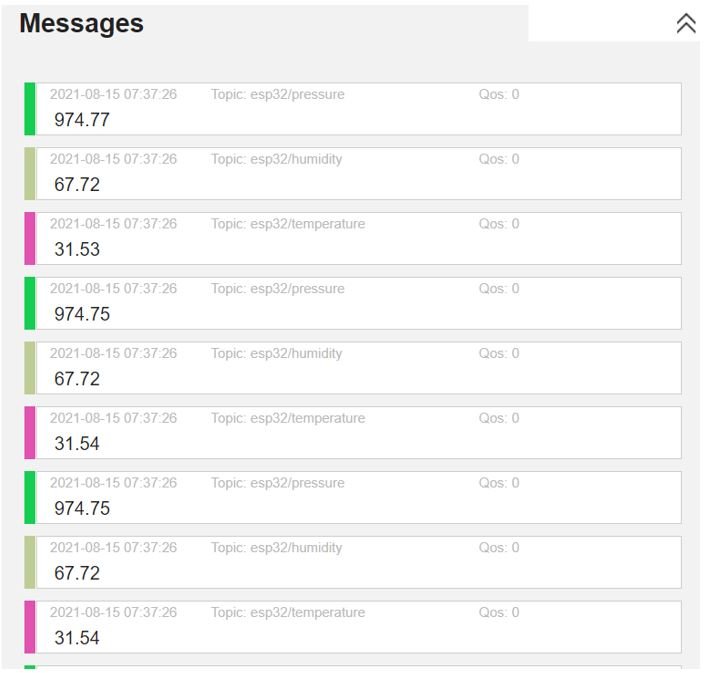
Now go to Subscriptions and add the subscription topics which we used in the program sketch. We will add these three topics which we have subscribed to: esp32/temperature, esp32/humidity, and esp32/pressure.

After adding the topics you will be able to view the sensor readings in the messages section. Similarly you will be able to view temperature, pressure and humidity readings in the serial monitor as well.
Testing for ESP32 Subscription
Now we will check the ESP32 topic subscription on the topic where we have subscribed our ESP32 module. Head over to ‘Publish’ and in the Topic specify the topic which you used in the program code where the ESP32 is subscribed. In our case, it is “esp32/message.” In the message section, write any text which you want to send to your board. Then hit the ‘Publish’ button.

Open your serial monitor. You will be able to see the same message get published to our ESP32 board.

Conclusion
In conclusion, we were able to create our ESP32 MQTT client and tested publishing and subscribing with the help of HiveMQ broker. We were successfully able to send BME280 sensor readings from the module to the broker via MQTT protocol. This tutorial is compatible with any other appropriate broker as well. You just need to specify its server and port in the program sketch.
HI, I have a question about using MQTT broker. In your tutorial, you used Hive as a broker. So could I open Hive in another LAN (for example my esp32 is at my home and I use a computer in my workplace via Hive to access these data.
We have problem with Covid 19 so I couldn’t test it.
Could you guide me how to create my own broker as Hive or integrate MQTT to application! Thanks!
I have new question. If I have 2 Raspbberry Pi and both of them run this firmware. So What will we get on Hive? Thanks!
Hi!
How can I implement a secure client? At HiveMQ there is an example for the ESP8266 but the used library “CertStoreBearSSL” seems to be not available for the ESP32.