In this tutorial, we will learn to interface DHT11 and DHT22 sensors with ESP32 using Arduino IDE. We will create a DHT11/DHT22 web server with ESP32 to display temperature and relative humidity values on a Web page.
In this project, we will create two types of DHT11 and DHT22 web server:
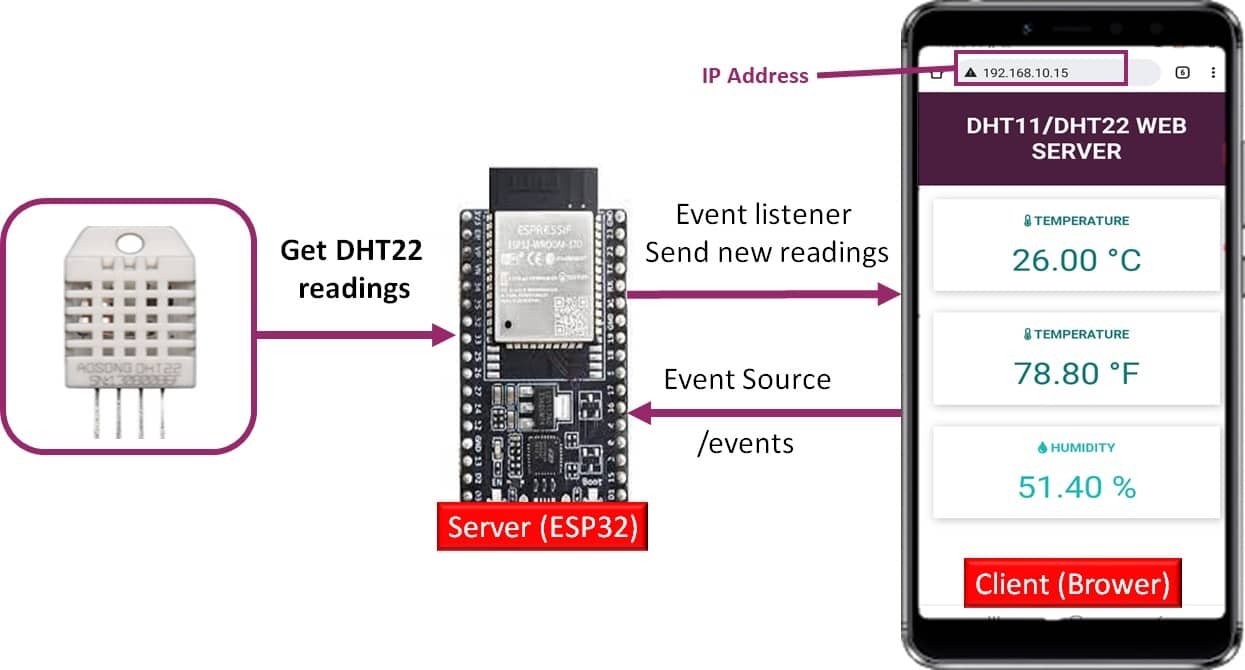
- #1 DHT11/DHT22 Server Sent Events Asynchronous web server: Server sent events DHT1 web server will automatically update temperature and humidity readings on web page after every 3 second without requiring to refresh web page.
- #2 Simple HTTP Web Server: This second web server will display updated values of temperature and humidity only when user refreshed the web page.
Prerequisites

Before starting this project, there are some necessary background concepts for understanding this project. These are the suggested readings.
- How to use Arduino to upload code to ESP32
- Pinout of ESP32 with a detailed description of all pins.
- How to use Digital output pins?
- How to use Digital input pins?
- Create simple ESP32 Web server to control GPIO pins from the web
Note: ESP32/ESP8266 boards will be used in station mode to connect these boards to your local WiFi network. But you can also create a soft access point web server with ESP32/ESP8266.
DHT11/DHT22 Introduction
The DHT11/DHT22 is a sensor which measures relative humidity and temperature sensor. It provides a calibrated digital output with a 1-wire protocol. Both sensors are inexpensive. They are quite similar to each other with some differences of specifications.
DHT22 is almost similar to the DHT11 but the former measures temperature and humidity with higher accuracy and supports wider range.
DHT11 vs DHT22
The following table lists the comparison of both DHT sensors.
| DHT22 | DHT11 | |
|---|---|---|
| Temperature | -40 to 80 ºC +/- 0.5ºC | 0 to 50 ºC +/-2 ºC |
| Humidity | 0 to 100% +/-2% | 20 to 90% +/-5% |
| Resolution | Humidity: 0.1%Temperature: 0.1ºC | Humidity: 1%Temperature: 1ºC |
| Operating Voltage | 3- 6 V DC( directly powerable from ESP32/ESP8266) | 3-5.5 V DC( directly powerable from ESP32/ESP8266) |
| Sampling time | 2 seconds | 1 second |
| Current rating | $4 to $10 | $1 to $5 |
| Output data type | float | int |
| Pinout | 4-pin (same as DHT11) | 4-pin (same as DHT22) |
| Price ($) | 5 | 2 |
As you can see from the above comparison table that DHT22 offers wider temperature range and resolution for temperature and humidity. But it is more expensive than DHT11. However, DHT11 has a better sampling period. Furthermore, the operating voltage range for both sensors is almost and we can directly power these sensors from power pins of ESP32 and ESP8266.
Regardless of above differences, both DHT sensors have the same working principle and same pinout. We can use the same MicroPython script to read temperature and humidity readings by selecting DHT type inside the code.
DHT sensors are pre-calibrated. We can directly connect them with ESP32/ESP8266 to obtain sensor output reading. They are internally composed of a humidity sensing sensor and a thermistor. These two components measure humidity and temperature.
DHT11/DHT22 Pinout
This following figure shows the pinout diagram of DHT sensors. DHT sensor consists of four pins. But on DHT modules only three pins are exposed to the pinout of the module and10k ohm pull-up resistor is internally connected to pin 2.
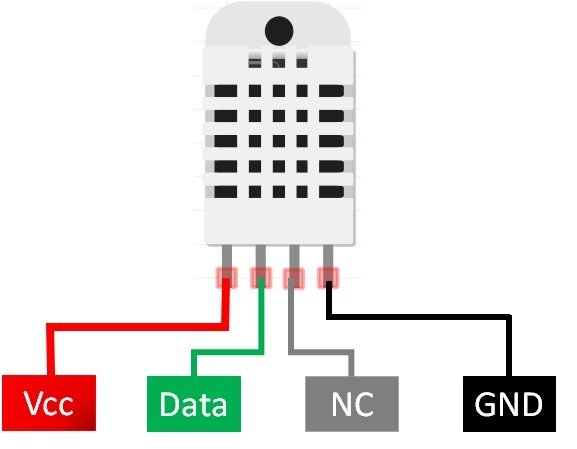
Pin Description
The following lists the pinout of the DHT sensor and their brief description. Pin number starts from left to right when you hold the sensor from the front end.
| DHT11/DHT22 Pin | Connection with ESP32/ESP8266 |
|---|---|
| 1 ( Vcc) | 3.3V |
| 2 (Data Out) | Any GPIO pins of ESP boards along with 10k ohm pull-up resistor |
| 3 (NC) | Not used |
| 4 (GND) | Ground |
- Vcc is the power supply pin. Apply voltage in a range of 3.3 V to 5.0 V to this pin
- Data Out is the digital output pin. It sends out the value of measured temperature and humidity in the form of serial data
- N/C is not connected
- GND: Connect the GND pin
Parts Required
To make a DHT web server with MicroPython, you must connect a 10k ohm pull-up resistor with a data_out pin of DHT11/DHT22. You will need following components
- ESP32
- DHT11 and DHT22
- Bread Board
- 10K ohm resistor
- Jumper wires
Interfacing DHT11/DHT22/ AM2302 with ESP32 – Wiring diagram
Connection diagrams for both are shown in the pictures below. As you can see connections are straightforward.
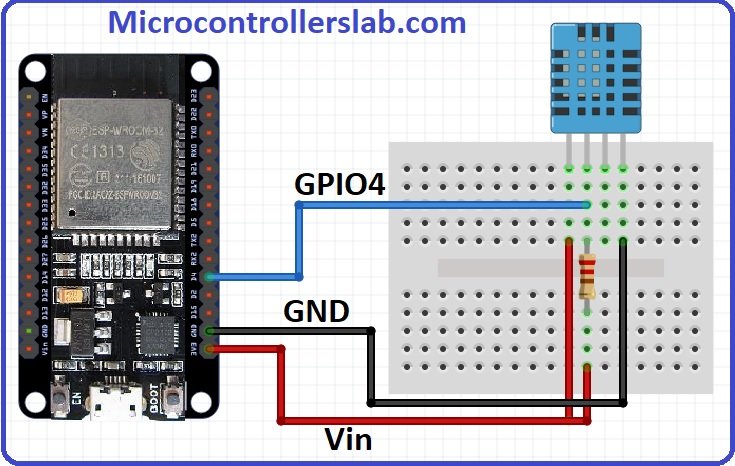
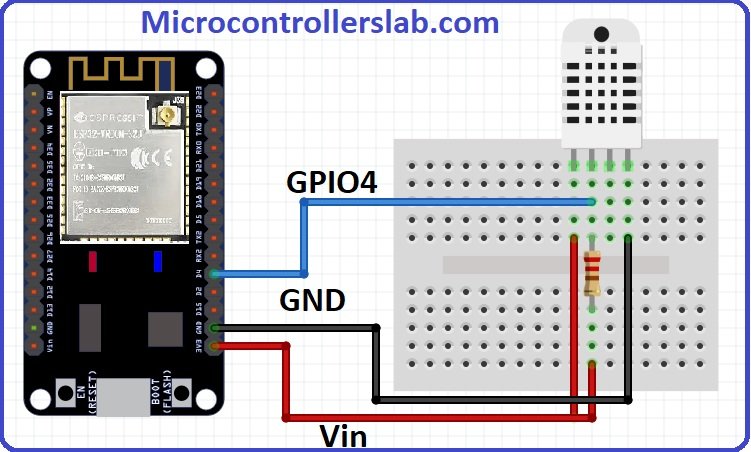
Pinout of both DHT11 and DHT22 sensors are the same as you can see in the picture.

- The first pin for both sensors is a power supply(Vcc) pin. Connect it with the 3.3-volt pin of ESP32.
- Data out is the pin through which we get temperature and humidity samples from the DHT sensor. Connect this pin with GPIO4 of ESP32 and also connect the data pin with a 10k pull-up resistor. But you can also use any digital pin of ESP32.
A Pull-up resistor is used to keep the data pin high for proper communication between the microcontroller and sensor. You can check the datasheet of DHT11 and DHT22 to get more information about it. DHT22 is also known by the name of AM2302.
- Third pin is not used
- Connect the fourth pin (GND) to the ground pin of the ESP32 board
Installing DHT11/DHT22 Library in Arduino IDE
Both DHT11 and DHT22 provide the output of temperature and humidity in the complex digital output format which can not be directly read with GPIO pins without writing any technique which can read these output signals. These sensors provide data through a single wire two-way communication protocol. A single process communication consists of 40 bits. But we do not need to worry about the working of these sensors and on which protocol we can receive this data. We have an Arduino library for DHT sensors which can be easily used to get values of temperature and humidity only by calling two lines of functions. We will see later on how to do it. Now let’s see how to install the DHT library in Arduino. This library is provided by Adafruit. Follow these steps to install the DHT sensor library:
Go to Sketch menu>> include file and click on manage libraries option.
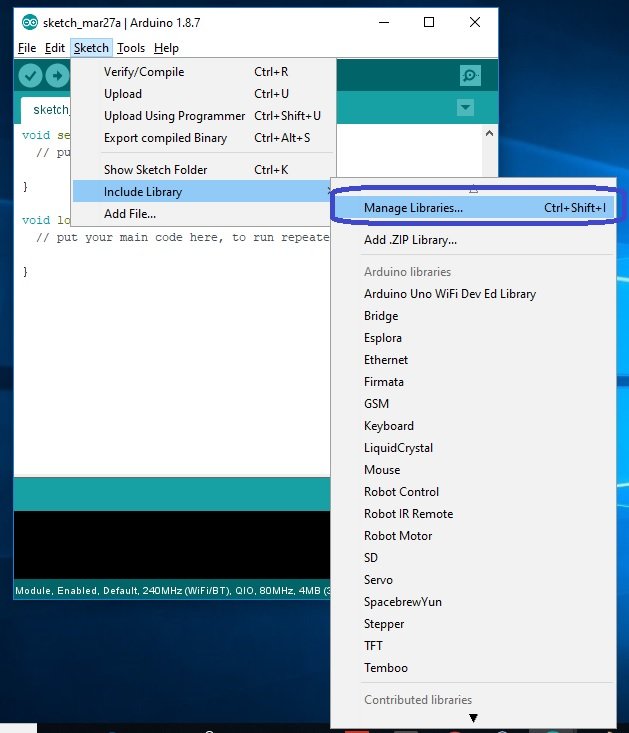
When you click on the manage libraries option, you will get this window. In this window write ‘DHT sensor‘ in the search bar and press enter.
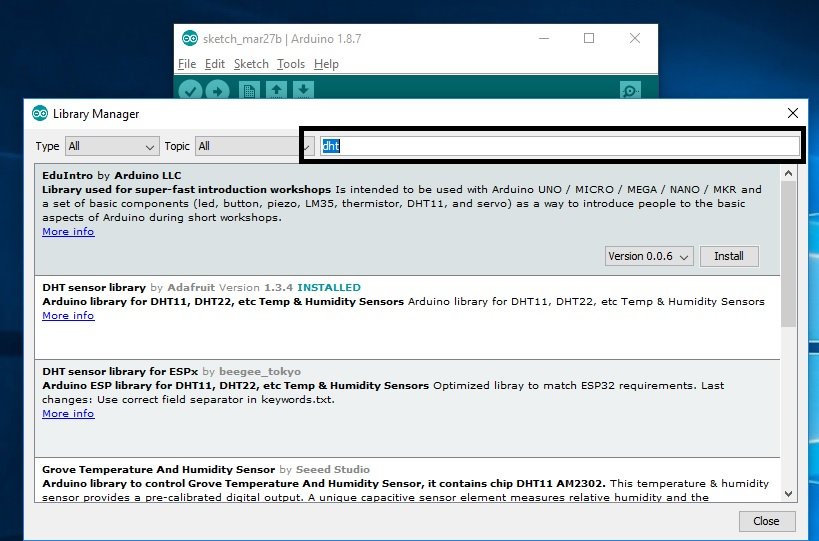
You will see many options available for DHT11 and DHT22 libraries. Select Adafruit library and click on the install button. You can select the latest version from the version window.

The same library can be used for both DHT11 and DHT22/AM2302 sensors. After that, you will see the message of library correctly installed.
Now click on the close button. This library is now successfully included in the library manager of Arduino IDE. This is a very powerful library. Because we can use the same library for different types of microcontrollers like Arduino and STM32 microcontrollers.
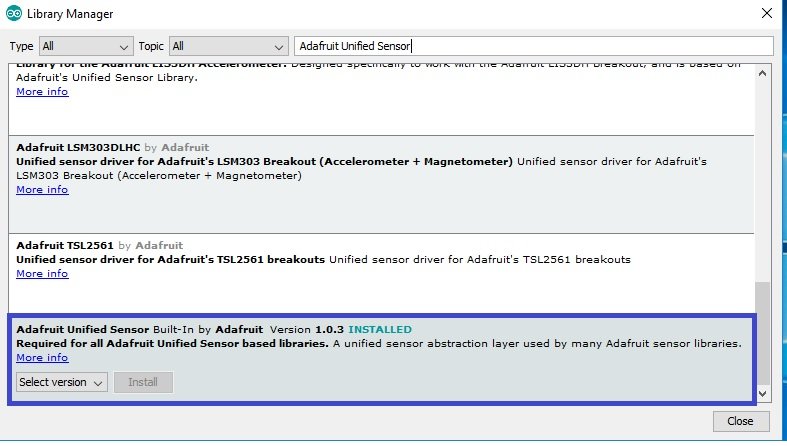
Adafruit also provides libraries for other sensors. So they provided a support package which is used to handle all sensor libraries. We also need to install the Adafruit Unified Sensor library. To install this, paste the Adafruit Unified Sensor search bar and select this option and click on install button.
You may like to check other tutorials which used this sensor:
DHT Asynchronous Web Server ESP32
First, let’s discuss DHT11/DHT22 Server Sent Events Asynchronous web server.
Asynchronous Web Server Overview
- The client starts the server-sent events connection with ESP32 server as an HTTP request. This will cause the module to send events to the web page.
- ESP32 connected with DHT11/DHT22receives sensor readings after every 3 seconds.
- These readings are marked as ‘events’ of the following names: ‘temperature’, ‘temperature in farenheit’ and ‘humidity’.
- These events sent by ESP32 have event listeners associated with them on the client-side. All the updated readings are received by the client on the said events.
- As in the case with SSE, only the ESP32 SERVER will be able to send events to the webpage. The web page gets updated accordingly and the process continues.
Installing ESPAsyncWebServer Libraries
The ESPAsyncWebServer library will help us in creating our web server easily. With this library, we will set an asynchronous HTTP server. AsyncTCP is another library that we will be incorporating as a dependency for the ESPAsyncWebServer library. This library will not be used directly inside our program code and only acts as the base for the first library.
Both of these libraries are not available in the Arduino library manager so we will have to download and load them in the IDE ourselves. We will use GitHub to download the respective libraries and then place them in the library folder of our Arduino IDE.
Click ESPAsyncWebServer library and AsyncTCP library to open the respective GitHub pages for the libraries. The webpage when you open the ESPAsyncWeb Server link will look something like this.

Click the Code button and go to the Download Zip option as highlighted in the figure. Your zip file will get downloaded to your computer right away. After the download is complete, extract the .zip file to the Arduino library folder. A similar process will apply to the installation of the AsyncTCP library as well. Make sure you rename the extracted files as ESPAsyncWebServer and AsyncTCP accordingly.
You can also go to Sketch > Include Library > Add .zip Library inside the IDE to add the libraries as well. Through this procedure now we will be able to use the functionalities of the libraries inside our Arduino IDE.
DHT11/DHT22 Asynchronous Web Server Arduino Code
Copy the following sketch and replace the wifi credentials with your own.
#include <Wire.h>
#include "DHT.h"
#include <WiFi.h>
#include "ESPAsyncWebServer.h"
// Replace with your network credentials
const char* ssid = "Enter Your WiFi Name";
const char* password = "Enter your WiFi Password";
// Uncomment one of the lines below for whatever DHT sensor type you're using!
//#define DHTTYPE DHT11 // DHT 11
//#define DHTTYPE DHT21 // DHT 21 (AM2301)
#define DHTTYPE DHT22 // DHT 22 (AM2302), AM2321
//DHT Sensor;
uint8_t DHTPin = 4;
DHT dht(DHTPin, DHTTYPE);
float temperature_Celsius;
float temperature_Fahrenheit;
float Humidity;
AsyncWebServer server(80);
AsyncEventSource events("/events");
unsigned long lastTime = 0;
unsigned long timerDelay = 30000; // send readings timer
void getDHTReadings(){
Humidity = dht.readHumidity();
// Read temperature as Celsius (the default)
temperature_Celsius = dht.readTemperature();
// Read temperature as Fahrenheit (isFahrenheit = true)
temperature_Fahrenheit= dht.readTemperature(true);
}
String processor(const String& var){
getDHTReadings();
//Serial.println(var);
if(var == "TEMPERATURE_C"){
return String(temperature_Celsius);
}
else if(var == "TEMPERATURE_F"){
return String(temperature_Fahrenheit);
}
else if(var == "HUMIDITY"){
return String(Humidity);
}
}
const char index_html[] PROGMEM = R"rawliteral(
<!DOCTYPE HTML><html>
<head>
<title>DHT Web Server</title>
<meta name="viewport" content="width=device-width, initial-scale=1">
<link rel="stylesheet" href="https://use.fontawesome.com/releases/v5.7.2/css/all.css" integrity="sha384-fnmOCqbTlWIlj8LyTjo7mOUStjsKC4pOpQbqyi7RrhN7udi9RwhKkMHpvLbHG9Sr" crossorigin="anonymous">
<link rel="icon" href="data:,">
<style>
html {font-family: Arial; display: inline-block; text-align: center;}
p { font-size: 1.2rem;}
body { margin: 0;}
.topnav { overflow: hidden; background-color: #4B1D3F; color: white; font-size: 1.7rem; }
.content { padding: 20px; }
.card { background-color: white; box-shadow: 2px 2px 12px 1px rgba(140,140,140,.5); }
.cards { max-width: 700px; margin: 0 auto; display: grid; grid-gap: 2rem; grid-template-columns: repeat(auto-fit, minmax(300px, 1fr)); }
.reading { font-size: 2.8rem; }
.card.temperature { color: #0e7c7b; }
.card.humidity { color: #17bebb; }
</style>
</head>
<body>
<div class="topnav">
<h3>DHT WEB SERVER</h3>
</div>
<div class="content">
<div class="cards">
<div class="card temperature">
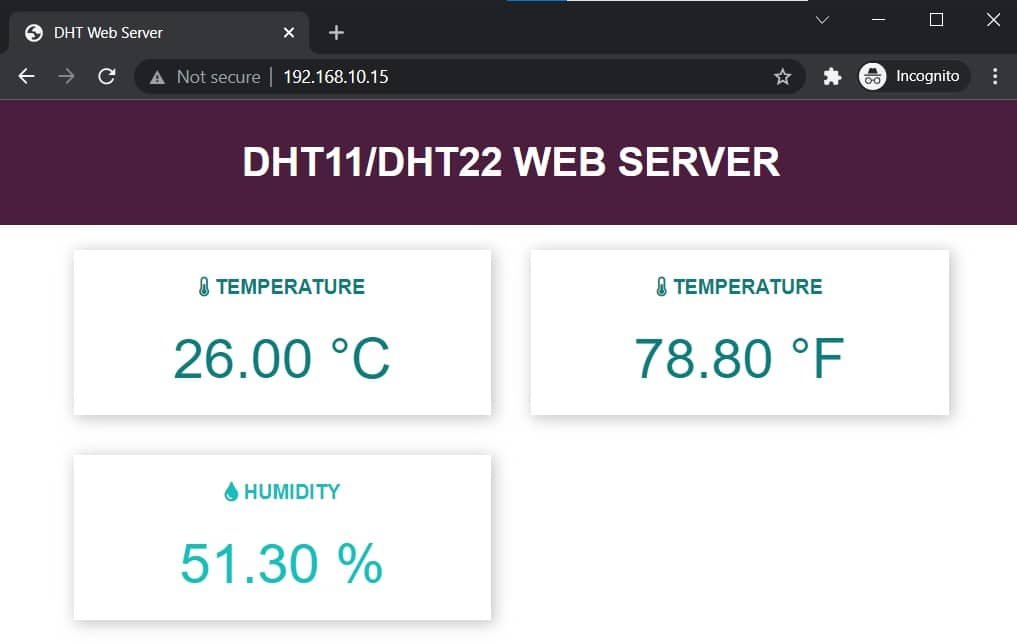
<h4><i class="fas fa-thermometer-half"></i> TEMPERATURE</h4><p><span class="reading"><span id="temp_celcius">%TEMPERATURE_C%</span> °C</span></p>
</div>
<div class="card temperature">
<h4><i class="fas fa-thermometer-half"></i> TEMPERATURE</h4><p><span class="reading"><span id="temp_fahrenheit">%TEMPERATURE_F%</span> °F</span></p>
</div>
<div class="card humidity">
<h4><i class="fas fa-tint"></i> HUMIDITY</h4><p><span class="reading"><span id="hum">%HUMIDITY%</span> %</span></p>
</div>
</div>
</div>
<script>
if (!!window.EventSource) {
var source = new EventSource('/events');
source.addEventListener('open', function(e) {
console.log("Events Connected");
}, false);
source.addEventListener('error', function(e) {
if (e.target.readyState != EventSource.OPEN) {
console.log("Events Disconnected");
}
}, false);
source.addEventListener('message', function(e) {
console.log("message", e.data);
}, false);
source.addEventListener('temperature_Celsius', function(e) {
console.log("temperature", e.data);
document.getElementById("temp_celcius").innerHTML = e.data;
}, false);
source.addEventListener('temperature_Fahrenheit', function(e) {
console.log("temperature", e.data);
document.getElementById("temp_fahrenheit").innerHTML = e.data;
}, false);
source.addEventListener('humidity', function(e) {
console.log("humidity", e.data);
document.getElementById("hum").innerHTML = e.data;
}, false);
}
</script>
</body>
</html>)rawliteral";
void setup() {
Serial.begin(115200);
pinMode(DHTPin, INPUT);
dht.begin();
WiFi.begin(ssid, password);
while (WiFi.status() != WL_CONNECTED) {
delay(1000);
Serial.println("Setting as a Wi-Fi Station..");
}
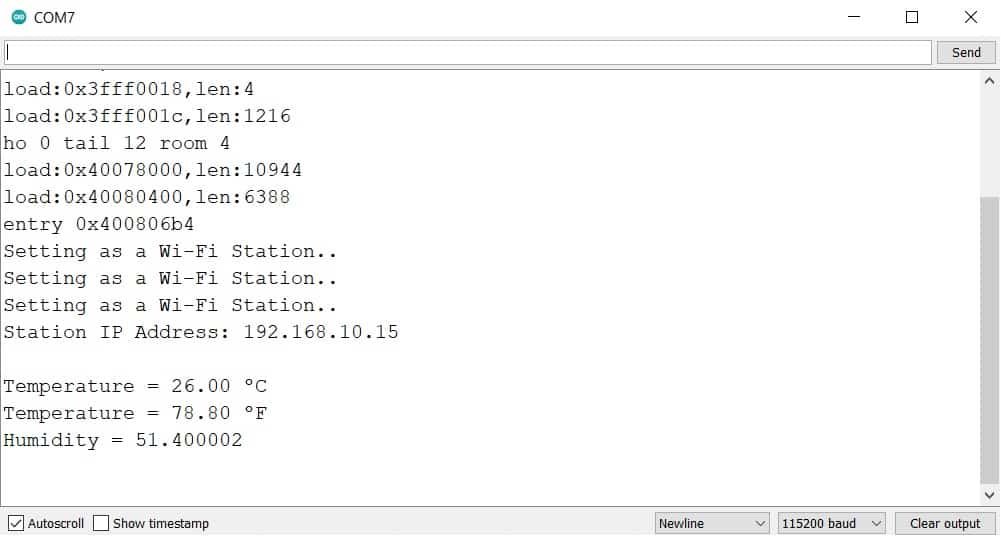
Serial.print("Station IP Address: ");
Serial.println(WiFi.localIP());
Serial.println();
// Handle Web Server
server.on("/", HTTP_GET, [](AsyncWebServerRequest *request){
request->send_P(200, "text/html", index_html, processor);
});
// Handle Web Server Events
events.onConnect([](AsyncEventSourceClient *client){
if(client->lastId()){
Serial.printf("Client reconnected! Last message ID that it got is: %u\n", client->lastId());
}
// send event with message "hello!", id current millis
// and set reconnect delay to 1 second
client->send("hello!", NULL, millis(), 10000);
});
server.addHandler(&events);
server.begin();
}
void loop() {
if ((millis() - lastTime) > timerDelay) {
getDHTReadings();
Serial.printf("Temperature = %.2f ºC \n", temperature_Celsius);
Serial.printf("Temperature = %.2f ºF \n", temperature_Fahrenheit);
Serial.printf("Humidity= %f %\n", Humidity);
Serial.println();
// Send Events to the Web Server with the Sensor Readings
events.send("ping",NULL,millis());
events.send(String(temperature_Celsius).c_str(),"temperature_Celsius",millis());
events.send(String(temperature_Fahrenheit).c_str(),"temperature_Fahrenheit",millis());
events.send(String(Humidity).c_str(),"humidity",millis());
lastTime = millis();
}
}How does the Code Works?
We will include all the necessary libraries for DHT11 and DHT22 temperature sensors e.g., Wire.h, and DHT.h. Additionally, the WiFi.h and the ESPAsyncWebServer.h libraries are included to connect to router and create an asynchronous web server, respectively.
#include <Wire.h>
#include "DHT.h"
#include <WiFi.h>
#include "ESPAsyncWebServer.h"We will specify our network credentials through which ESP32 will connect to WiFi router. The WiFi name and password will be saved in character variables named ssid and password. Make sure to replace the credentials with the ones for your router local network.
// Change according to your network credentials
const char* ssid = "Enter your WiFi name here";
const char* password = "Enter your WiFi password";
This is used to define which type of DHT sensor we want to use. You can use this with DHT11, DHT21, and DHT22 sensors. You should uncomment the line according to the sensor you are using. For example, we are using DHT22 in this tutorial, we have uncommented this, and others are remain commented. DHTTYPE variable stores the name of the sensor we are using.
// Uncomment one of the lines below for whatever DHT sensor type you're using!
//#define DHTTYPE DHT11 // DHT 11
//#define DHTTYPE DHT21 // DHT 21 (AM2301)
#define DHTTYPE DHT22 // DHT 22 (AM2302), AM2321
We have defined the name of the GPIO pin of ESP32 with which we will connect the DHT11/DHT22 sensor. We are using GPIO pin number four GPIO4. Therefore, we should define pin number four.
//DHT Sensor;
uint8_t DHTPin = 4;
This line will create the object of DHT according to our defined pin number and DHT type. We have defined both these parameters in the last steps.
DHT dht(DHTPin, DHTTYPE);These three float type variables will be used to store values of temperature in Celsius, Fahrenheit, and humidity.
float temperature_Celsius;
float temperature_Fahrenheit;
float Humidity;
Here, we define two variables lastTime and timerDelay. We will include a delay of 3000ms or 3 seconds before updating the DHT11/DHT22 readings to the web server page. The updating time is being stored in the variable ‘timerDelay.’
unsigned long lastTime = 0;
unsigned long timerDelay = 3000;  // send readings timer
Create Server Sent Event Source
After that, we will create an object of the class AsyncWebServer. This will help us in the setup of the server routes. We have assigned it a port 80 which is the HTTP default port.
AsyncWebServer server(80);As mentioned earlier, We will use Server-Sent Events known as SSE to update new sensor readings automatically from the DHT web server and display them on the web page. We will create a new event source on /events. The Server-Sent Events (SSE) will update sensor reading automatically whenever a new reading is available without the need to refresh the web browser page.
AsyncEventSource events("/events");Get DHT11/DHT22 Sensor Readings
Next, we will use obtain the sensor data for temperature and humidity by using the getDHTReadings() function.
void getDHTReadings(){

   Humidity = dht.readHumidity();
  // Read temperature as Celsius (the default)
  temperature_Celsius = dht.readTemperature();
  // Read temperature as Fahrenheit (isFahrenheit = true)
  temperature_Fahrenheit= dht.readTemperature(true);
}
HTML Placeholders Replacement Function
We will also create a processor() function. This function will take care of the placeholders inside the HTML text by setting them up for the current sensor readings. Until the next set of readings come up, the current sensor readings will be displayed on the web page through this function.
String processor(const String& var){
  getDHTReadings();
  //Serial.println(var);
  if(var == "TEMPERATURE_C"){
    return String(temperature_Celsius);
  }
  else if(var == "TEMPERATURE_F"){
    return String(temperature_Fahrenheit);
  }
   else if(var == "HUMIDITY"){
    return String(Humidity);
  }
}
HTML and CSS File
In this HTML document, we use cards, paragraphs, links, icons, headings, and title tags to create a web page. This web page displays temperature readings of the DHT11/DHT22 sensor.
On a web page, we display icons of temperature from the Font Awesome Icons website. To create a font, we will use the fontawesome.com website. Go to this link (fontawesome). You should include the following line in your HTML document to use icons from fontawesome:
<link rel="stylesheet" href="https://use.fontawesome.com/releases/v5.7.2/css/all.css" integrity="sha384-fnmOCqbTlWIlj8LyTjo7mOUStjsKC4pOpQbqyi7RrhN7udi9RwhKkMHpvLbHG9Sr" crossorigin="anonymous">To create the web page, we will use index_html. To handle the events sent by the web browser client, we will use the following code for each sensor reading. Below is the example code for the line which displays the temperature readings in celsius units.
<h4><i class="fas fa-thermometer-half"></i> TEMPERATURE</h4><p><span class="reading"><span id="temp_celcius">%TEMPERATURE_C%</span> °C</span></p>In this case, we are using the id temp_celcius to update new sensor readings regarding temperature in Celcius. For temperature in Fahrenheit variables, we are using the id temp_fahrenheit, and similarly, for humidity, we use id hum. These ids describe which CSS style to apply to each reading and also JavaScript code uses this id to access and change elements related to that id.
Handle Server Events
To handle events, we will initialize a new object of EventSource called /events.
if (!!window.EventSource) {
 var source = new EventSource('/events');
After initializing the server events, we will listen to all the messages received from the server through addEventListener(). In this block of code, we are creating addEventListener for open, error, and message. These event listeners are set in default as mentioned in the AsyncWebServer documentation.
source.addEventListener('open', function(e) {
  console.log("Events Connected");
 }, false);
 source.addEventListener('error', function(e) {
  if (e.target.readyState != EventSource.OPEN) {
    console.log("Events Disconnected");
  }
 }, false);

 source.addEventListener('message', function(e) {
  console.log("message", e.data);
 }, false);
Now, to create an addEventListener for DHT11/DHT22 sensor readings. For example, for temperature in Celcius, we will add the event listener with the name of temperature_Celsius. This will send this event to the web page whenever a new reading will be accessible.
source.addEventListener('temperature_Celsius', function(e)Inside the function, the following lines send the new temperature(Celsius) readings event to the web browser client whenever the new value of temperature is available. This temperature(Celsius) reading is related to the id temp_celcius.
 {
  console.log("temperature", e.data);
  document.getElementById("temp_celcius").innerHTML = e.data;
 }, false);
Likewise, the same addEventListener() function will be defined for temperature in Fahrenheit and humidity with its respective ID.
source.addEventListener('temperature_Fahrenheit', function(e) {
  console.log("temperature", e.data);
  document.getElementById("temp_fahrenheit").innerHTML = e.data;
 }, false);
 source.addEventListener('humidity', function(e) {
  console.log("humidity", e.data);
  document.getElementById("hum").innerHTML = e.data;
 }, false);
setup() Function
In the setup() function, we will first initiate the serial communication with the serial monitor with a baud rate of 115200 by using the begin() function.
Serial.begin(115200);Initialize DHT11/DHT22 Sensor
Now inside this function, first line will initialize the serial communication with the baud rate of 115200 and the pinMode function will make the GPIO pin four as a digital input pin. The dht.begin() function initialize the DHT22 sensor and we can read temperature and humidity values from DHT11/DHT22 sensor.
  pinMode(DHTPin, INPUT);
  dht.begin();
By using the WiFi.begin() function, the ESP32 will connect to the local network with the given network credentials as parameters. This will then print the IP address which is assigned to ESP32 and we will use this IP address to access the web server later.
  // Set the device as a Station and Soft Access Point simultaneously
  WiFi.mode(WIFI_AP_STA);

  // Set device as a Wi-Fi Station
  WiFi.begin(ssid, password);
  while (WiFi.status() != WL_CONNECTED) {
    delay(1000);
    Serial.println("Setting as a Wi-Fi Station..");
  }
  Serial.print("Station IP Address: ");
  Serial.println(WiFi.localIP());
  Serial.println();
Handle Clients Requests
When a user accesses the web page with an ESP32 IP address on the root / URL ESP32 serve will respond with the data stored inside index_html. The processor will be one of the arguments so that new sensor readings are updated and replaced with placeholders.
// Handle Web Server
  server.on("/", HTTP_GET, [](AsyncWebServerRequest *request){
    request->send_P(200, "text/html", index_html, processor);
  });
Server Event Source
This block of code will create the event source on the server.
// Handle Web Server Events
  events.onConnect([](AsyncEventSourceClient *client){
    if(client->lastId()){
      Serial.printf("Client reconnected! Last message ID that it got is: %u\n", client->lastId());
    }
    // send event with message "hello!", id current millis
    // and set reconnect delay to 1 second
    client->send("hello!", NULL, millis(), 10000);
  });
  server.addHandler(&events);
By using the server.begin() function, we will start the server.
server.begin();In loop(), we will obtain the new readings from the DHT11/DHT22 sensor by using the getDHTReadings() function. These will then be displayed in the serial monitor through their respective variables.
getDHTReadings();
Serial.printf("Temperature = %.2f ºC \n", temperature_Celsius);
Serial.printf("Temperature = %.2f ºF \n", temperature_Fahrenheit);
Serial.printf("Temperature = %f %\n", Humidity);
Serial.println();
These updated readings will be sent to the web page through events.send
// Send Events to the Web Server with the Sensor Readings
    events.send("ping",NULL,millis());
    events.send(String(temperature_Celsius).c_str(),"temperature_Celsius",millis());
    events.send(String(temperature_Fahrenheit).c_str(),"temperature_Fahrenheit",millis());
    events.send(String(Humidity).c_str(),"humidity",millis());
Demonstration
Copy the above code to Arduino IDE. Choose the correct board and COM port before uploading your code to the ESP32 board. Go to Tools > Board and select ESP32 Dev Module.

Next, go to Tools > Port and select the appropriate port through which your board is connected.

Now click on the upload button to upload code to ESP32. After that open the Arduino serial monitor and press the enable button on ESP32:

You will receive the IP address of the ESP32 development board printed on your serial monitor. Copy that address and paste it into a new browser window. Press Enter.
The web server will display sensor readings for temperature, pressure, humidity, and gas which will be updated by new ones after every 3 seconds.
If you access the web server from your mobile device, you will see the DS18B20 reading as follows:

In this guide, we have learned how to build a DS18B20 web server with ESP32 and Arduino IDE and how to display the sensor readings on a web page using an asynchronous server sent events web server. Additionally, new sensor readings will be updated automatically.
Web Server #2 Create DHT11/DHT22 Simple HTML Web Server ESP32
Have you ever seen a remote monitoring system where an HMI-based system displays remote sensor values? Did you ever try to make a web server that can control or display the values of different sensors on your local server?
If yes, then this tutorial is a step-by-step guide for you. We will learn the example of interfacing DHT11 and DHT22 with ESP32 and how to display its values on the web server.
DHT11 and DHT22 sensors provide temperature and humidity output on a single wire protocol. We will measure these values with the help of the ESP32/ESP8266 using MicroPython firmware. On top of that, we will use the network and socket API of microPython to create a socket server on ESP32/ESP8266 which we will serve the web page to a socket client. ESP32/ESP8266 web server will contain an HTML document which displays temperature and humidity values. This web page will be used to display temperature value both in Celsius and Fahrenheit and humidity percentage.

So far you have learned about wiring diagram and how to install libraries for these sensors. Now let’s move to the more interesting part of this article. We will create an ESP32 Web server in station mode. This web server will serve the web pages to clients who try to access this web server through an existing network by using an IP address of ESP32. We will save the web page inside ESP32 and whenever any web client will make the request through HTTP for this web page through IP address, ESP32 web server will send these web pages to the client over HTTP protocol.
Now copy the code given below in Arduino IDE and upload this code to ESP32 board. You need to make changes in code ssid and password name as shown below. In ssid, write the name of your WiFi network and in password write password of your WiFi.

DHT ESP32 Web server Code
Now upload this code by clicking on the upload button.
#include <WiFi.h>
#include <Wire.h>
#include "DHT.h"

// Uncomment one of the lines below for whatever DHT sensor type you're using!
//#define DHTTYPE DHT11 // DHT 11
//#define DHTTYPE DHT21 // DHT 21 (AM2301)
#define DHTTYPE DHT22 // DHT 22 (AM2302), AM2321
//DHT Sensor;
uint8_t DHTPin = 4;
DHT dht(DHTPin, DHTTYPE);
float Temperature;
float Humidity;

const char* ssid = "Enter SSID here";
const char* password = "Enter Password here";

WiFiServer server(80);

String header;

void setup() {
Serial.begin(115200);
pinMode(DHTPin, INPUT);
dht.begin();

Serial.print("Connecting to Wifi Network");
Serial.println(ssid);
WiFi.begin(ssid, password);
while (WiFi.status() != WL_CONNECTED) {
delay(500);
Serial.print(".");
}
Serial.println("");
Serial.println("Successfully connected to WiFi.");
Serial.println("IP address of ESP32 is : ");
Serial.println(WiFi.localIP());
server.begin();
Serial.println("Server started");

}

void loop()
{
Temperature = dht.readTemperature();
Humidity = dht.readHumidity();
WiFiClient client = server.available();

if (client)
{
Serial.println("Web Client connected ");
String request = client.readStringUntil('\r');
client.println("HTTP/1.1 200 OK");
client.println("Content-type:text/html");
client.println("Connection: close");
client.println();
client.println("<!DOCTYPE html><html>");
client.println("<head><meta name=\"viewport\" content=\"width=device-width, initial-scale=1\">");
client.println("<link rel=\"icon\" href=\"data:,\">");
client.println("</style></head><body><h1>ESP32 Web Server Reading sensor values</h1>");
client.println("<h2>DHT11/DHT22</h2>");
client.println("<h2>Microcontrollerslab.com</h2>");
client.println("<table><tr><th>MEASUREMENT</th><th>VALUE</th></tr>");
client.println("<tr><td>Temp. Celsius</td><td><span class=\"sensor\">");
client.println(dht.readTemperature());
client.println(" *C</span></td></tr>");
client.println("<tr><td>Temp. Fahrenheit</td><td><span class=\"sensor\">");
client.println(1.8 * dht.readTemperature() + 32);
client.println(" *F</span></td></tr>");
client.println("<tr><td>Humidity</td><td><span class=\"sensor\">");
client.println(dht.readHumidity());
client.println(" %</span></td></tr>");
client.println("</body></html>");
client.stop();
client.println();
Serial.println("Client disconnected.");
Serial.println("");
}
}
Getting the IP address

After uploading coding, open the serial monitor of Arduino IDE. you will see these messages on the serial monitor.
First, you will see the message ” Connecting to a WiFi network”. After ESP32 successfully connect to WiFi, you will see the successfully connect message and the IP address of ESP32. This IP address will be used by the web clients to access web pages over any web browser. Note down this IP address, we will need it to access the web server.
Accessing Web Server

Now open any web browser and enter the IP address which we noted in the last step. After you press enter, you will get this output in the web browser in table format. Its showing temperature in Celcius and Fahrenheit and also humidity in percentage.
Code working
Now I will explain the working of sketch line by line. At the start of the sketch, we have added three libraries for WiFi driver, DHT sensors and wire library. These libraries are necessary to include to use its related functions within the code.
#include <WiFi.h>  // Include library for WiFi
#include <Wire.h>  // Add library for Wire
#include "DHT.h"    //Add library for DHT11 and DHT11
This is used to define which type of DHT sensor we want to use. You can use this with DHT11, DHT21 and DHT22 sensor. You should uncomment the line according to the sensor you are using. For example, I have use DHT22 in this example, I have uncommented this and others are remain commented. DHTTYPE variable stores the name of the sensor we are using.
// Uncomment the line according to your selection of sensing device
//#define DHTTYPE DHT11 // DHT 11
//#define DHTTYPE DHT21 // DHT 21 (AM2301)
#define DHTTYPE DHT22 // DHT 22 (AM2302), AM2321
We have defined a name of GPIO pin with which we will connect the DHT11/DHT22 sensor. We are using GPIO pin number four. Therefore we have to define pin number four.
uint8_t DHTPin = 4;This line will create the object of DHT according to our define pin number and DHT type. We have defined both these parameters in the last steps.
DHT dht(DHTPin, DHTTYPE);These two float type variable will be used to store values of temperature and humidity.
float Temperature;
float Humidity;
These variable stores the name and password of the WiFi network.
const char* ssid = "Enter the name of your network";
const char* password = "Enter the password here";
This line will create the instance of web server library over port number 80. For the HTTP protocol, 80 is a default port number. So we will be using this default port number. The advantage of using this default port number is that we will not need to specify port number while accessing web server through an IP address.
WiFiServer server(80);
String header;   //Variable used to store requests from web clients
Inside setup function
Now inside this function, the first line will initialize the serial communication with the baud rate of 115200 and pinMode function will make the GPIO pin four as a digital input pin. The dht.begin() function starts to read the values of DHT11/DHT22 sensor.
Serial.begin(115200);
pinMode(DHTPin, INPUT);
dht.begin();
Now, this part of the sketch will try to connect with a WiFi network and after successfully connecting with the network, it will display the message and IP address of the ESP32 board.
Serial.print("Connecting to Wifi Network");   // Display this string on serial monitor
Serial.println(ssid);    // Print name of ssid on the serial monitor
WiFi.begin(ssid, password);   // It will start connecting to the network
while (WiFi.status() != WL_CONNECTED)    // This condiction checks either connected to
{                                                                  // to a network or not
delay(500);                                                // it will keep try after every half second
Serial.print(".");                                         // It will exist this loop upon connection
}
Serial.println("");
Serial.println("Successfully connected to WiFi.");    // Display this message on Serial monitor
Serial.println("IP address of ESP32 is : ");
Serial.println(WiFi.localIP());   // This function will display IP address of ESP32 or station mode ESP32
server.begin();                      // This statement will start the server. Now web client can connect to ESP32 web server
Serial.println("Server started"
Inside the loop function
These lines get the values of temperature and humidity and save them in these two variables.
Temperature = dht.readTemperature();
Humidity = dht.readHumidity();
This server.available function checks if any web client is available or not. If it is available logical high value will be stored inside this client variable.
WiFiClient client = server.available();if the value of the client variable is logical high this ‘if’ condition becomes true. Inside this ‘if” condition we are displaying web page and values of sensor data on the web page. Every HTTP request from a web client end with ‘\r’, so this client.readStringUntil() function listens to the request of web client until \r is not found.
if (client)
{
Serial.println("Web Client connected ");
String request = client.readStringUntil('\r');
After that we client.println() function sends HTML files to web page. So to understand this part, lets me understand some basics of this HTML and how to make tables in HTML because we are displaying data in table format.
To create a table in HTML, we use <table> and </table> tags.
- As you know every table consists of rows and columns. So <tr> and </tr> tags are used to add row to a table.
- Every table also has a heading. To add heading to a table we use <th> and </th> tags.
- To define the number of columns or cells in each row, we use these <td> and </td> tags.
In this example, we measure three values. Therefore we will need three rows and two cells and one heading with measurement and value message.
<!DOCTYPE html>
<html>
<head>
  <meta name="viewport" content="width=device-width, initial-scale=1">
  <link rel="icon" href="data:,">

</head>
<body>

  <table>
    <tr>
      <th>MEASUREMENT</th>
      <th>VALUE</th>
    </tr>
    <tr>
      <td>Temperature in Celsius</td>
      <td>--- *C</td></tr>
    <tr>
      <td>Temperature in Fahrenheit</td>
      <td>--- *F</td>
    </tr>
    <tr>
      <td>Humidity</td>
      <td>--- %</td>
    </tr>
</body>
</html>
So this code will create a table which will look like this:

So this code first creates heading with the message of ‘measurement’ in one cell and the message of ‘value’ in another cell. After that, we created three rows to display values of temperature and humidity. Now lets come to Arduino programming part of this project of displaying sensor values on the Web server using ESP32.
After web client requests for a web page, ESP32 web server responds to the web client with an HTML file which will show as a web page in web browser. The client.println() function is used to send the HTML files to web client. This code will send the HTML files to the web client along with values of temperature and humidity in tabular form.
client.println("<!DOCTYPE html><html>");
client.println("<head><meta name=\"viewport\" content=\"width=device-width, initial-scale=1\">");
client.println("<link rel=\"icon\" href=\"data:,\">");
client.println("</style></head><body><h1>ESP32 Web Server Reading sensor values</h1>");
client.println("<h2>DHT11/DHT22</h2>");
client.println("<h2>Microcontrollerslab.com</h2>");
client.println("<table><tr><th>MEASUREMENT</th><th>VALUE</th></tr>");
client.println("<tr><td>Temp. Celsius</td><td><span class=\"sensor\">");
client.println(dht.readTemperature());
client.println(" *C</span></td></tr>");
client.println("<tr><td>Temp. Fahrenheit</td><td><span class=\"sensor\">");
client.println(1.8 * dht.readTemperature() + 32);
client.println(" *F</span></td></tr>");
client.println("<tr><td>Humidity</td><td><span class=\"sensor\">");
client.println(dht.readHumidity());
client.println(" %</span></td></tr>");
client.println("</body></html>");
To send the value of temperature, you will send this value through dht.readtemperature() function as shown below. First, it will send a new table row entry and send the value between these tags.
client.println("<tr><td>Temp. Celsius</td><td><span class=\"sensor\">");
client.println(dht.readTemperature());
client.println(" *C</span></td></tr>");
This line will stop the web client connection.
client.stop();Adding styles to a web page to look more professional

As you see the table which displaying values is not looking attractive without colors and table borders. So now let’s add some CSS to this code and make to more professionally looking good like shown below.
Add this code inside the HTML part before the closing heading tag </head>. you will see the web page like shown above. Check this picture to know where you need to add this code which will add style to the web page.

client.println("<style>body { text-align: center; font-family: \"Arial\", Arial;}");
client.println("table { border-collapse: collapse; width:40%; margin-left:auto; margin-right:auto;border-spacing: 2px;background-color: white;border: 4px solid green; }");
client.println("th { padding: 20px; background-color: #008000; color: white; }");
client.println("tr { border: 5px solid green; padding: 2px; }");
client.println("tr:hover { background-color:yellow; }");
client.println("td { border:4px; padding: 12px; }");
client.println(".sensor { color:white; font-weight: bold; background-color: #bcbcbc; padding: 1px; }");
CSS stands for Cascading Style Sheets and it is used for adding colors and styles to web pages. In the above code, CSS adds style and colors to each element of the table like rows, cells, and heading. you can check more information about creating CSS and HTML here.
This is how we can interface dht11/dht22 with esp32 and display values on the web server.
DHT11/DHT22 ESP32 Web Server Demo
We also have a similar guide available using MicroPython firmware:
You may also like to check other ESP32 projects :
- ESP32 DS18B20 Temperature Sensor Web Server with Arduino IDE
- Password protected ESP32 web server in Arduino IDE
- ESP32 ESP-NOW and Wi-Fi Web Server using Arduino IDE
- Accessing ESP32 web server from anywhere in the world
- ESP32 web server in Arduino
- BMP180 WEB SERVER WITH ESP32
- Control Servo motor from Web Server with ESP32
Thanks for this tutorial!
What distinguish you from others is the detail such that even a toddler will understand.
Really appreciate
Worked perfectly! Thank you.
I love the depth of detail, especially how to get the correct ip address , and CSS
I always have this error code :
Arduino: 1.8.12 (Windows Store 1.8.33.0) (Windows 10), Board:”ESP32 Dev Module, Disabled, Default 4MB with spiffs (1.2MB APP/1.5MB SPIFFS), 240MHz (WiFi/BT), QIO, 80MHz, 4MB (32Mb), 921600, None”
sketch_may04c:18:12: error: cannot declare variable ‘server’ to be of abstract type ‘WiFiServer’
WiFiServer server(80);
^
In file included from C:\Program Files\WindowsApps\ArduinoLLC.ArduinoIDE_1.8.33.0_x86__mdqgnx93n4wtt\libraries\WiFi\src/WiFi.h:32:0,
from C:\Users\siebelef\OneDrive\kweek\sketch_may04c\sketch_may04c.ino:1:
C:\Program Files\WindowsApps\ArduinoLLC.ArduinoIDE_1.8.33.0_x86__mdqgnx93n4wtt\libraries\WiFi\src/WiFiServer.h:31:7: note: because the following virtual functions are pure within ‘WiFiServer’:
class WiFiServer : public Server {
^
In file included from C:\Users\siebelef\Documents\ArduinoData\packages\esp32\hardware\esp32\1.0.4\cores\esp32/Arduino.h:152:0,
from sketch\sketch_may04c.ino.cpp:1:
C:\Users\siebelef\Documents\ArduinoData\packages\esp32\hardware\esp32\1.0.4\cores\esp32/Server.h:28:18: note: virtual void Server::begin(uint16_t)
virtual void begin(uint16_t port=0) =0;
^
C:\Users\siebelef\OneDrive\kweek\sketch_may04c\sketch_may04c.ino: In function ‘void setup()’:
sketch_may04c:29:26: error: invalid conversion from ‘const char*’ to ‘char*’ [-fpermissive]
WiFi.begin(ssid, password);
^
In file included from C:\Users\siebelef\OneDrive\kweek\sketch_may04c\sketch_may04c.ino:1:0:
C:\Program Files\WindowsApps\ArduinoLLC.ArduinoIDE_1.8.33.0_x86__mdqgnx93n4wtt\libraries\WiFi\src/WiFi.h:79:9: note: initializing argument 1 of ‘int WiFiClass::begin(char*, const char*)’
int begin(char* ssid, const char *passphrase);
^
exit status 1
cannot declare variable ‘server’ to be of abstract type ‘WiFiServer’
How can I solve it?
Hi
It looks like, you did not install the ESP32 library in Arduino IDE properly. For that you can see this tutorial:
http://microcontrollerslab.com/install-esp32-arduino-ide/
one other problem could be the old version of Arduino IDE, try to use latest version of Arduino IDE.
Hi, i want to display a message on the webpage if the temperature increases after a certain value. How do i do that?
Thank you 🙂
looks great, but forgive me to say it has one drawback:
in order to get updated values you need to refresh the webpage. Canofcourse built a refresh into your webpage but it would be fancier to use an asynchronous webserver that will only refresh the measured values rather than the entire webpage
Yes, you are right. We are also planning to update this article with an asynchronous web server feature. We will update this article soon.
hola los valores de temperaturas y humedad salen con tres enteros, que se puede hacer?
por ejemplo:
temp Celsius 371.20 *C
Hello! I am making a heating station and I would like to know if it is possible to use the DHT11 and the lamp codes together.
Regards.