In this tutorial, we will show you how to design a dual-speed RC oscillator for PIC microcontroller. If we are designing a PIC microcontroller-based project where high frequency is not a requirement, there is no need to use an external crystal oscillator. We can use the internal oscillator of the microcontroller. We can check this article to know how to select the internal oscillator of the PIC microcontroller. If our required microcontroller does not have an internal oscillator, we can use an external oscillator as a dual-speed oscillator.

What is Dual Speed RC Oscillator?
What does “dual speed RC oscillator” mean? It means you can use an RC oscillator as either a lower speed or high-speed oscillator just by changing the current flow through the dual speed RC oscillator. In this tutorial, I will show you how to do it. To design an RC oscillator, we need one resistor and one capacitor. But to design a dual speed RC oscillator, we need two resistors and one capacitor. One resistor will be used to change the frequency from low to high and high to low by changing the current flow through the other resistor, as shown below. Usually, we use only one resistor and one capacitor to design an RC oscillator for a PIC microcontroller.
A Dual-Speed RC (Resistor-Capacitor) oscillator is a type of oscillator in PIC microcontrollers to provide clock signals for the device. It offers two speed options for the oscillator, allowing you to choose between a lower speed mode for power-saving applications and a higher speed mode for performance-critical tasks.

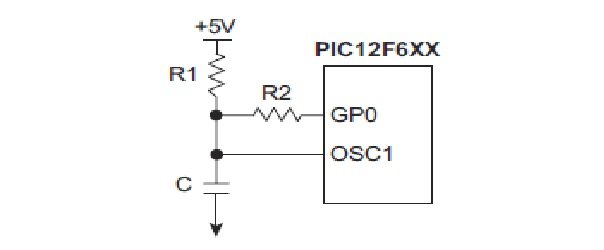
Circuit diagram of dual speed RC oscillator is shown below.
In a dual-speed RC oscillator, we use two resistors. To use the RC oscillator as a dual-speed oscillator, you need to use one GPIO (General Purpose Input and Output) pin of the PIC microcontroller.
How to Configure RC oscillator?
Follow these steps to configure this RC oscillator in dual-frequency mode:
- Select the Dual-Speed RC Oscillator Mode: Most PIC microcontrollers offer various oscillator modes, and you need to select the Dual-Speed RC oscillator mode. This is typically done by configuring specific bits in the oscillator control register.
- Choose the Oscillator Speed: In Dual-Speed RC oscillators, you have two speed options: low speed and high speed. The choice between these two modes depends on your application’s requirements. You can configure the oscillator to start in either the low or high-speed mode.
- Configure the Frequency: Dual-Speed RC oscillators often allow you to adjust the oscillator frequency by changing the values of the resistors (R) and capacitors (C) in the oscillator circuit. The actual formula for calculating the oscillator frequency may vary depending on the specific PIC microcontroller model.
- Start the Oscillator: After configuring the oscillator mode and speed, you need to start the oscillator by setting the appropriate control bits in the oscillator control register. This will enable the oscillator and provide clock signals to the microcontroller.
- Monitor the Oscillator Stability: RC oscillators are less accurate than crystal oscillators, so you may need to monitor and calibrate the oscillator if precise timing is critical for your application. Some PIC microcontrollers offer mechanisms for adjusting the oscillator frequency, such as the FRC Calibration mode.
- Configure the Clock Source: Once the oscillator is running, you can configure the PIC microcontroller to use the RC oscillator as the clock source for the CPU and peripherals. This is typically done by setting the appropriate bits in the configuration registers.
- Test and Optimize: Finally, you should test the oscillator’s performance in your specific application and adjust the resistor and capacitor values as needed to achieve the desired frequency and stability.
Example
- First of all, use one input and output pin of the microcontroller with resistor R2 as shown above. This pin will be used both as an input and output through programming.
- When you turn on the microcontroller, this GPIO pin will be in a high impedance state.
- Now declare this input and output pin using this command TRIS.GP0=0; and make this pin high using this command PORT.GP0=1;.
- The frequency of the oscillator depends on the values of R1, R2, and the capacitance value of the C capacitor.
- You can make calculations to obtain the desired frequency. Many online calculators are available for this purpose.
- The frequency of the PIC microcontroller with an external RC oscillator depends on the values of resistance and capacitance on the OSC1 pin.
- We can change the frequency by changing the resistance value.
- The resistance value can be changed by altering the voltage value on the GP0 pin.
- When the GP0 pin is high, resistor R1 becomes parallel to resistor R2, reducing the overall resistance.
- The decrease in resistance leads to an increase in the frequency of the RC oscillator.
- When we use the GP0 pin as an input by setting TRIS.GP0=1, it minimizes the current flow through resistor R2.
- Now, resistor R2 is no longer in parallel with resistor R1, resulting in an increase in resistance.
- The increase in resistance causes a decrease in the frequency of the RC oscillator.
Conclusion
In conclusion, the dual-speed RC oscillator provides a versatile solution for designing projects with PIC microcontrollers. Users can switch between lower speed and higher speed oscillations by utilizing the internal oscillator or an external oscillator, depending on the project requirements. This flexibility allows for achieving both high-speed processing and low power consumption based on the specific application needs. Users can fine-tune the frequency of the RC oscillator by adjusting resistor values and capacitor capacitance to attain the desired performance. Therefore, the dual-speed RC oscillator proves to be a valuable tool for designing efficient and customizable PIC microcontroller-based projects.
Related content: