In this user guide, we will learn how to send sensor data to Google Firebase and build an Android app using ESP32 and the Arduino IDE. By combining the power of ESP32, the versatility of Google Firebase, and the simplicity of MIT App Inventor, we will create an IoT web app that displays sensor readings in real-time on our Android smartphones. Whether you’re a beginner or an experienced developer, this step-by-step guide will equip you with the knowledge and skills to create your own ESP32-based IoT application and harness the benefits of Google Firebase’s real-time database. So, let’s dive in and unlock the potential of ESP32 and Google Firebase for your IoT projects.

Previously, we used the Blynk application to control ESP32’s output (Control ESP32 Outputs using Blynk App and Arduino IDE). This time we will build our ESP32 application which will display sensor readings on our smartphone. You can access the sensor readings conveniently anywhere and anytime. You can use any appropriate sensor such as DS18B20, BME680, LM35, and MPU6050. However, for this article, we will be using a DHT11 sensor, which measures temperature and humidity. We will program our ESP32 board using the Arduino IDE and connect it to the DHT11 sensor. Furthermore, we will send the sensor readings to the Google Firebase database. We will demonstrate the real-time sensor readings through our app, which we will build in MIT App Inventor.
If you want to receive data on ESP32 from Google Firebase, you can read this article:
This article consists of following sub-topics:
- Introduction of DHT11 sensor and its connection with an ESP32 board.
- Introduction of Google Firebase and setting up Google Firebase Console
- Setting up Arduino IDE and programming the NodeMCU
- Building app in MIT App Inventor
We have a similar guide with ESP8266:
ESP8266 Send Sensor Readings to Google Firebase and Build an Android app to display Data
Recommended Components
The following components are used in this project or are helpful for building it with the ESP32.
| Component | How it’s used in this project | Buy on Amazon |
|---|---|---|
| ESP32 Development Board | Reads the sensor data and connects to Google Firebase over Wi-Fi. | Check Price |
| Micro USB Cable | Powers the ESP32 and uploads the sketch from your computer. | Check Price |
| Breadboard | Holds the ESP32 and any sensors for solderless prototyping. | Check Price |
| Jumper Wires | Connect the ESP32 to your sensor and power rails. | Check Price |
As an Amazon Associate we earn from qualifying purchases. Prices and availability are accurate as of the date/time indicated and are subject to change.
Project Overview

We will create an IoT app through Google firebase and MIT App Inventor. The heading of the app will consist of “ESP32 & DHT11 Sensor APP” followed by first ‘Temperature’ and its reading and then ‘Humidity’ and its reading with appropriate units. We aim to build an application that will display sensor readings obtained from DHT11 connected with the ESP32 module programmed in Arduino IDE. This transmission of data from the module to the application will occur via Google Firebase. These readings will automatically update to new values in real-time when the IoT app receives them.
We will require the following for our project:
Hardware Required:
- ESP32 development board
- DHT11 Sensor
- Connecting Wires
- Breadboard
Software Required:
- Google Firebase
- Arduino IDE
- MIT App Inventor
- Android Smartphone with MIT AI2 Companion installed
Working Process
- DHT11 sensor will send temperature and humidity reading to the ESP32 development board.
- The ESP32 module will transmit the sensor data to the Google Firebase server.
- We will include Google Firebase’s database inside our IoT app through MIT App Inventor. Thus, we could access the temperature and humidity readings in a device that has MIT Inventor installed on it e.g., our android smartphone/tablet.

Introduction to DHT11 sensor
DHT11 sensor is used to measure the temperature and humidity. It has a resistive humidity sensing component and a negative temperature coefficient (NTC). An 8-bit MCU is also connected in it which is responsible for its fast response. It is very inexpensive but it gives values of both temperature and humidity simultaneously. DHT sensors are pre-calibrated. We can directly connect them with ESP32/ESP8266 to obtain sensor output reading. They are internally composed of a humidity sensing sensor and a thermistor. These two components measure humidity and temperature.
Features of DHT11
- Humidity range: from 20 to 90% RH
- Temperature range: from 0 – 50 C
- Signal transmission range: ~20 m
- Inexpensive
- Fast response and it is also durable
For more information regarding DHT11, you can have a look at the articles listed below:
- DHT11 interfacing with arduino and weather station
- MicroPython: DHT11/DHT22 Web Server with ESP32/ESP8266 (Weather Station)
- Interface DHT11/DHT22 with ESP32 and display values on Web Server
- DHT11 sensor interfacing with pic microcontroller
Connecting DHT11 sensor with the ESP32 development board
Connecting the DHT11 sensor with the ESP32 board is a straightforward process DHT sensor typically has four pins. The first pin is the VCC pin, which needs to be connected to the power source. The second pin is the data pin, which should be connected to an additional 10k ohm resistor. The third pin is not used in this case. Finally, connect the fourth pin, the ground pin, to the ground of the ESP32 board. However, in DHT modules, only three pins are exposed and a 10k ohm pull-up resistor is internally connected to pin 2. For our project, we will be using the module version of the DHT sensor.
Connect the ground and the VCC of the DHT11 sensor module to the ground and 3.3V pin of ESP32. Then connect the data pin of the DHT11 sensor module to any appropriate output pin of the board. We have used GPIO14 in this case.
Follow the schematic diagram below for the ESP32 module and connect them accordingly.
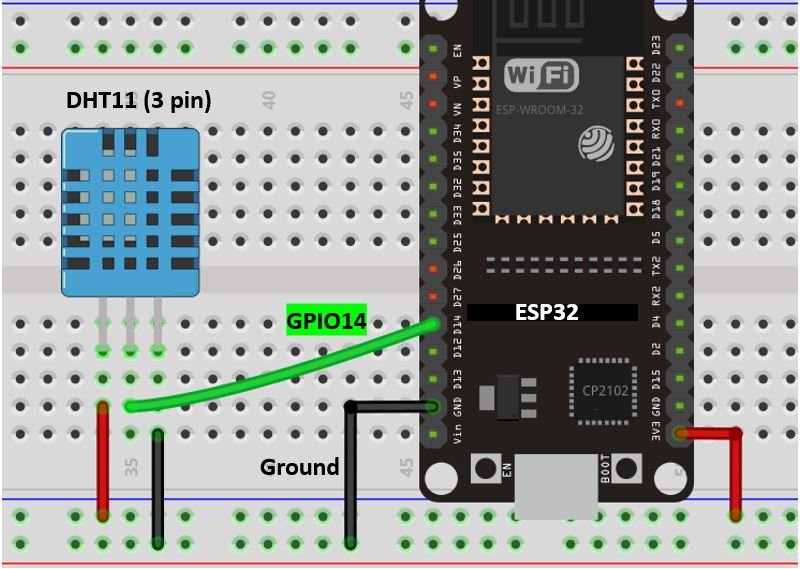
Vin is connected with a 3.3V pin on the module and both the ESP board and the sensor module is commonly grounded.
Google Firebase Introduction
Recommended Reading: Google Firebase: Control ESP32 Outputs with Arduino IDE
Google Firebase is an application development software created by Google. It can be used with any android/IOS application, IoT sensors and web services to create and alter the data obtained from them. It is a helpful software for building mobile/web applications easily and interactively. Paid services include a Real-time database, firebase storage, hosting and test lab. However, you can use Analytics for advanced messaging for free although you will have to create an account before accessing it.
One of the significant attributes of this software is that it is beginner-friendly. It is very simple to connect your application to Google Firebase. You have to follow each step carefully. If you have any difficulty or want to access further information, take a look at the official Google Firebase Documentation.
Setting up Google Firebase Console
Before proceeding with the project let us understand the steps which we need to follow to successfully connect with the Google Firebase application.
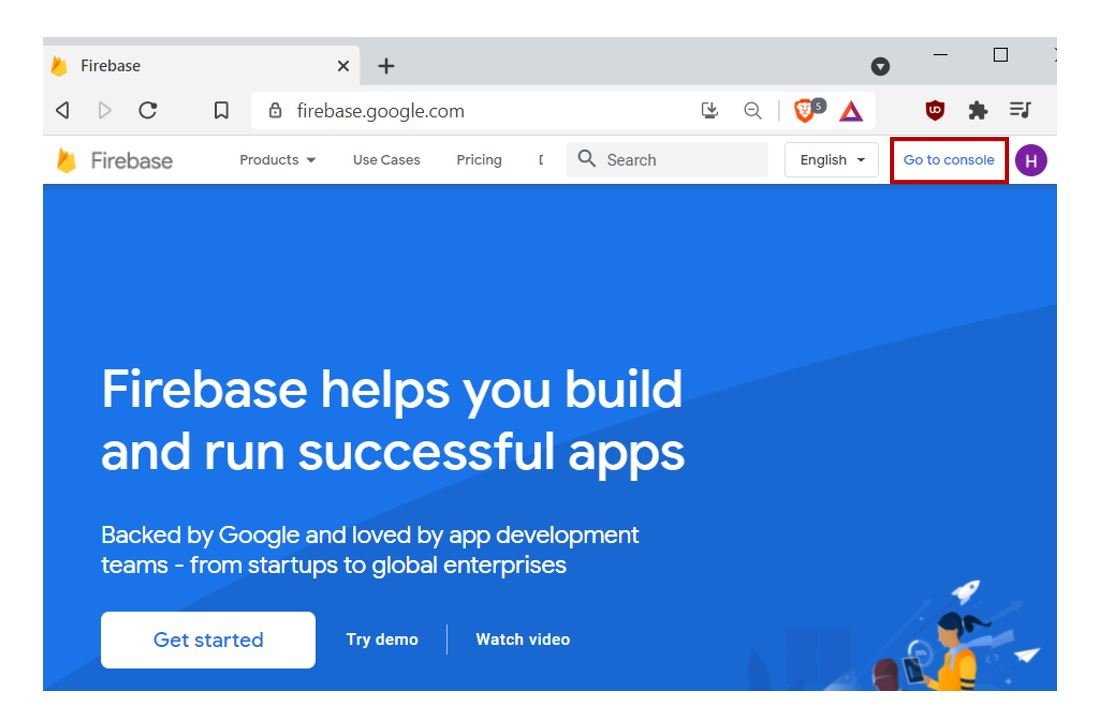
Firstly, type https://firebase.google.com/ in your browser search tab and press enter.
This will open the Firebase main page. Click ‘Go to Console’ as highlighted in the red rectangular box.
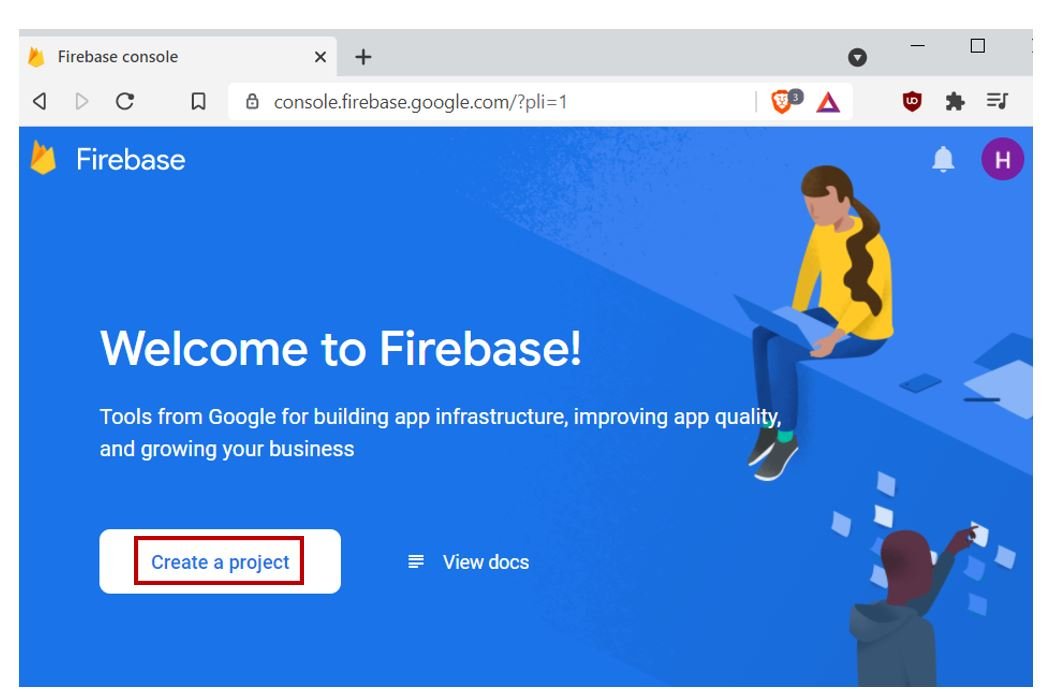
You will be redirected to a new web page with the welcome message. Click the button ‘Create a Project’ as shown below.
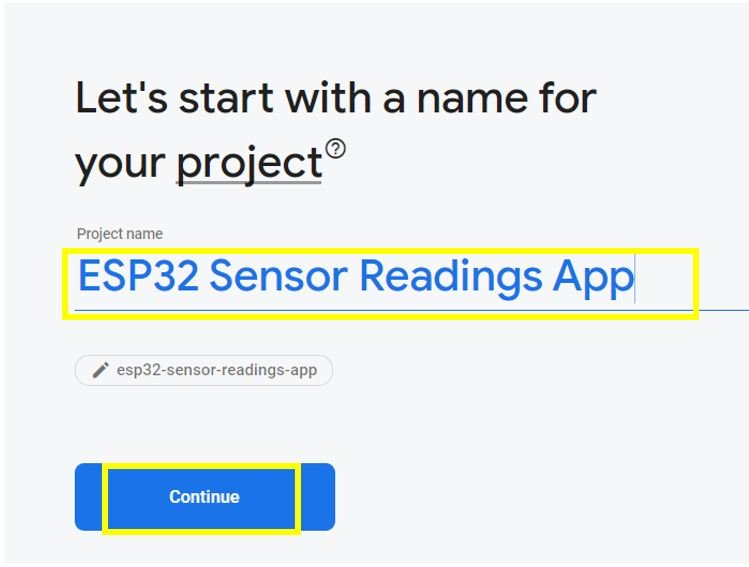
The following page opens up.
Step 1: Write the name of your project. Remember to tick the Firebase term agreement. Now click ‘Continue’.
Step 2: Now enable ‘Google analytics for this project’ by swiping the sliding button. Click ‘Continue’ to proceed further.

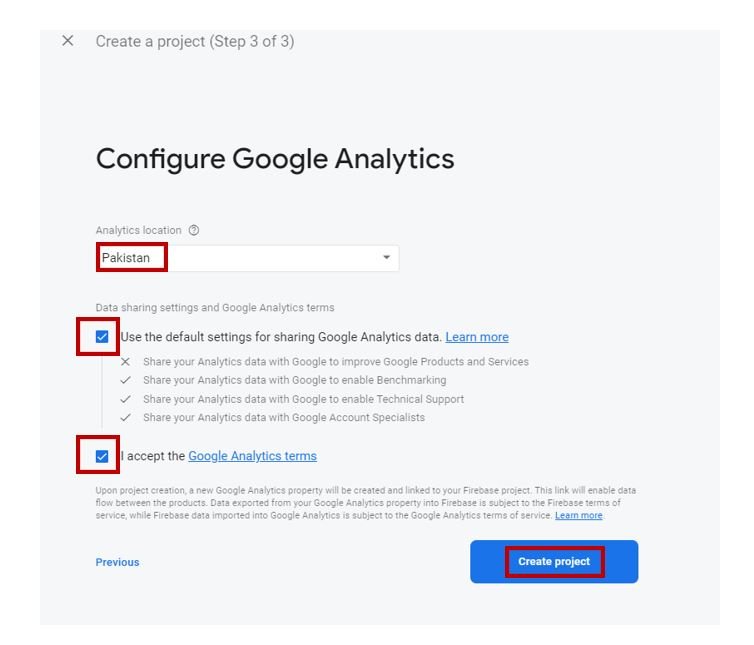
Step 3: After choosing your location and ticking the required boxes click ‘Create Project’.
After a few moments, your project will be created.
Click ‘Continue.’
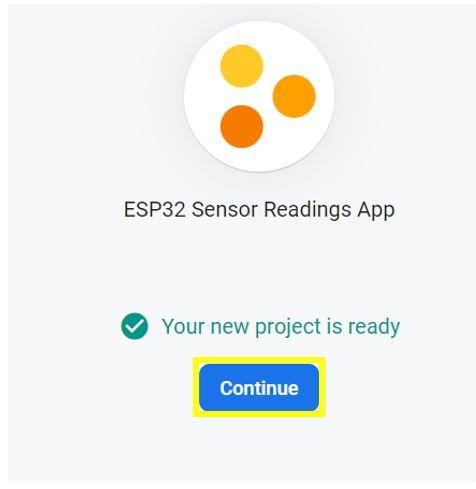
Your newly created project will open.
Obtaining Authorization key and Firebase host
Go to the settings icon and click ‘Project Settings’.

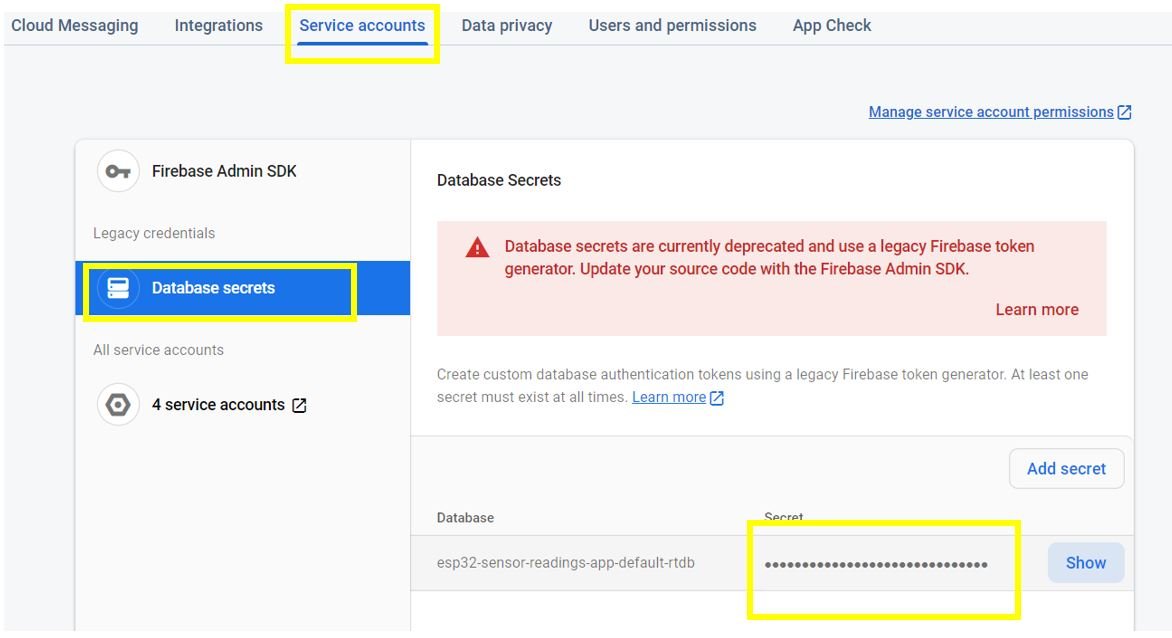
Now, go to ‘Service Accounts’ and click ‘Generate new private key’.

Then go to ‘Database secrets.’ You will be able to view a secret key associated with your project. This is the unique authorization key that you will save and use later on in the program code. Keep it a secret and do not share it with anyone or your project security will be compromised.
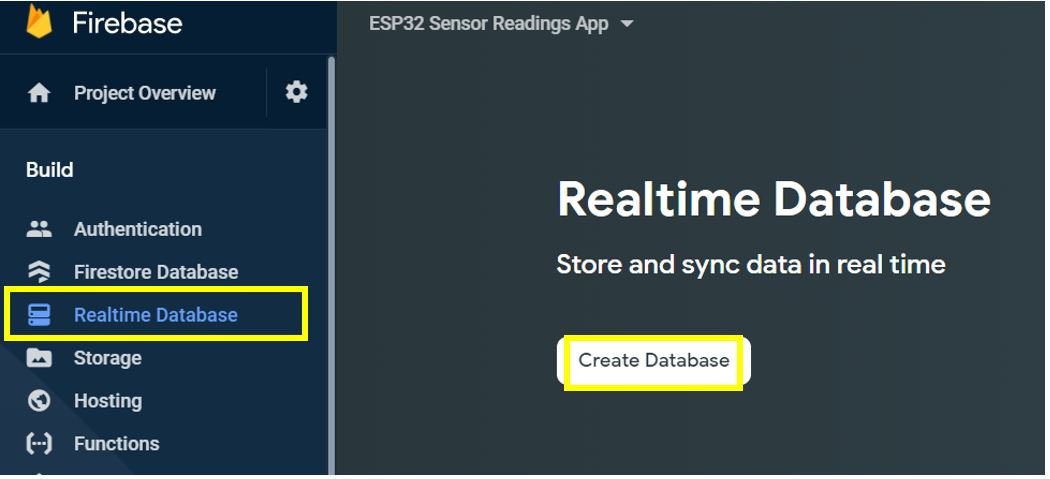
Next, Under the Build tab go to ‘Realtime Database.’ Then click ‘Create Database.’
After setting your location, check ‘Start in Lock mode’ and then click the Enable button. Your database settings are now completed. Copy the text shown in the highlighted box below. Save it as well. This will act as your Google Firebase host which we will incorporate in our program code.

Setting up Arduino IDE
We will use Arduino IDE to program our ESP32 development board. Thus, you should have the latest version of Arduino IDE. Additionally, you also need to install the ESP32 plugin.
If your IDE does not have the plugin installed you can visit the link below: Installing ESP32 library in Arduino IDE and upload code.
Installing Google Firebase ESP32 Library
To use Google Firebase with our ESP32 board, we would have to install its library in our Arduino IDE.
To download the library, click here. Click on ‘Code’ and then ‘Download Zip’.
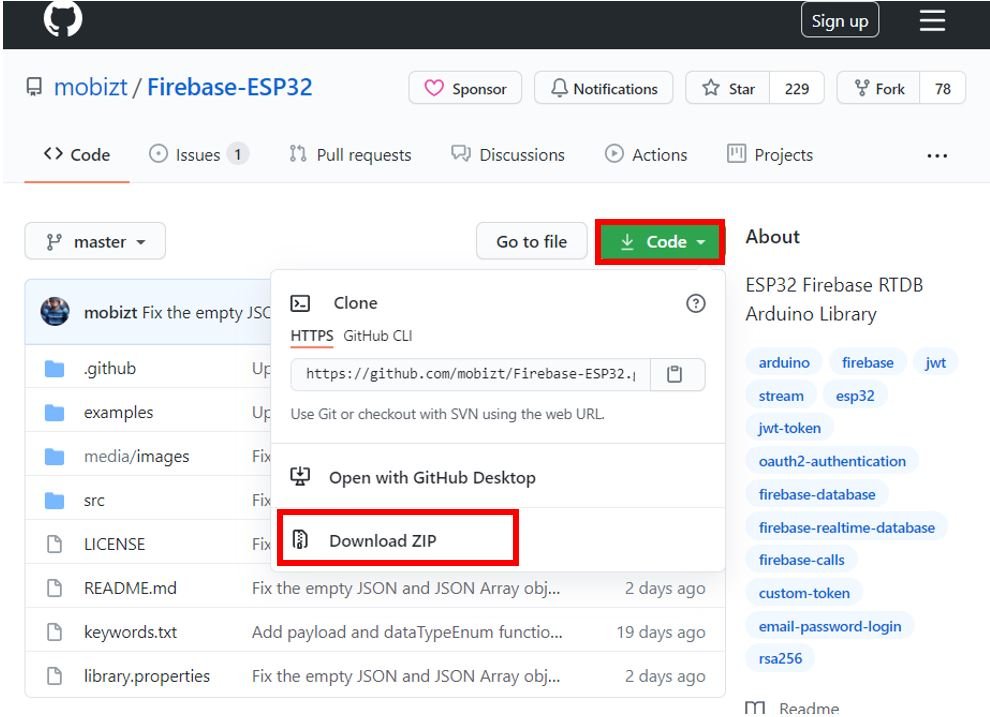
You will download the library as a .zip folder which you will extract and rename as ‘FirebaseESP32’ Then, transfer this folder to the installation library folder in your Arduino IDE.
Likewise, you can also go to Sketch > Include Library > Add .zip Library inside the IDE to add the library as well. After installation of the library, restart your IDE.
Installing DHT Library
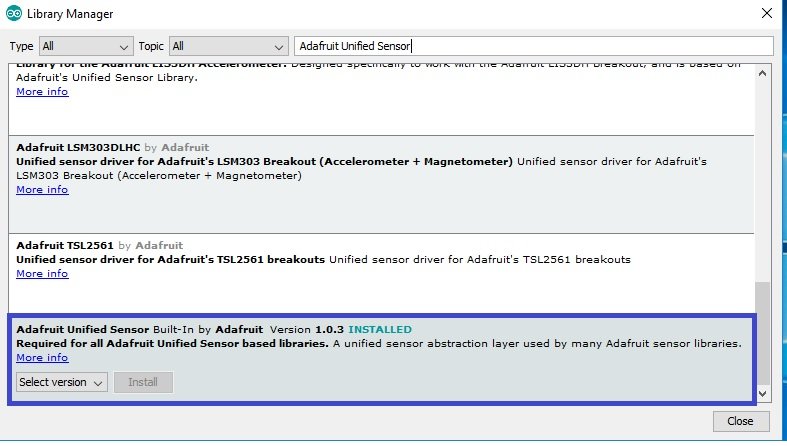
As we are connecting the DHT11 sensor with ESP32 so we will have to install DHT11 libraries to our module. We will require two libraries for this project:
- DHT sensor library
- Adafruit Unified Sensor library
We will use the Library Manager in our Arduino IDE to install the latest versions of the libraries. Open your Arduino IDE and go to Sketch > Include Libraries > Manage Libraries. Type each library name in the search bar and install them both.

ESP32 Code to Send Sensor Data to Google Firebase
Open your Arduino IDE and go to File > New to open a new file. Copy the code given below in that file. You need to enter your network credentials. Additionally, you also have to provide your Authorization key and the Google Firebase Host both of which we saved previously.
#include <FirebaseESP32.h>
#include <WiFi.h>
#include "DHT.h"
#define FIREBASE_HOST "esp32-sensor-readings-app-default-rtdb.firebaseio.com"
#define WIFI_SSID "Your_SSID" // Change the name of your WIFI
#define WIFI_PASSWORD "Your_Password" // Change the password of your WIFI
#define FIREBASE_Authorization_key "Replace_with_your_secret_key"
#define DHTPIN 14
#define DHTTYPE DHT11
DHT dht(DHTPIN, DHTTYPE);
FirebaseData firebaseData;
FirebaseJson json;
void setup() {
Serial.begin(115200);
dht.begin();
WiFi.begin (WIFI_SSID, WIFI_PASSWORD);
Serial.print("Connecting...");
while (WiFi.status() != WL_CONNECTED)
{
Serial.print(".");
delay(300);
}
Serial.println();
Serial.print("IP Address: ");
Serial.println(WiFi.localIP());
Serial.println();
Firebase.begin(FIREBASE_HOST,FIREBASE_Authorization_key);
}
void loop() {
float hum = dht.readHumidity();
float temp = dht.readTemperature();
if (isnan(hum) || isnan(temp) ){
Serial.println(F("Failed to read from DHT sensor!"));
return;
}
Serial.print("Temperature: ");
Serial.print(temp);
Serial.print("°C");
Serial.print(" Humidity: ");
Serial.print(hum);
Serial.print("%");
Serial.println();
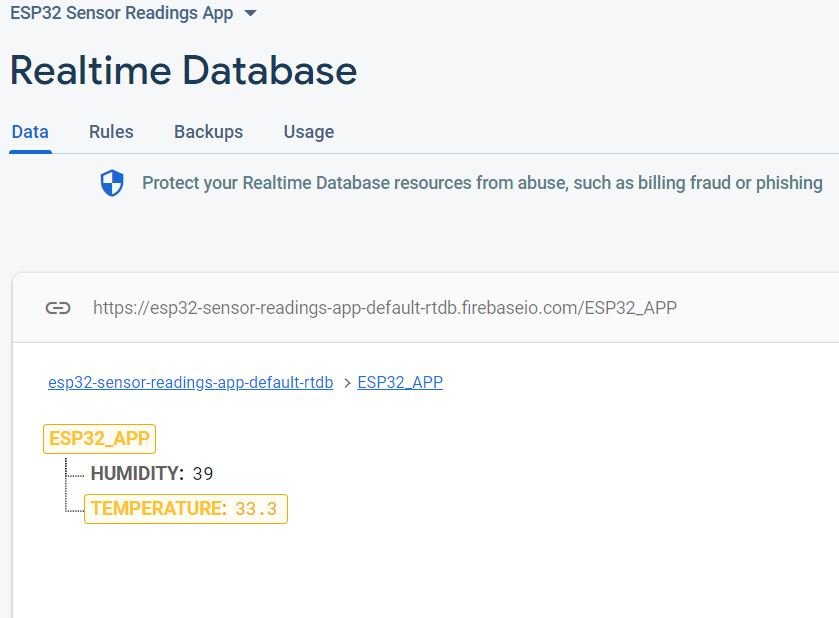
Firebase.setFloat(firebaseData, "/ESP32_APP/TEMPERATURE", temp);
Firebase.setFloat(firebaseData, "/ESP32_APP/HUMIDITY", hum);
delay(200);
}How the Code Works?
Now, let us understand how each part of the code works.
Including Libraries
Firstly, we will include the relevant libraries which are necessary for this project. We are using three libraries: WiFi.h, FirebaseESP32.h and DHT.h
WiFi.h library is used to connect our ESP32 module with the local WIFI network. The other libraries are the ones that we previously installed and will be required for the Firebase and sensor functionality.
#include <FirebaseESP32.h>
#include "DHT.h"
#include  <WiFi.h>
Defining Firebase and Network Credentials
Secondly, we will define the network credentials. One for the SSID and the other for the password. These will be our network credentials which will be used to connect to our wireless network. Replace both of them with your credentials to ensure a successful connection.
Next, we will define the Google firebase host and authorization key which we accessed and saved previously.
#define FIREBASE_HOST "esp32-sensor-readings-app-default-rtdb.firebaseio.com"
#define WIFI_SSID "Your_SSID" // Change the name of your WIFI
#define WIFI_PASSWORD "Your_Password" // Change the password of your WIFI
#define FIREBASE_Authorization_key "Replace_with_your_secret_key"
Defining DHT Sensor
The following lines of code will specify the type of DHT sensor and the GPIO pin of the ESP32 board which we will connect with the data pin of the sensor.
#define DHTPIN 14
#define DHTTYPE DHT11
DHT dht(DHTPIN, DHTTYPE);
Creating FirebaseData Object
Define the FirebaseData object as ‘firebaseData.’ This will be used later on in the code to access the sensor readings.
FirebaseData firebaseData;setup() function
Inside the setup() function, we will open a serial connection at a baud rate of 115200. Additionally, we will initiate the connection with the DHT sensor as well.
Serial.begin(115200);
dht.begin();
The following section of code will connect our ESP32 board with the local network whose network credentials we already specified above. We will use the WiFi.begin() function. The arguments will be the SSID and the password which we defined earlier in the code. After the connection establishes, the IP address of the ESP board prints on the serial monitor.
WiFi.begin (WIFI_SSID, WIFI_PASSWORD);
   Serial.print("Connecting...");
  while (WiFi.status() != WL_CONNECTED)
  {
    Serial.print(".");
    delay(300);
  }
  Serial.println();
  Serial.print("IP Address: ");
  Serial.println(WiFi.localIP());
  Serial.println();
Now, we will connect our ESP32 module with Google Firebase by using the Firebase.begin() function. It takes in two parameters. The first is the Firebase host and the second is the authorization key. Both were defined earlier on in the program code. Through correct credentials, a successful connection will be made.
Firebase.begin(FIREBASE_HOST,FIREBASE_Authorization_key);loop() function
The loop() function takes care of obtaining and handling the sensor readings. First, we read the humidity using dht.readHumidity(), and save the sensor reading in the variable ‘hum’. Similarly, we obtain the temperature reading from the sensor and save it in the variable ‘temp’.
float hum = dht.readHumidity();
float temp = dht.readTemperature();
If the connection between the module and the sensor is incorrect or the values are not being accessed properly then an error message will be printed. This will help us in debugging our circuit or a possible issue in the initialization of the sensor.
if (isnan(hum) || isnan(temp)  ){
    Serial.println(F("Failed to read from DHT sensor!"));
    return;
  }
Thus, we will display these temperature and humidity readings on the serial monitor. Newer readings will continuously appear on the screen.
  Serial.print("Temperature: ");
  Serial.print(temp);
  Serial.print("°C");
  Serial.print(" Humidity: ");
  Serial.print(hum);
  Serial.print("%");
  Serial.println();
Through Firebase.setFloat() we will update our app with the current temperature and humidity readings. This function will take in three parameters. The first is the FirebaseData object which we created. The second is the “project name/the name of the tag which we will set in our MIT block.” Lastly, we will specify the variable in which we were saving our updated sensor variables i.e., temp and hum respectively.
Firebase.setFloat(firebaseData, "/ESP32_APP/TEMPERATURE", temp);
Firebase.setFloat(firebaseData, "/ESP32_APP/HUMIDITY", hum);
Building App with MIT APP Inventor to Display Sensor Data from Google Firebase
MIT App Inventor is an incredible web application that helps users build interesting Android applications. It is a block-based programming tool through which users can create fully functional apps for Android devices such as smartphones, tablets e.tc. Often termed beginner-friendly, even people with no prior experience in programming can easily learn how to use this application efficiently. We will use this tool to build our ESP32 sensor-based app as well.
Steps to Create Android App
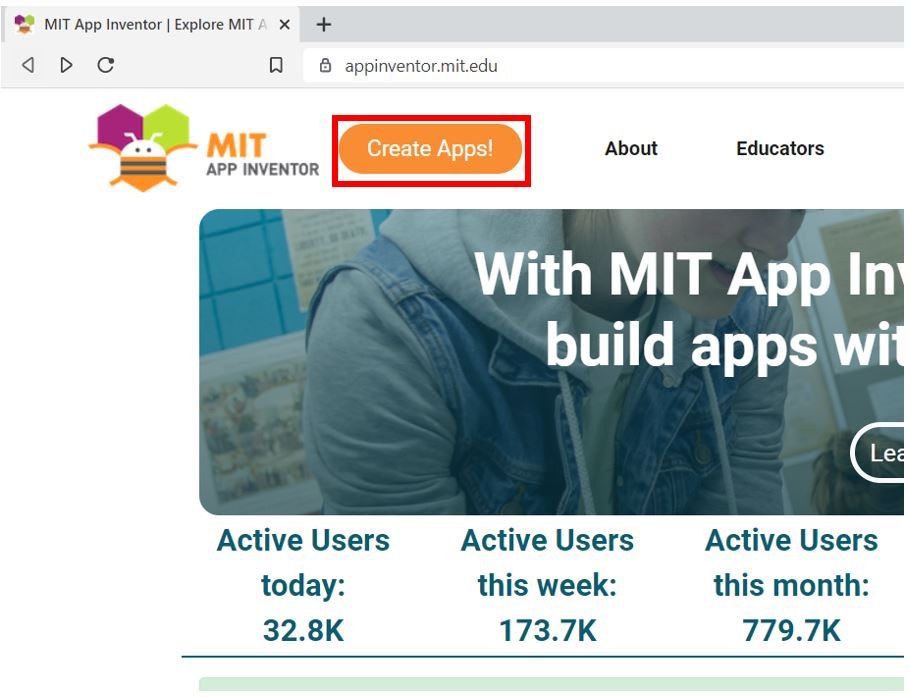
Go to the following website: and click the ‘Create Apps!’ button.
You will be redirected to a new window where you will be asked to sign in with your email account. After signing in you will have to accept the terms as shown below.

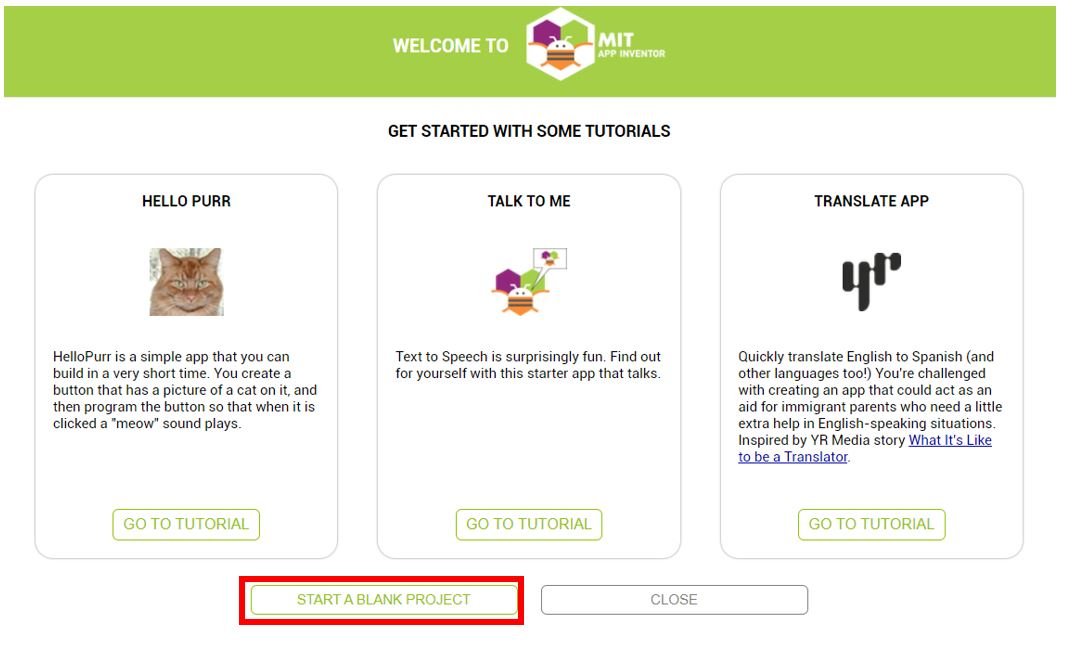
You will receive a welcome message. You can visit the link to get more information on how to install the inventor on your smartphone. Press ‘Continue’ to proceed. If you want, you can have a look at the tutorials being specified. Otherwise, go to ‘Start a blank project’ to start your app invention.
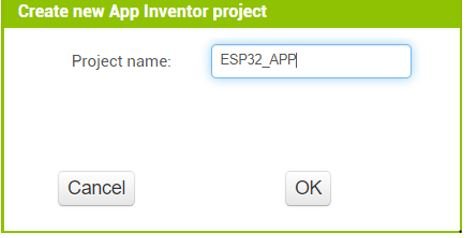
You will be asked to specify your project name. Choose an appropriate name. Click ‘ok.’
The following page will open. It is known as the Designer. This is where we will design the user interface of our app. We can add text, buttons, images and various other functionalities to our app by dragging and dropping components from the palette to the viewer. Then we will set their attributes through the ‘Properties’ column.

Creating User Interface
Firstly, we will add a heading for our app. Go to Palette > User Interface and head over to ‘Label.’ Now click and drag the label. Drop it on the Viewer side. Now you will be able to view it in the viewer as well as in the components list.
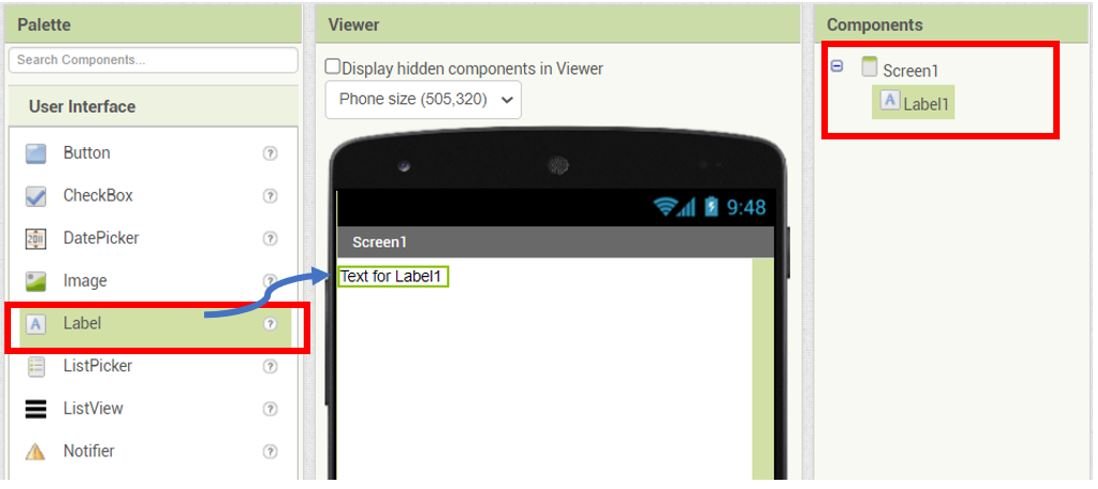
Head over to the ‘Properties’ to change the text, font size and colour. The label will automatically update in the viewer. Keep in mind the viewer will show you the final look of your app which will appear on your smartphone.

To add a space between the heading and the next block of text we will create another label and set it with an empty text. You can change the properties of the label to incorporate your preferred spacing dimension by changing the width and height of the label. We have set the height as 20%.
Adding Temperature Sensor Readings
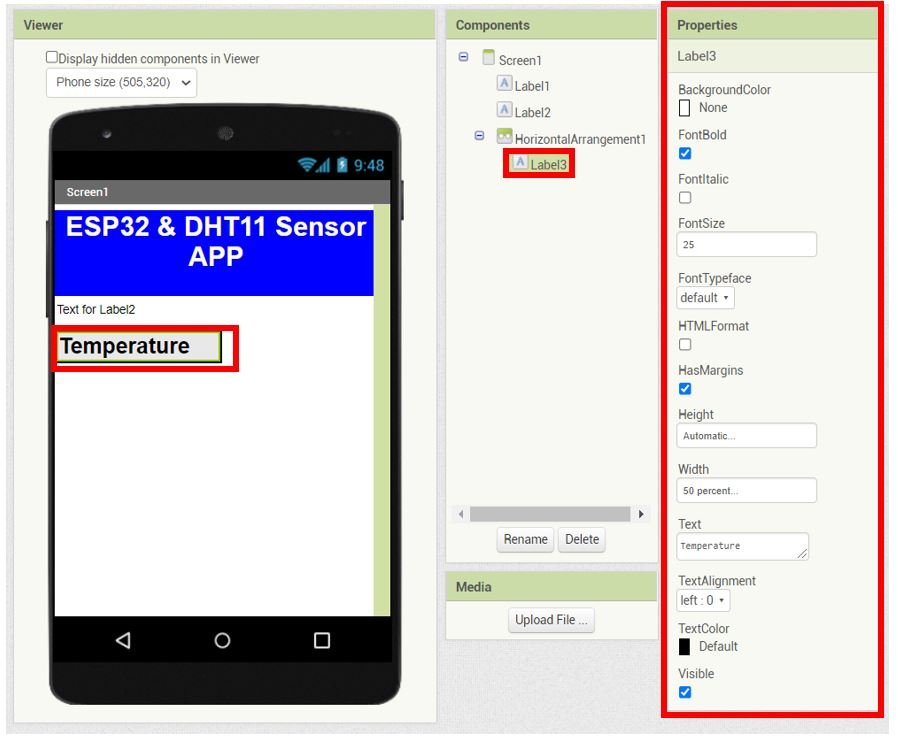
Next, we will add a block for the temperature readings. Go to Palette > Layout > HorizontalArrangement. Click and drag HorizontalArrangement and drop it in the Viewer.

Go to the ‘Properties’ and set its text as ‘Temperature’ and change the styling according to your preference. We have set the width to 50% and the height will be set automatically. Additionally, you can choose the font type, size and colour as well.
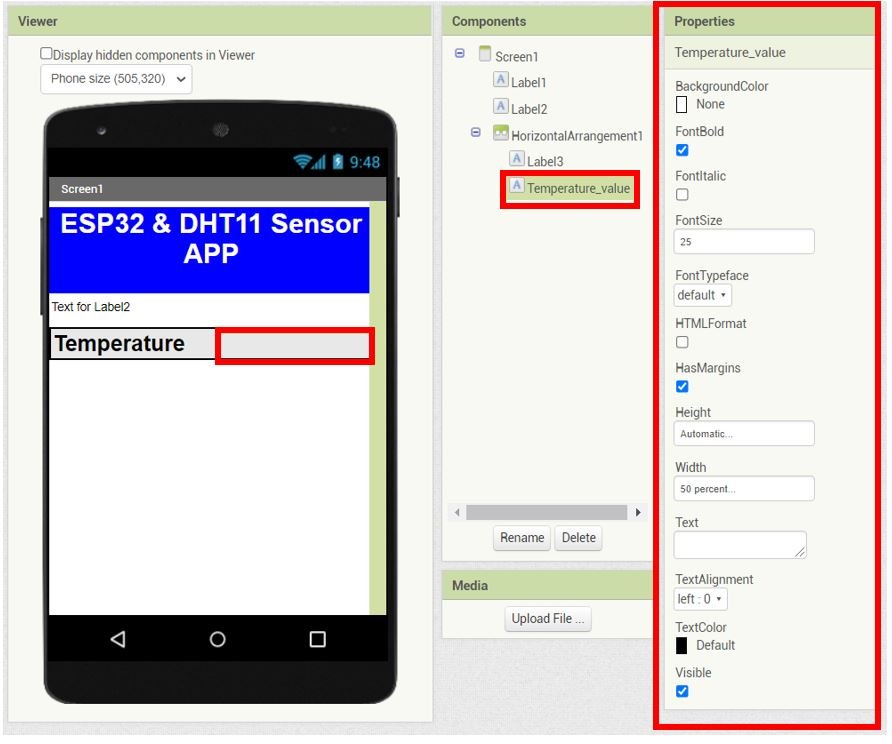
Now we will add another label beside Temperature which will specify the sensor reading. Again, follow the same procedure of creating a label. This time we will rename our label as ‘Tempertaure_value.’ Set it as an empty text and make its width 50% as well.
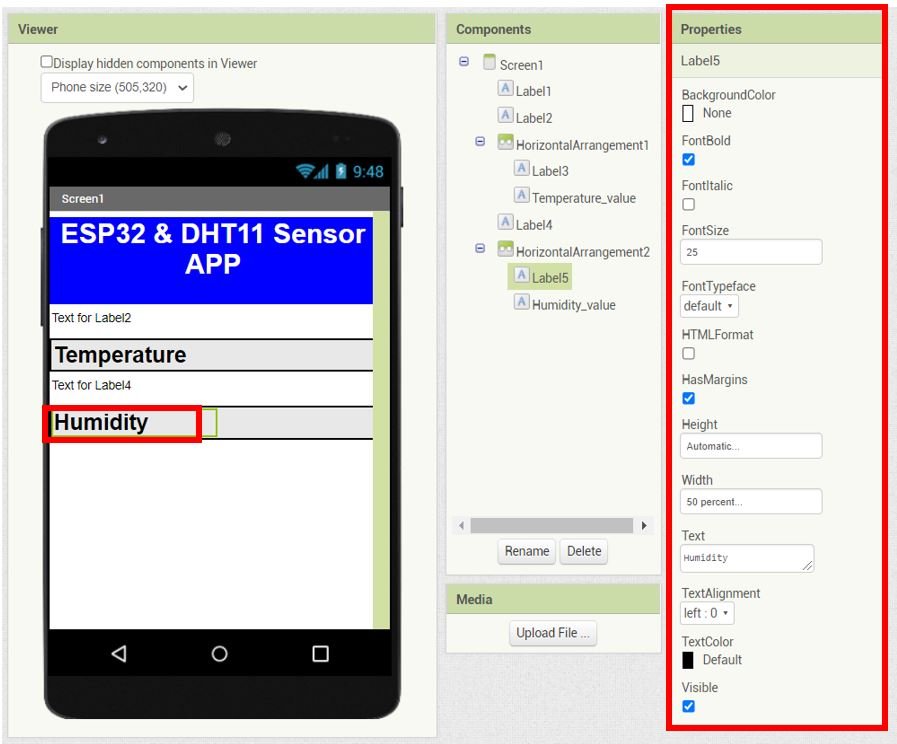
Adding Humidity Readings
Likewise, we will create a similar block for humidity as well. Go to Palette > Layout > HorizontalArrangement. Click and drag HorizontalArrangement and drop it in the Viewer.
Go to the ‘Properties’ and set its text as ‘Humidity’ and change the styling according to your preference. We have set the width to 50% and the height will be set automatically. Additionally, you can choose the font type, size and colour as well. Now we will add another label beside Humidity which will specify the sensor reading. This time we will rename our label as ‘Humidity_value.’ Set it as an empty text and make its width 50% as well.
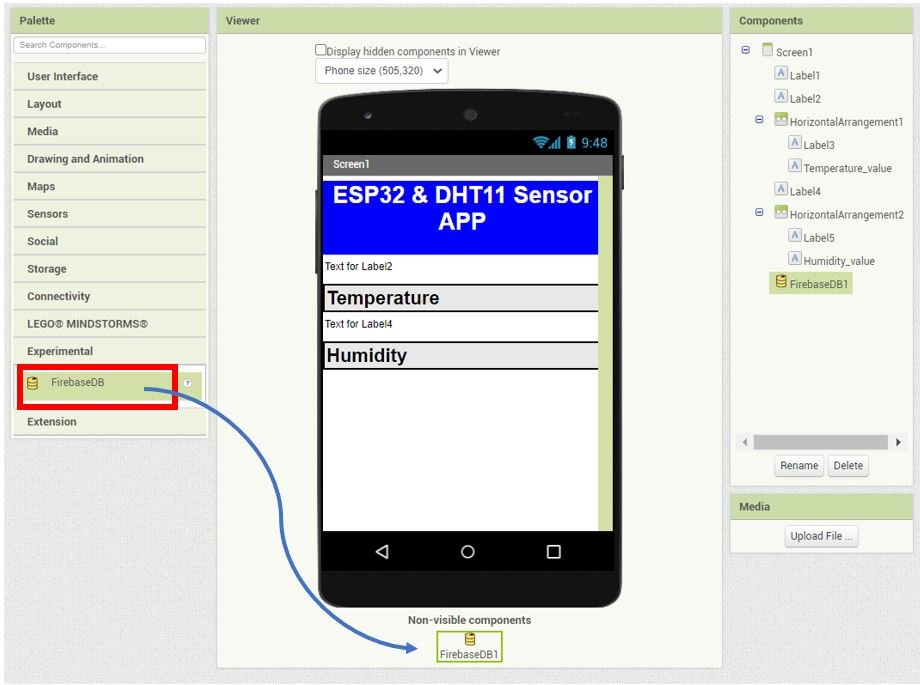
Adding FirebaseDB to MIT App Inventor
Go to Palette > Experimental and click and drag FirebaseDB in the viewer. This is a non-visible component of our app and will let us connect it with our Firebase project.
Now we will add the secret key authorization key of our Google firebase project which we saved earlier. In the properties section of our FirebaseDB1, copy the key where FirebaseToken is written. The Firebase token is the same as the secret key. Also, specify the complete URL of your project in place of the Firebase URL.

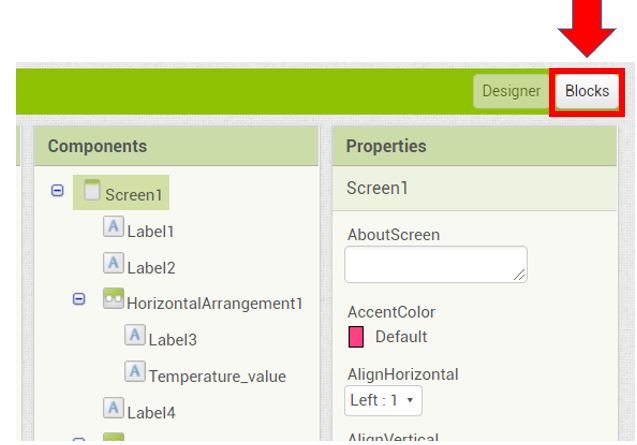
Blocks layout
Now click on the ‘Blocks’ button. A new editor will open up. Here we will design how our app will respond. We will assemble blocks in the workspace by clicking and dragging them.
First, click ‘FirebaseDB1’ and a series of blocks will open. Click and drag the ‘DataChanged’ block in the workspace.

Then go to Built-in > Control and choose the if-then block.

Click and drag it in the workspace and place it as shown below:

The blocks fit like puzzle pieces. Now similarly follow the diagram below and arrange all the blocks. Press the word ‘tag’ to obtain the ‘get tag’ blocks. Go to Blocks > Built-in > logic to get the “=” sign block. Add ‘TEMPERATURE’ and ‘HUMIDITY’ variables by accessing the empty ‘text’ box. Go to Blocks > Built-in > HorizontalArrangement > Temperature_value and choose the appropriate block. Likewise go to Blocks > Built-in > HorizontalArrangement > Humidity_value and choose the appropriate block. The ‘join’ box is also available in Blocks > Built-in > logic.
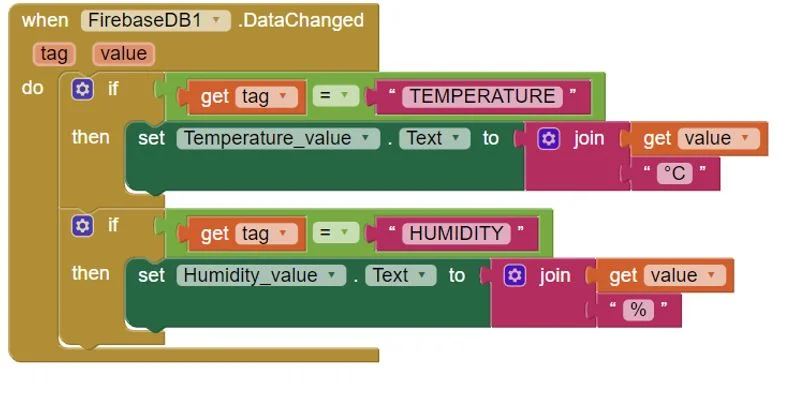
Basically, we will use ‘FirebaseDB1.DataChanged’ to obtain the updated sensor readings whenever the readings will update to newer ones in the Google Firebase database. Remember we were using the Realtime Database feature in Firebase so readings will continuously change.
For more information regarding building your app in MIT App Inventor, follow this guide: App Inventor Tutorials.
Setting up App Inventor on Smartphone
Now, as we have built our app in MIT app inventor, integrated Google Firebase with our ESP32 board and have also written its code let’s move ahead and install the App Inventor in our smartphone. Through this, we will be able to access our app on our smartphone from anywhere around the world. Follow the steps closely.
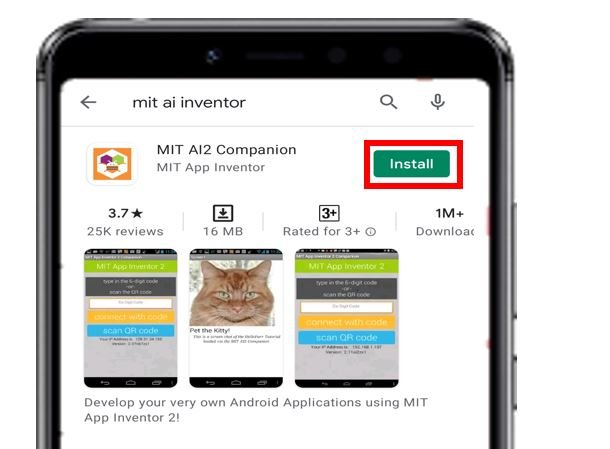
Firstly, go to Play Store and install ‘MIT AI2 Companion.’
After you installed the application, open it. You will have to either scan a QR code or type a 6-character code.
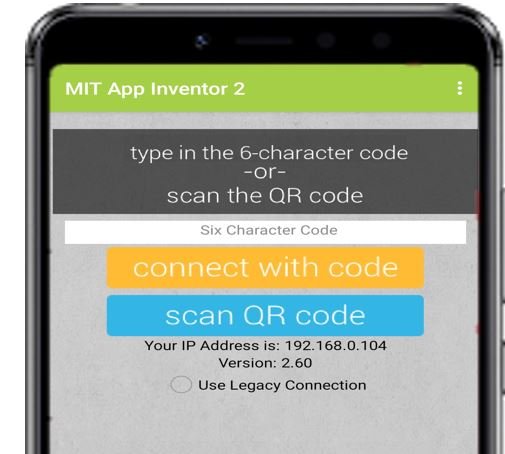
To access these, go to MIT App Inventor main page where we initially built our app. Go to Connect > AI Companion. You will receive your unique codes.

Connect using either option. After a few moments, the connection will establish. On our smartphone, we will be able to view the screen which we created.
Now, we will demonstrate the sensor readings.
Demonstration
Choose the correct board and COM port before uploading your code to the board. Go to Tools > Board and select ESP32 Dev Module.

Next, go to Tools > Port and select the appropriate port through which your board is connected.

Click on the upload button to upload the code to your ESP32 development board.
After you have uploaded your code to the development board, press its ENABLE button.

In your Arduino IDE, open up the serial monitor and you will be able to see the status of your WIFI connection and the IP address of your ESP module.
Shortly afterwards you will be able to view the temperature and humidity readings.

Open the MIT Companion app on your smartphone. The sensor readings continuously updating in real-time will be seen in the user interface which we designed.
You can even go to your Google Firebase Console and see the sensor readings changing in the Realtime database which we created.
Conclusion
In conclusion, we were able to build our own ESP32 sensor readings App via Google Firebase and MIT App Inventor. With this app, we can access the sensor data from anywhere in the world with the help of Google firebase database. It is very convenient and interesting to create the user interface of the app and control our ESP module’s output through Goggle Firebase.
You may also like to read:
- ESP8266 NodeMCU Data Logging to Firebase Realtime Database
- ESP32/ESP8266: Google Firebase Authentication (Email and Password)
- ESP32 ESP-NOW Getting Started Tutorial with Arduino IDE
- ESP32 Send Sensor Readings to ThingSpeak using Arduino IDE (BME280)
- ESP32 Send Emails Through SMTP Server (Plain text, HTML, and Attachments)
- Control ESP32 Outputs using Google Assistant and Adafruit IO
may i know how to save updated data in fire base
Hi, I can not speak English. I am getting help from a Google translator. This person that explained all the instructions is great for a novice like me …. Thank you, thank you …
it is good article,it can help me