Pic microcontroller assembly language programming: Like we need language to communicate with each other. Language is a set of symbols by which we convey our message to others. Similarly, we communicate with microcontrollers with a language called assembly. An assembler is used to understand our instructions, or you can say our symbols, which we provide to the microcontroller.
Recommended Components
The following components are used in this project or are helpful for building it with a PIC microcontroller.
| Component | How it’s used in this project | Buy on Amazon |
|---|---|---|
| PIC16F877A microcontroller | PIC MCU used to run the assembly language programs discussed in this tutorial. | Check Price |
| PICkit 5 programmer/debugger | Programs and debugs the PIC over the ICSP interface. | Check Price |
| Breadboard | Solderless base for prototyping circuits with the PIC. | Check Price |
| Jumper Wires | Connect the MCU pins, power rails and peripherals on the breadboard. | Check Price |
As an Amazon Associate we earn from qualifying purchases. Prices and availability are accurate as of the date/time indicated and are subject to change.
Assembly Language Introduction
An assembly language program is basically a set of instructions stored in computer memory. Computers can only understand 1’s and 0’s. Assembly language instructions are for humans only. Computers do not understand them, so we need to convert these assembly language instructions to binary form, which is understandable for computers. Assembly language commands are converted into 1’s and 0’s by a compiler. A data file used for storing the compiled program is called an “executive file”, i.e. “HEX data file”. The name comes from the hexadecimal presentation of a data file and has a suffix of “hex” as well, for example “probe.hex”. After it has been generated, the data file is loaded into the microcontroller using a programmer. Assembly language codes can be written in any editor. Let’s start with the registers of pic microcontrollers to understand the basic instructions of pic microcontrollers.
Pic Microcontroller Instructions and Registers
Programming PIC microcontrollers in assembly language involves using the specific assembly instructions and registers provided by the PIC architecture. The exact syntax may vary depending on the assembler you are using (e.g., MPLAB® XC8 Assembler), and the specific PIC microcontroller model. Below is a basic overview of the PIC assembly language and some commonly used registers:
PIC microcontroller has many registers for arithmetic and logic operations. The 8-bit WREG register is the most frequently used register in PIC micro-controllers. It is often called an accumulator or Working Register. It can be easily initialized with a constant. For Example:
MOVLW k // here k is any 8-bit value.
MOVLW 10
MOVLW 0x45
In the instruction ‘L” stands for literal, meaning the value is immediately present. ‘W” means WREG. So the whole instruction means move an immediate value in WREG. MOVLW 0xAA //moves 0xAA (or 0b10101010) in WREG. We will use WREG register for simple instructions like MOV and ADD. In CPU, registers are used to store information temporarily. That information could be a byte of data processed or an address pointing to the data to be fetched. The vast majority of PIC registers are 8-bit registers.
Literal addressing
Used when moving constant values. For example, MOVLW 0x23 will move 23 (hex) to WREG.
Direct Addressing
In direct addressing mode, Operand is the address of a register or memory location. Used when moving variables. For example, MOVWF _myReg will move the contents of myReg to WREG.
Opcode
The specific relevant content for this request, if necessary, is delimited with characters: An opcode is short for ‘Operation Code’. It is a number interpreted by your machine (uC) that represents the operation to perform. For example, MOVLW is an Opcode.
Labels
A label is an identifier used to represent a line in code or section of a program. Goto statements can be used in conjunction with a Label to jump to the execution of code identified by the particular label. See Task 1 code for example.
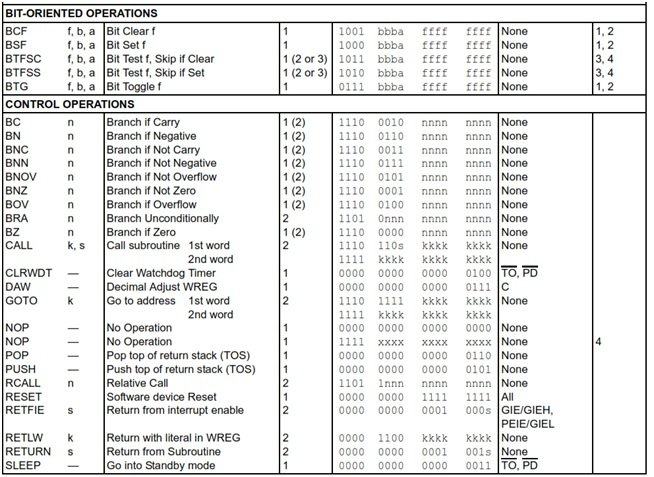
Assembly Language Instructions
The Following Table is taken from Page 376 of the 18F46K22 Datasheet
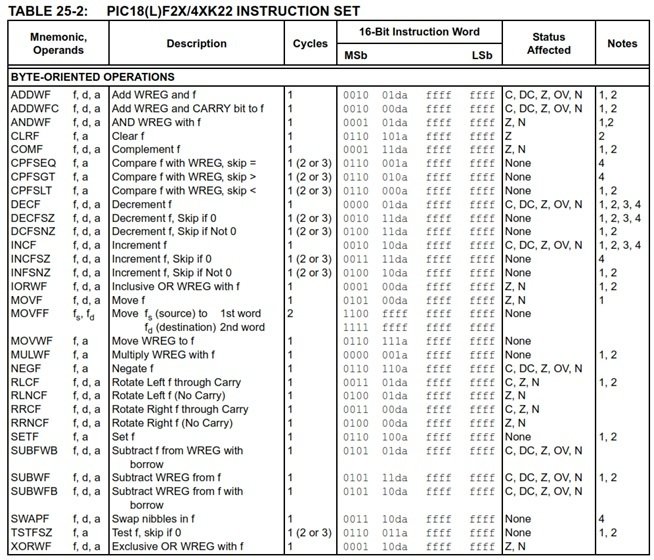

Pic Microcontroller Literal Assembly Language Instructions
Pic Microcontroller Control Assembly Language Instructions
The mikroC Debugger can be used to check the execution of PIC microcontroller assembly language instructions.
Pic Microcontroller Assembly Language Examples
In this section, we will see pic microcontroller assembly language examples.
Example 1
The program initializes analog select registers, configures TRISB as an output port, and then enters an infinite loop. Inside the loop, it alternately outputs the values of myReg1 and myReg2 to the PORTB. The specific behavior will depend on how the values of myReg1 and myReg2 are used elsewhere in the program, as the provided code snippet does not include any logic that modifies these variables within the loop.
; Declare two global variables
unsigned short myReg1, myReg2;

void main() {
    ; Initialize analog select registers
    ANSELA = 0b00000010;   ; asm{ CLRF ANSELA ; Clear ANSELA
    CLRF ANSELB ; Clear ANSELB
    CLRF ANSELC ; Clear ANSELC
    CLRF ANSELD ; Clear ANSELD

    ; Configure TRISB as an output port
    MOVLW 0xFF ; Move 0xFF to WReg register
    MOVWF TRISB, 0 ; Move 0xFF to TRISB

    ; Initialize myReg1 and myReg2
    MOVLW 0xAA ; Move 0xAA to Wreg
    MOVWF _myReg1, 0 ; Move 0xAA to myReg1 variable
    MOVLW 0x55 ; Move 0x55 to Wreg
    MOVWF _myReg2, 0 ; Move 0x55 to myReg2 variable

    ; Main loop
LOOP_START:
    MOVF _myReg1, 0, 0 ; Move contents of myReg1 to WReg
    MOVWF PORTB ; Move WReg to PORTB
    MOVF _myReg2, 0, 0 ; Move myReg2 to WReg
    MOVWF PORTB ; Move WReg to PORTB

    GOTO LOOP_START ; Jump to LOOP_START
}
Example 2
In this section, let’s see an example of converting C code into equivalent assembly language code.
The following c code initializes two variables, x, and i, both of type unsigned short, to zero. Then, it enters a for loop where i is incremented from 1 to 9 (inclusive) in each iteration, and the value of i is added to x. The final result is the sum of numbers from 1 to 9 stored in the variable x.
unsigned short x = 0; // Initialize x to 0
unsigned short i = 0; // Initialize i to 0

// Loop from i = 1 to i < 10, incrementing i in each iteration
for (i = 1; i < 10; i++) {
    x = x + i; // Add the current value of i to x
}
The equivalent of the following C code in assembly is given below. Use mickroC debugger to verify your code.
#include <xc.h> // Assuming you're using a PIC microcontroller and MPLAB XC8

unsigned short x = 0; // Initialize x to 0
unsigned short i = 0; // Initialize i to 0

void main() {
    OSCCON.IRCF0 = 0; // Set oscillator frequency to 500 kHz
    OSCCON.IRCF1 = 1;
    OSCCON.IRCF2 = 1;

    ANSELA = 2; // Set ANSELA register to 0b00000010

    asm {
        MOVLW 0X01; // Load immediate value 0x01 to Wreg
Loop:
        INCF _i, 1; // Increment i (i = i + 1)
        MOVF _i, 0; // Move the value of i to Wreg
        ADDWF _x, 1; // Add the value of Wreg to x

        MOVLW 9; // Load immediate value 9 to Wreg
        CPFSGT _i; // Compare i with Wreg and skip the next instruction if i > Wreg
        goto Loop; // Jump back to the Loop label if i > 9
    }
}
Example 3
Write the equivalent of the following C code in assembly. This is used to generate delay by performing no operation instructions.
#include <stdio.h>

unsigned short I, J, X;  // Declare variables I, J, and X

// Nested loop: Outer loop for I, inner loop for J
for (I = 0; I < 255; I++) {
    for (J = 1; J < 255; J++) {
        X = X + J;  // Dummy instruction to generate a delay of (256*256), do not worry about overflow
    }
}

X = I;  // Set a break point here
The equivalent of the following C code in assembly is given below. Use mickroC debugger to verify your code.
unsigned short I,J,X;
void main() {

 OSCCON.IRCF0=0;
 OSCCON.IRCF1=1;
 OSCCON.IRCF2=1;
 ANSELB=0;
 TRISB=0;
 asm {


 MOVLW 0xF0;
 MOVWF LATB,0;
 Rotate:
 RLNCF LATB,1,0;
 goto Outer


 Inner:
 INCF _J,1;// J=J+1
 MOVF _J,0;// move J to Wreg
 ADDWF _X,1; //X=X+Wreg

MOVLW 255; // Wreg=10
 CPFSEQ _J;
 goto Inner
 goto Outer
 Outer:
 INCF _I,1;// i=i+1
 MOVLW 255;
 CPFSEQ _I;
 goto Inner
 goto Rotate

 }


}
Example 4
This assembly language program rotates the bits of LATB to the left. This code is written in C with inline assembly for a PIC microcontroller. It performs a left rotation through the carry of the LATB register, effectively shifting its bits to the left
unsigned short I,X,u,J;
void DEL();
void main() {
 ANSELA =2;

TRISB = 0x00;
 LATB = 0x01;

asm{
 CLRF ANSELA; // Write 0 to ANSELA
 CLRF ANSELB; // Write 0 to ANSELB
 CLRF ANSELC; // Write 0 to ANSELC
 CLRF ANSELD; // Write 0 to ANSELD

RLNCF LATB,1;

}

}
Example 5
The following code selects the memory bank and increments the value of the i variable.
unsigned short i absolute 0x400;
 void main()
 {
 asm{
 CLRF _i,BANKED;
 MOVLB 4;
 LOOP_START:
 INCF _i,1,BANKED;
 GOTO LOOP_START;

 } }
Example 6
Write the Equivalent Assembly code for the following C snippet.
short var1 = -63 //Assign any negative value short var2 = 0;
var2 = abs(var1); //The var2 must get the absolute value of var1
Equivalent assembly code
short var1=-10;
short var2=0;


void main() {
asm{
MOVLW 0;
MOVFF _var1,_var2;
ADDWF _var1,0;
 BNN end
 NEGF _var2


 end:
 goto end
}

}
Example 7
Write the Assembly Equivalent of the following C function.
// Global Variables
short num1, num2, maximum;

// Function to Find Maximum of Two Numbers
short max_of_2() {
    if (num1 > num2) {
        maximum = num1; // If num1 is greater than num2, set maximum to num1
    } else {
        maximum = num2; // If num2 is greater than or equal to num1, set maximum to num2
    }
}
Equivalent assembly code:
short num1=10;
short num2=12;
short maximum=0;


void main() {

asm{
//call max_of_2;

 max_of_2:
MOVFF _num1, _maximum;
MOVF _num1,0;
CPFSGT _num2
return
MOVFF _num2,_maximum
return


}

}
Example 8
Write the Assembly Equivalent of the following C function. This code finds the maximum value of the array
// Global Variables
short array_element = 0;
short i = 0;
const short size_array = 8;

// Array Declaration
data short My_array[size_array] = {2, 4, 5, 12, 56, 13, 1, 1} absolute 0x0060;

// Main Function
void main() {
    // Loop through the array and assign each element to array_element
    for (i = 0; i < size_array; i++) {
        array_element = My_array[i];
    }

    // Infinite loop to keep the program running
    while (1);
}
Equivalent assembly code
short array_element = 0;
 short i =0;
 const short size_array = 8;
 data short My_array[size_array] = {2, 4, 5, 12, 56, 13, 1, 1} absolute 0x0060;


void main() {
 My_array[1]=2;
 asm{

LFSR 1, 0x0060;
 for:
 INCF _i,1;
 MOVFF POSTINC1,_array_element;
 MOVLW _size_array;
 CPFSEQ _i
 goto for

 end:
 goto end;


 }

}
Pic Microcontroller Assembly Program to Calculate Factorial
Calculating the factorial of a number in PIC microcontroller assembly language involves using a loop to multiply the number by its decremented value until it reaches 1. Here’s an example code for calculating the factorial of a number in assembly for a PIC microcontroller:
; PIC Microcontroller Assembly Code to Calculate Factorial

; Define constants
NUM EQU 5         ; Change this to the desired number

; Define variables
    cblock 0x20
    result
    numCopy
    endc

    org 0x00        ; Start of program memory

    ; Initialization
    MOVLW NUM       ; Load the number into W
    MOVWF numCopy   ; Copy the number to numCopy for decrementing
    CLRF result     ; Clear result register

    ; Factorial calculation loop
FACTORIAL_LOOP:
    MOVF numCopy, W ; Move numCopy to W
    MULWF result    ; Multiply result by numCopy
    MOVWF result    ; Move the result back to result

    DECFSZ numCopy, F ; Decrement numCopy, skip next instruction if zero
    GOTO FACTORIAL_LOOP ; Jump back to FACTORIAL_LOOP if numCopy is not zero

    ; Result is now stored in the result register

    ; Your code continues here...

    ; Example: Display the result using PORTB
    MOVF result, W  ; Move the result to W
    MOVWF PORTB     ; Display the result using PORTB

    ; Infinite loop
    GOTO $          ; Stay in an infinite loop
Conclusion
In conclusion, understanding and utilizing PIC microcontroller assembly language programming is essential for interacting with and controlling microcontrollers. By working with assembly language instructions, programmers can effectively communicate with the microcontroller and execute specific tasks with precision. This form of low-level programming allows for a deep level of control and optimization, although it requires a thorough understanding of the hardware architecture and instruction set. Through appropriate usage of assembly language, developers can harness the full potential of PIC microcontrollers, making them suitable for a diverse range of applications. As technology continues to advance, proficiency in assembly language programming for microcontrollers will remain a valuable skill for embedded systems development.
You may also like to read:
- MIPS assembly language programming tutorials
- 8086 Microprocessor Addressing Modes Explained with Assembly Examples
- 8086 Data Transfer Instructions – Assembly Language Programming
- 8086 Integer Arithmetic Instructions – Assembly Language Programming
- 8086 Integer Multiplication Instructions – Assembly Language Programming
- 8086 Integer Division Instructions – Assembly Programming
- 8086 Conditional Branch Instructions – Assembly Examples
hai my name is ezza and im a student . i have one problem with my project, Auto Irragation system using soil moisture sensor and pic microcontroller. Im still new with the programmer and when I already write the coding and build it,then I put the coding into proteus to make sure my coding function as what I want. then when I want to burn it to PIC and hardware, the program not function and its like i never write any coding into PIC. can u help me how to make my PIC function ..
hey, I’m a student from Ethiopia. I faced some difficulities while working my project and I’m sending this comment hoping that you will help me. the project is a simple DC motor speed control using PIC 16f877 microcontroller and the problem is that I couldn’t write the assembly language. I have written the c-language but the assembly language is difficult for me so please help me
I want to write simple 4bit addition programme in pic18 , how can I write it?
Please help me
Hi Radhika, Do you mean 4 bits, as in 1 nibble addition? Or do you mean 4 digits such as 5,349