VL53L0X is a LIDAR based sensor which measures the distance between an object and a sensor. It measures distance up to 2m. This laser ranging sensor operates in a range of 2.5 to 3.6 volts and uses a time of flight principle for measuring distance. The sensor consists of a vertical-cavity surface-emitting laser (VCSEL). This cavity releases a laser beam that strikes the object in a detection range and reflects back. The device measures time taken by the laser beam. Using this time, we calculate the distance between the object and the sensor.
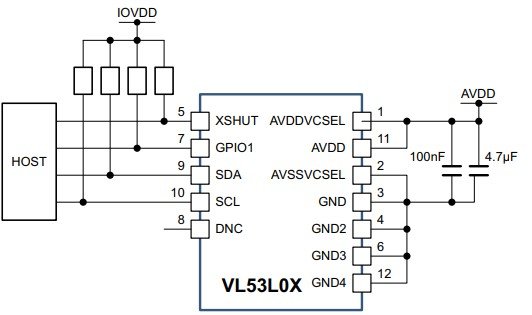
VL53L0X Pinout
VL53L0X LIDAR based sensor consists of 12 pins. But only I2C communication pins are needed to interface VL53L0X module with microcontrollers such as Arduino.

This diagram shows the pinout of VL53L0X module. This module has all required components such as pull-up resistors and capacitors. Pin header provides four terminals. Two pins are used for data transfer over I2C communication and two pins are for power supply.

Pin Description
Now let’s discuss all pins of VL53L0X sensor and their functionality.
It has total 12 pins I which pin 9 and pin 10 are level shifted while pins 5 and 7 are not.
Pin#01: AVDDVCSEL
It is the power supply pin of VCSEL driver integrated inside a package as shown in block diagram in figure (3). Apply a voltage of 2.6V to 5.5V at this pin.
Pin#02: AVSSVCSEL
It is the ground pin of VCSEL driver. Connect this pin to the common ground.
Pin#03, 04, 06, 12: GND, GND2, GND3, GND4
They are ground pins of sensor chip.
Pin#05: XSHUT
It is an active-low shutdown input pin. To enable this sensor, connect this pin to VDD. Connecting this pin to ground pin put this sensor into standby mode.
Pin#07: GPIO1
It is the programmable interrupt output pin.
Pin#08: DNC
DNC stands for Do Not Connect. Leave this pin unconnected.
Pin#09: SDA
It is a serial data digital input/output pin for communication.
Pin#10: SCL
It is the digital serial clock input pin.
Pin-11: AVDD
It is the voltage supply pin.
Block Diagram
Block diagram illustratess that it has many electronics components inside such as RAM, ROM, single photon Avalanche Diode( SPAD), Microcontrollerand VCEFL driver.

VL53L0X Module Features
- This small module consists of a 940nm vertical cavity surface-emitting laser, VCSEL driver and a microcontroller.
- VL53L0X measures a distance accurately up to 2 m.
- This sensor operates in a voltage range of 2.6V to 3.5V and a supply current of 10mA.
- It has protocol which enables communication.
- This device consists of internal IR filters which provides higher immunity to ambient light and optical crosstalk compensation.
- The VCSEL laser source is safe to human eye.
- It has additional features of reset (Xshut) and GPIO interrupt
- The temperature range specified for operation is -20°C to 70°C.
Where to use it?
The sonar sensor uses ultrasonic waves, but its sensing cone is wide. So, we can use IR sensors to measure the distance. The measurement of these sensors depends on the object characteristics and other environmental factors. Therefore, we use VL53L0X to obtain precise measurements. It has a narrow cone which bounces light and directly determines the distance. The value is independent of characteristics like size and dimensions of object. This sensor is easy to use, and its breakout board is also available in the market.
The VL53L0X breakout board has only four pins and you can directly interface it with Arduino and other microcontrollers due to the presence of level shifters. You can use it in designing robotic projects like line robots, quadcopter etc. You can control it using API which has three modes of ranging. These three modes control this sensor module. Through this, you can design many high-end applications. If you need a precise measurement of a distance, then this would be a good option as compared to other IR sensors.
How to use VL53L0X?
To connect the sensor directly to a microcontroller, we need to connect pull-up resistors and capacitor as shown in the figure (4).
This sensor is available in breakout board form which allows its direct interfacing with other microcontrollers. The is a terminal for power supply. This module has an onboard voltage regulator which regulates the voltage to 2.8V. Apply voltage in a range of 2.6V to 5.5V at the terminal. SCL and SDA are pins for communication.
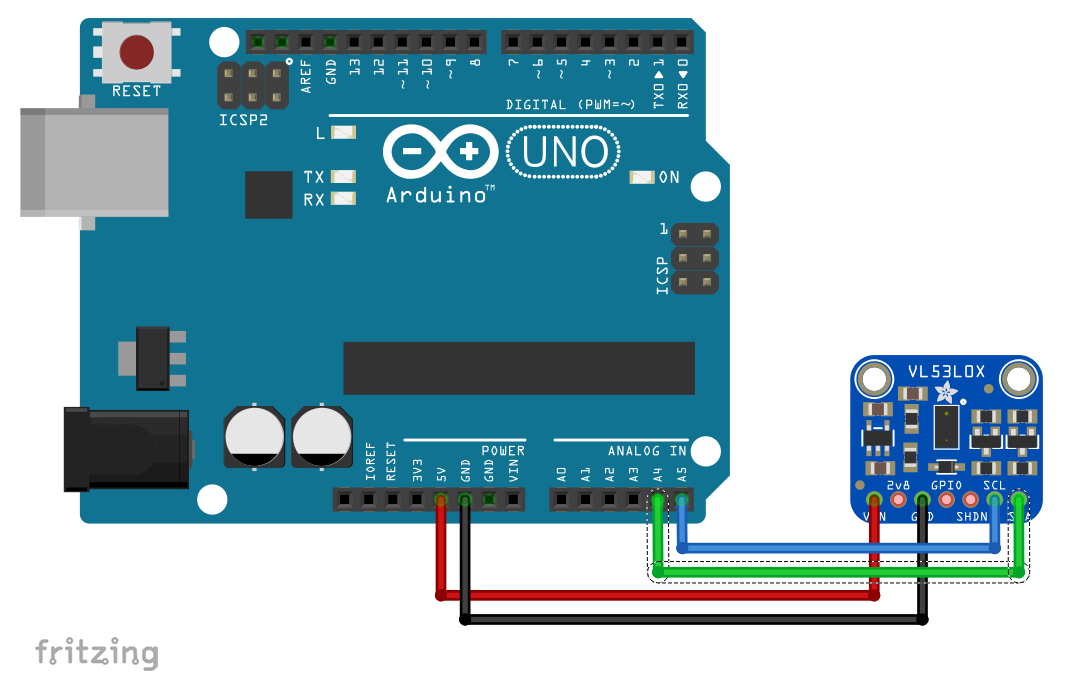
VL53L0X Interfacing with Arduino Uno
The figure shows the connections of the sensor breakout board with Arduino Uno. We use Arduino Uno I2C interface to connect VL53L0X distance sensor module. Make connections according to this table:
| Arduino Uno | VL53L0X Module |
|---|---|
| 5V | Vin |
| GND | GND |
| A4 | SDA |
| A5 | SCL |
Visit this link and download Arduino Library:
If you don’t know how to add library in Arduino IDE, watch this video tutorial:
VL53L0X Example Code Arduino
This example code measures the distance between the object and sends measured voltage value on the serial monitor of Arduino IDE. After downloading the above library, extract the folder and give it the name “Adafruit_VL53L0X.h”. Now copy this code to Arduino IDE and upload this sketch to Arduino Board.
#include "Adafruit_VL53L0X.h"

Adafruit_VL53L0X lox = Adafruit_VL53L0X();

void setup() {
  Serial.begin(115200);

  // wait until serial port opens for native USB devices
  while (! Serial) {
    delay(1);
  }

  Serial.println("Adafruit VL53L0X test");
  if (!lox.begin()) {
    Serial.println(F("Failed to boot VL53L0X"));
    while(1);
  }
  // power
  Serial.println(F("VL53L0X API Simple Ranging example\n\n"));
}


void loop() {
  VL53L0X_RangingMeasurementData_t measure;

  Serial.print("Reading a measurement... ");
  lox.rangingTest(&measure, false); // pass in 'true' to get debug data printout!

  if (measure.RangeStatus != 4) {  // phase failures have incorrect data
    Serial.print("Distance (mm): "); Serial.println(measure.RangeMilliMeter);
  } else {
    Serial.println(" out of range ");
  }

  delay(100);
}
After uploading code, make sure you made correction connections with between distance sensor and Arduino Uno. After that, open serial monitor, you will see ouput like this:

How Code Works?
First we include header file of sensor library with #include preprocessor directive.
#include "Adafruit_VL53L0X.h"After that, we define an object of a structure-function of Adafruit_VL53L0X() Because we can use the same library to read distance measurement data from multiple VL53L0X modules.
Adafruit_VL53L0X lox = Adafruit_VL53L0X();Setup Function
Inside the setup function, you need to define baud rate at which speed you want to receive data from senso. Also while() condition checks, if serial monitor is open or not. If open, code will execute further, otherwise stuck in this while() loop.
Serial.begin(115200);
  // wait until serial port opens for native USB devices
  while (! Serial)
 {
    delay(1);
 }
This if (!lox.begin()) condition checks either you made a connection with the sensor correctly or not. It also checks if the module is ready to operate. If not, “Failed to boot VL53L0X” message will display on serial print.
 if (!lox.begin())
{
    Serial.println(F("Failed to boot VL53L0X"));
    while(1);
  }
While Loop
First, you create a object from a created structure that is define above.
VL53L0X_RangingMeasurementData_t measure; //measure objectThis line sets the sensor in data mode. You can also set it in debug mode by sending “false”.
lox.rangingTest(&measure, false); // pass in 'true' to get debug data printout!This section reads data from sensor and send the measured value on serial monitor.
if (measure.RangeStatus != 4)
  {  // phase failures have incorrect data
    Serial.print("Distance (mm): ");
    Serial.println(measure.RangeMilliMeter);
  }
else
 {
    Serial.println(" out of range ");
  }
VL53L0X Applications
This lidar based distance sensor has numerous functions which include:
- gesture recognition
- proximity detection
- Robotics for Obstacle detection
- collision avoidance systems
- power switch monitors
- drones
- IoT products
- automatic faucets, soap dispensers for hand detection
This is not a LIDAR sensor. It is a much simpler, cheaper, and less accurate Time Of Flight sensor. I also used to think it was a LIDAR.