In this tutorial, we will learn about infrared sensor module and how to use it with Arduino. We will first introduce you to the IR sensor, its applications, working principle and then interface it with Arduino and program it for obstacle detection.
Before reading this article, make sure you are already familiar with Arduino UNO. If you haven’t used Arduino Uno R3 before, then check the following link.
Introduction to Infrared Obstacle Avoidance Sensor Module
Infrared sensor is an electronic device which is used to detect objects via heat. It works with the detection of infrared radiations and changes in heat in its surrounding. There are two types of infrared sensors available in the market.
- Thermal infrared sensor: It works by the changes of heat in its surrounding or uses infrared radiations as a heat source.
- Photo infrared sensor: It uses a photo diode to detect infrared radiations. We will focus on this type of IR sensor.
Several types of infrared obstacles avoidance sensor modules are available in the market but the one we will focus on in this article is the photo IR obstacle avoidance sensor module, FC-51.
The Infrared obstacle avoidance sensor module (FC-51) is the combination of two infrared sensors. First one is an infrared transmitter and the second one is an infrared receiver. The infrared transmitter emits the infrared light through the LED. This infrared light has a certain frequency and when it is reflected back after the collision of any obstacle or object then this light is received by the infrared receiver. Then this infrared obstacles avoidance sensor tells the system, that someone is present in this particular area.
It can easily detect the object from 2 to 30 cm area and its detection angle is 35o.
This infrared obstacles avoidance sensor module has been currently used in so many applications such as in robotic industry, automobile industry and security purposes, etc. It is easily available in the market or online shop.
Pin Out

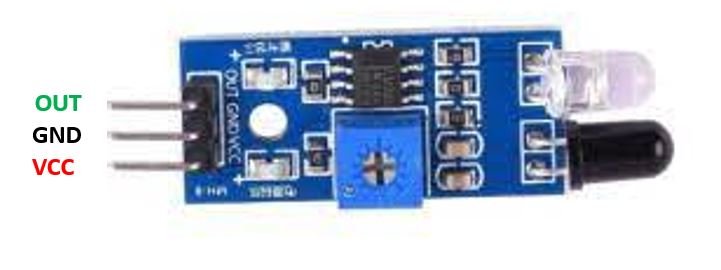
This infrared obstacle avoidance sensor module consists of three pins:
- VCC: This is the pin that supplies power to the IR sensor module. 3.3 to 5 Volts DC voltage is applied to turn on this sensor
- GND: This is the ground pin which is connected to the input ground.
- OUT: This is the output pin of this sensor which is connected with any type of controller. When an obstacle is in front of the sensor, this pin is in a LOW state.
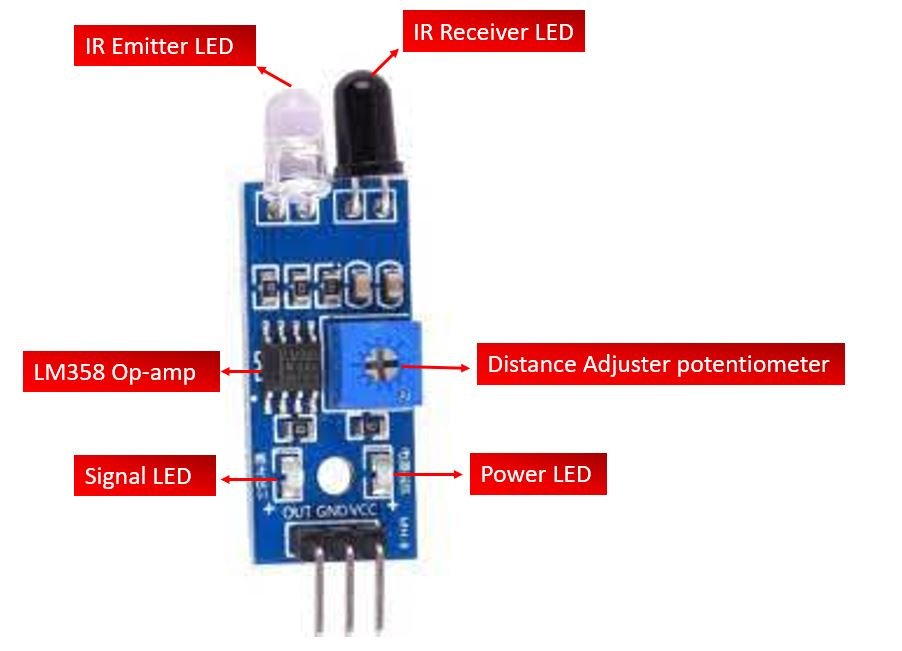
The IR sensor module also consists of other components such as an IR emitter LED which emits the infrared light, an IR receiver LED which receives the light after the collision with any object, a power LED which turns on when this sensor is powered up, distance adjuster, through this, the user can easily adjust the range or distance of sensor by increasing or decreasing the potentiometer resistance. Lastly, the obstacle LED which turns ON whenever an obstacle is detected.

Working Principle of Infrared Obstacle Avoidance Sensor Module
The working principle of this infrared obstacles sensor module is very simple. As this sensor consists of one IR transmitter and one IR receiver, therefore, the main work is done by them.
When an IR transmitter emits the infrared light during the presence of an object, then some portion of this infrared light is reflected back to the IR transmitter after the collision with the object. So, the reflected portion of the infrared light is received by the IR receiver. This reflected portion has some light intensity and based on this intensity the output of this infrared obstacle avoidance sensor module is defined. In other words, this light intensity is inversely proportional to output voltages. This means that when the intensity is increased then the resistance of this module is increased therefore the output voltages are dropped. Similarly, when intensity is decreased then resistance is decreased so the output voltages are increased. These output voltages are received by the controller from OUT pin of this module. Hence when an obstacle is detected, the OUT pin goes LOW. otherwise it stays HIGH.
Circuit diagram of Infrared Obstacle Avoidance Sensor Module
Circuit diagram of infrared sensor is given below.
The IR Sensor Module consists of the following components:
- IR receiver TSFF5210
- Photodiode
- 100 ohm resistor
- 10k resistor
- 10k variable resistor
- LM358 IC
The infrared receiver Led and the photo diode constitute the main parts of this sensor module. The photo diode emits the infrared radiations which strike any object and reflect back with some angle. The IR receiver TSFF5210 detects these reflected radiations.
LM358 is used as a comparator. Whenever the IR receiver detects the infrared radiations, the output of LM358 goes high therefore the LED connected at the output turns ON. This output pin is used to interface with Arduino Uno R3.
Applications of Infrared sensor
Infrared sensors have many applications now a days from domestic use to industrial use. Some of the applications are mentioned below.
- Object detection
- Motion detection
- Obstacle avoidance robot
- Gas leakage detection
- Smoke detection
- Distance measurement
- Robotics
- Object counter and many others
Interface IR Obstacle Avoidance Sensor Module with Arduino
We will be requiring the following components.
- Arduino UNO
- Infrared Obstacle Avoidance Sensor Module (FC-51)
- Connecting Wires
Assemble the devices as shown in the schematic diagram below:

We will connect 3 pins of the sensor module with Arduino. These include the VCC, GND, and OUT pins. The VCC will be connected with the 5V pin from Arduino. GND of both the devices will be in common. We will connect Arduino digital pin 2 with the OUT pin of the sensor.
You can use appropriate digital pin of Arduino to connect with the sensor module’s OUT pin.

Arduino Sketch for Infrared Obstacle Avoidance Sensor
Open your Arduino IDE and go to File > New to open a new file. Copy the code given below in that file.
The following sketch will turn the onboard LED of Arduino ON, when an obstacle is detected in front of the sensor.
const int IR_Sensor = 2; //Digital output reads pin for IR SENSOR

void setup()
{
  pinMode(13, OUTPUT); // ON Board LED to show output
  pinMode(IR_Sensor, INPUT);
}

void loop()
{
  if (digitalRead(IR_Sensor) == HIGH) // if no obstacle LED off
  {
    digitalWrite(13, LOW); // LED off when no obstacle
  }
  else
  {
    digitalWrite(13, HIGH); // LED on when there is a obstacle
  }
}
How the Code Works?
The first step is to define the Arduino digital pin that we have connected with the IR sensor’s OUT pin. It is pin 2 in our case.
const int IR_Sensor = 2;Inside the setup() function, we will configure the sensor pin as an input pin and the Arduino’s onboard LED pin as the output pin.
void setup()
{
  pinMode(13, OUTPUT); // ON Board LED to show output
  pinMode(IR_Sensor, INPUT);
}
loop()
Inside the infinite loop() function, we will first find out the sensor output value using digitalRead(). We will pass the digital pin connected to the sensor as an argument inside it.
Then, we will check if the sensor output is HIGH or LOW. Remember the output will be HIGH when no obstacle is present and LOW when an obstacle is detected. If the output is HIGH then the onboard LED will stay OFF. However, if the output is LOW which means an obstacle is detected in front of the sensor, then the Arduino’s onboard LED will turn ON.
void loop()
{
  if (digitalRead(IR_Sensor) == HIGH) // if no obstacle LED off
  {
    digitalWrite(13, LOW); // LED off when no obstacle
  }
  else
  {
    digitalWrite(13, HIGH); // LED on when there is a obstacle
  }
}
Video demo:
You may also like to read:
- IR Remote Controlled Home Automation System using Arduino
- Control LEDs Using IR Remote and Arduino
- Bidirectional Rotation of an Induction Motor with a Remote Control Device
- RC522 RFID Reader Module with Arduino
- Send Sensor Readings to Android Phone using Arduino and NRF24L01 via BLE
- RS485 Serial Communication between two Arduino boards


i need a aurdino code for black and white colour detection using ir sensor
Can i use pic16f877a internal comparator in place of lm358.
yes you can
Can i have a code for infrared sensor interfacing with arduino uno r3 ??
Pls I need the code for the circuit above
You made this circuit in Proteus. I am not able to find IR receiver and transmitter in Proteus Library. If you have this component library let me know because i want to simulate this in Proteus.