LM75 Temperature Sensor module is a delta-sigma analog to digital converter. The cost-effective device consumes less power and is highly precise. An over-temperature protection circuit is integrated to sink the current that shut down in the module in case of over the limit temperature. LM75 communicates the data using the I2C interface. To connect multiple hosts to the same bus, three address pins are available for the purpose.
It is a popular temperature sensor among the hobbyist and is included in many small electronics projects. This post presents the pin configurations, pinout diagram specifications, features interfacing with Arduino, and applications of a LM75 temperature sensor module.
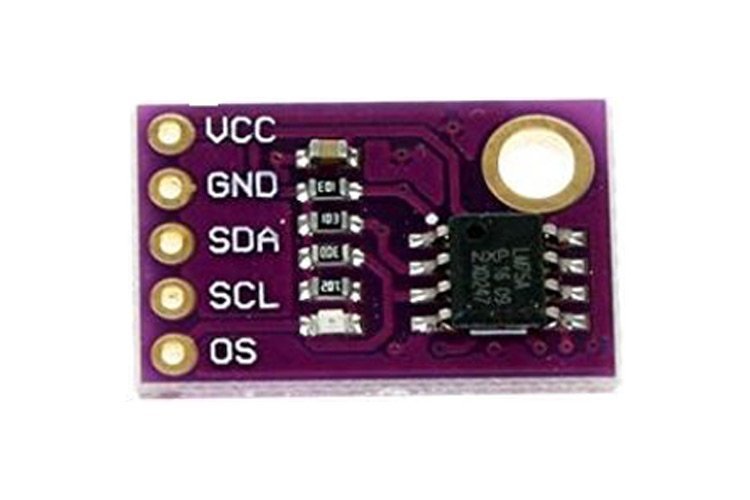
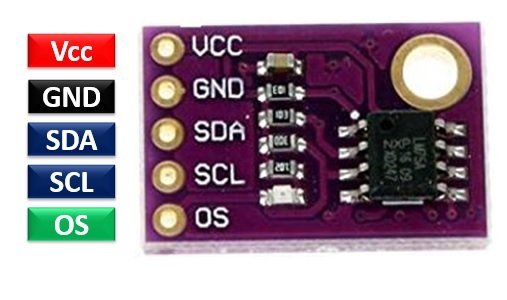
LM75 Pinout
This Temperature sensor module consists of LM75 IC. Moreover, it has pull-up resistors, a coupling capacitor for smoothing and a status LED for power indication. The pinout of the convenient LM75 Temperature Sensor module is as shown:
Pin Configuration
The pin configuration in tabular are detailed below:
| Pin Number | Pin Name | Function |
|---|---|---|
| 8 | VCC | Positive power supply pin |
| 4 | GND | Reference potential pin |
| 2 | SCL | Open drain Serial Clock pin. An I2C line to carry clock signals and must be connected to a pull-up resistor. But module has built-in pull resistors. Therefore, does not require external pull-up resistors. |
| 1 | SDA | Open drain Serial Data pin An I2C line to carry data transmission and must be connected to a pull-up resistor. But module has built-in pull resistors. Therefore, does not require external pull-up resistors. |
| 3 | OS | Over temperature Shutdown Output pin |
Features & Specifications
- Operating Voltage: 3.3 Volts – 5.0 Volts
- Temperature Range: -55°C – 125°C
- Temperature Conversion time: 100ms
- Supply Current: 250uA
- Maximum Supply Current: 1mA
- OS Sink Current: 10mA
- Delta-sigma Resolution: 8-bits
- TOS temperature: 80°C
- THYST temperature: 75°C
- Transmits/receives using the I2C protocol.
- Shutdown mode uses a 4uA current at 3 volts of input supply.
- Overtemperature pin works as an interrupt or thermostat input.
- Connects up to eight different hosts to a single device.
- Supports the stand-alone operation and acts as a thermostat.
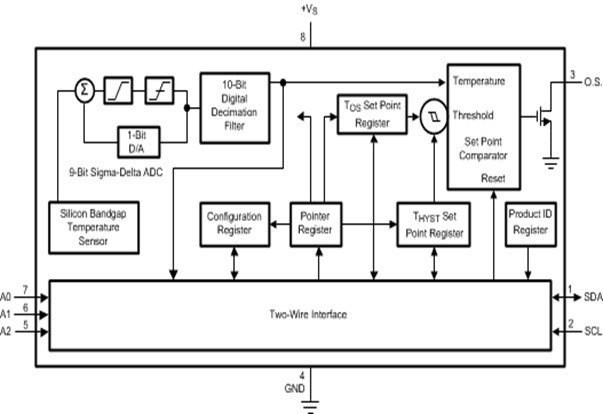
LM75 Block Diagram
The functional diagram of LM75 Temperature Sensor for better understanding of the internal circuitry is as shown below:
LM75 Interfacing with Arduino
This section deals with the interfacing of the LM75A Temperature sensor to Arduino UNO microcontroller. But you can use other Arduino boards also which have at least one I2C port.
Connection Diagram
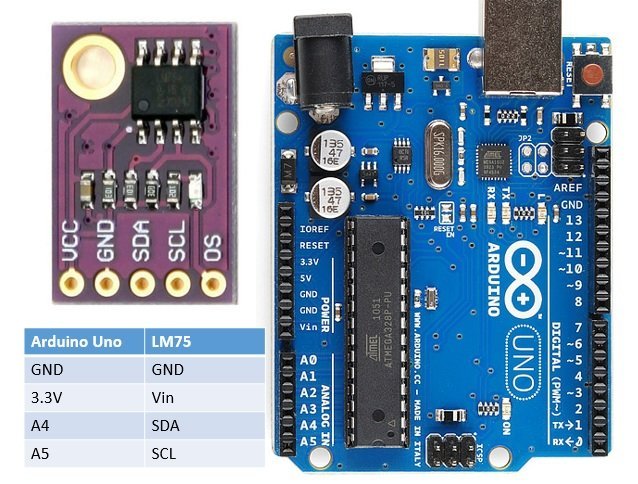
- Connect the power supply GND pin and the Vin Volts pin of the LM75 temperature sensor module to the GND and the 3.3V pin of Arduino UNO, respectively.
- Connect the SDA and SCL pins of the LM75 to the A4 and A5 pins of the Arduino to communicate serial data.
| Arduino UNO | LM75 |
|---|---|
| 3.3V | VCC |
| GND | GND |
| SDA | A4 |
| SCL | A5 |
Install LM75 Arduino Library
Before going to the programming section, First, download the LM75 Arduino library and install it on the Arduino IDE software. It is very convenient to use the prewritten library specifically for the module and add it to the sketches to perform the commands. Download the LM75 Arduino Library from this link:
After that, follow these steps to install the library: Sketch >Include Library> Add .ZIP Library. Moreover, you can check this video to know how to install a new library in Arduino IDE:
Arduino Code
This code takes temperature measurement and prints it on Arduino serial monitor.
 #include <inttypes.h>
#include <Wire.h>
#include <lm75.h>

TempI2C_LM75 Temperature = TempI2C_LM75(0x48,TempI2C_LM75::nine_bits);


void setup()
{
Serial.begin(9600);
Serial.println("Start");
Serial.print("Actual temp ");
Serial.print(Temperature.getTemp());
Serial.println(" oC");
delay(2000);
}

void loop()
{
Serial.print(Temperature.getTemp());
Serial.println(" oC");
delay(2000);
}
How does the code work?
In this section, we will see how the above given Arduino code works.
Include libraries
First, we include the required libraries i.e. “LM75.h” for temperature sensor, “Wire.h” for I2C protocol support. Also, create an instance of TempI2C_LM75 with the name “Temperature” to get the temperature value from the LM75 sensor module.
 #include <inttypes.h>
#include <Wire.h>
#include <lm75.h>

TempI2C_LM75 Temperature = TempI2C_LM75(0x48,TempI2C_LM75::nine_bits);
Void Setup
The setup loop initializes the Serial monitor with a baud rate of 9600bps. It will also display the introductory messages on Arduino serial monitor screen.
void setup()
{
Serial.begin(9600);
Serial.println("Start");
delay(2000);
}
Inside the loop() function, we get a temperature sample from LM75 and print it on Arduino serial monitor after every 2 seconds.
void loop()
{
Serial.print(Temperature.getTemp());
Serial.println(" oC");
delay(2000);
}
Upload the code to Arduino board. After successful compilation and uploading, you will temperature value on Arduino serial monitor.
Applications
- Medical Systems
- Home Automation
- Environment Control
- DIY Projects
- Industrial Applications
Related Articles:
- Interface MLX90614 Non-Contact IR Temperature Sensor with Arduino
- Interface LM35 Temperature Sensor with Arduino
- DHT22 Temperature and Humidity Sensor Interfacing with Pic Microcontroller
- LM35 Temperature Sensor with 7-Segment Display
- BMP280 Barometric Pressure and Temperature Sensor Module
- TMP36 Low Voltage Temperature Sensor
- LM35 Temperature Sensor with ESP32 – Web Server
- XBee Based Temperature and Gas Monitoring System Using Pic Microcontroller
- Automatic Temperature controller using pic microcontroller
- IOT based temperature data logger using esp8266 and pic microcontroller
- DS18B20 Temperature Module interfacing with arduino
- thermistor interfacing with arduino temperature meter
- Temperature sensor using PIC16F877A microcontroller
- Wireless temperature sensor using gsm and microcontroller
Cool! and I really liked the examples from the libraries, really very interesting and we can leave it on stand by and then wake it up by time or command,
I added in your sketch, an active buzzer on pin 13 and a condition to activate above 30 degrees Celiac.
Thanks!
Carlos Bruni
IFBA Campus Salvador / Electrotechnics