In this user guide, we will learn about Force Sensor also known as FSR, and learn to interface FSR sensor Arduino using the Arduino IDE. We will go through its introduction, working mechanism, pinout, and how to obtain readings from the sensor. Furthermore, we will display the sensor readings on Arduino serial monitor. After learning how to obtain the analog reading from the FSR, we will proceed to an advanced Arduino sketch where we will use the analog reading to do further calculations to find the voltage, resistance, conductance, and force in newtons.
Recommended Components
The following components are used in this project or are helpful for building it with the Arduino.
| Component | How it’s used in this project | Buy on Amazon |
|---|---|---|
| Arduino Uno R3 | The main microcontroller board that runs the sketch and reads the sensors/modules in this project. | Check Price |
| Breadboard | Lets you wire the components to the Arduino without soldering for quick prototyping. | Check Price |
| Jumper Wires | Connect the Arduino pins to the module and other parts on the breadboard. | Check Price |
| Resistor Kit (220Ω/4.7kΩ) | Provides the 10kΩ pull-down resistor that forms the voltage divider with the force sensor. | Check Price |
As an Amazon Associate we earn from qualifying purchases. Prices and availability are accurate as of the date/time indicated and are subject to change.
Force Sensor (FSR) Introduction
FSR 400 force sensor or force-sensing resistor is made of a conducting polymer whose resistance changes when external force or pressure is applied to it. The conductive polymer material has the property of increasing resistance when force or pressure is applied on its conductive surface. The force sensing resistor has a thin size, low cost, and good shock resistance. However, readings obtained from multiple force sensors will have a considerable difference between them causing them to have low precision. It has many applications such as in the automobile industry like car sensors, resistive touchpads, musical instruments, keypads, portable electronics systems, and foot pronation systems. These sensors are easily available in the market or online shops.
The force-sensing resistors are known for their thin size (less than 0.5mm), very low cost, and also good shock resistance. The only disadvantage of the FSR sensor is its low precision. There will be approximately 10% or more difference in measurement results.
There are various types of force sensors available. These sensors come in a variety of different shapes and sizes where each is used accordingly. Below you can view some common FSR sensors found in the market.

Force Sensor (FSR) Working
Force sensing resistor works on two principles. The first one is percolation in which conductive polymer material particles move and filter. The second one is quantum tunneling in which conductive polymer material particles pass through a potential barrier. Both of these principles can occur simultaneously during working conditions of the FSR. However, one dominates the other one and this depends upon the polymer material.
When the force sensor is connected with Arduino and any mechanical force, pressure or stress is applied on it then its resistance is decreased. Thus, its resistance is inversely proportional to applied force, pressure, or stress. This is because the force sensor is constructed of various thin flexible layers consisting of resistive carbon elements. The harder the layers are pressed together the more resistance decreases as more resistive carbon elements get in contact with the conductive traces. This decreased resistance is measured by the Arduino board.
Obtaining Reading from FSR Sensor
To obtain a reading from the force sensor we will connect it with a fixed resistor. The force sensor itself acts as a variable resistor due to its changing resistance upon adding force. Thus, it will follow a voltage divider configuration.
Every force-sensing resistor consists of two pins. The first one is directly connected to VCC and the second one is connected to the ground through a pull-down resistor. There is a point between the pull-down resistor and force sensing resistor shown in the figure below, this point is directly connected to an analog input of any controller which is used with this sensing resistor for measuring purposes.
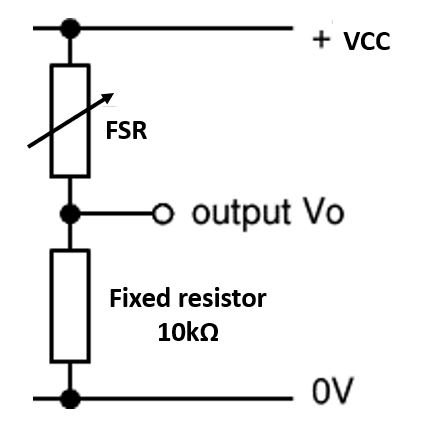
Our voltage divider configuration consists of the variable resistor that is the force sensor and a fixed resistor of 10k ohms. To obtain Vo, the output voltage across the fixed resistor, the following voltage divider formula will be used:
Vo=(10k/10k+R fsr)*VCC
Understanding the Voltage divider configuration
The force sensing resistor will be powered up with 3.3V to 5V dc voltages. When the resistance is decreased then current flowing through the FSR is increased. Similarly, the voltage across the 10k ohm resistor is also increased. However, this equation is only valid for linear resistivity but not linear voltages. In this equation, output voltages are inversely proportional to force sensing resistance.
Now as the force on the FSR increases, R fsr decreases linearly. Thus following the voltage divider equation for Vo, this decrease in R fsr will result in a direct increase in Vo whenever more force will be applied to the force sensor. This will cause the Vo to vary with decreasing resistance. We will use this varying voltage output to obtain a digital value by connecting it to an ADC pin of the Arduino board.
The table below shows some sample values for force applied in newton on the FSR and the FSR resistance and voltage across the fixed resistor (Vo).
| Force (N) | FSR (R) | Vo |
|---|---|---|
| 0 | Infinite | 0 |
| 1N | 6k ohm | 3.1V |
| 10N | 1k ohm | 4.5V |
The Force Sensing Resistor (FSR) has an output voltage range of 0-5V where 0V denotes the least pressure and 5V denotes the highest pressure applied to the sensor. Additionally, the sensor is less sensitive to higher force ratings.
Interfacing FSR Force Sensor with Arduino UNO
In this section, we will show you how to connect the force sensor with Arduino UNO to be able to get the readings from the sensor.
Required Components:
- Arduino UNO board
- Force Sensor
- 10k ohm resistor
- Breadboard
- Connecting Wires
Follow the schematic diagram below to connect the two devices together. We are using the 10k ohm as a pull-down resistor and connecting it in series with the sensor, in this case, to form a voltage divider configuration as seen above. The ADC pin A2 is connected in between the force sensor’s pin 2 and 10k ohm resistor.

Arduino Sketch: Displaying Simple Readings from FSR in Serial Monitor
Open your Arduino IDE and go to File > New to open a new file. Copy the code given below in that file and save it.
This sketch will display the ADC values obtained from the FSR while touching it with varying pressure.
int sensor_pin = A2;
int sensor_value;

void setup(void) {
  Serial.begin(9600);
}

void loop(void) {
  sensor_value = analogRead(sensor_pin);

  Serial.print("Analog reading = ");
  Serial.print(sensor_value);

  if (sensor_value < 10) {
    Serial.println(": No pressure");
  } else if (sensor_value < 200) {
    Serial.println(": Light touch");
  } else if (sensor_value < 500) {
    Serial.println(": Light squeeze");
  } else if (sensor_value < 800) {
    Serial.println(": Medium squeeze");
  } else {
    Serial.println(": Strong squeeze");
  }
  delay(1000);
}
How the Code Works?
We will first define some variables which we will use later on in the program sketch. This includes the integer variable ‘sensor_pin’ that saves the Arduino ADC pin connected with the force sensor. It is A2 in our case. We will also define another integer variable called ‘sensor_value’ that will store the reading obtained from the sensor.
int sensor_pin = A2;
int sensor_value;
Inside the setup() function we will open the serial communication at a baud rate of 9600.
void setup(void) {
  Serial.begin(9600);
}
Next, inside the infinite loop() function, we will find out the ADC value according to the pressure applied on the sensor using analogRead(). We will pass the ADC pin connected to the sensor as an argument inside it. This will be stored in the integer variable ‘sensor_value.’ This reading will get printed in the serial monitor.
 sensor_value = analogRead(sensor_pin);

  Serial.print("Analog reading = ");
  Serial.print(sensor_value);
Now, after obtaining the sensor reading we will compare it to set values to determine the amount of pressure on the sensor. As we mentioned previously, the FSR has an output voltage range of 0-5V where 0V denotes the least pressure and 5V denotes the highest pressure applied to the sensor. This analog voltage will be converted to digital in between values of 0-1023. Hence we have used estimated values between this range to determine the amount of pressure.
  if (sensor_value < 10) {
    Serial.println(": No pressure");
  } else if (sensor_value < 200) {
    Serial.println(": Light touch");
  } else if (sensor_value < 500) {
    Serial.println(": Light squeeze");
  } else if (sensor_value < 800) {
    Serial.println(": Medium squeeze");
  } else {
    Serial.println(": Strong squeeze");
  }
  delay(1000);
Demonstration
Choose the correct board and COM port before uploading your code to the board.
Go to Tools > Board and select Arduino UNO

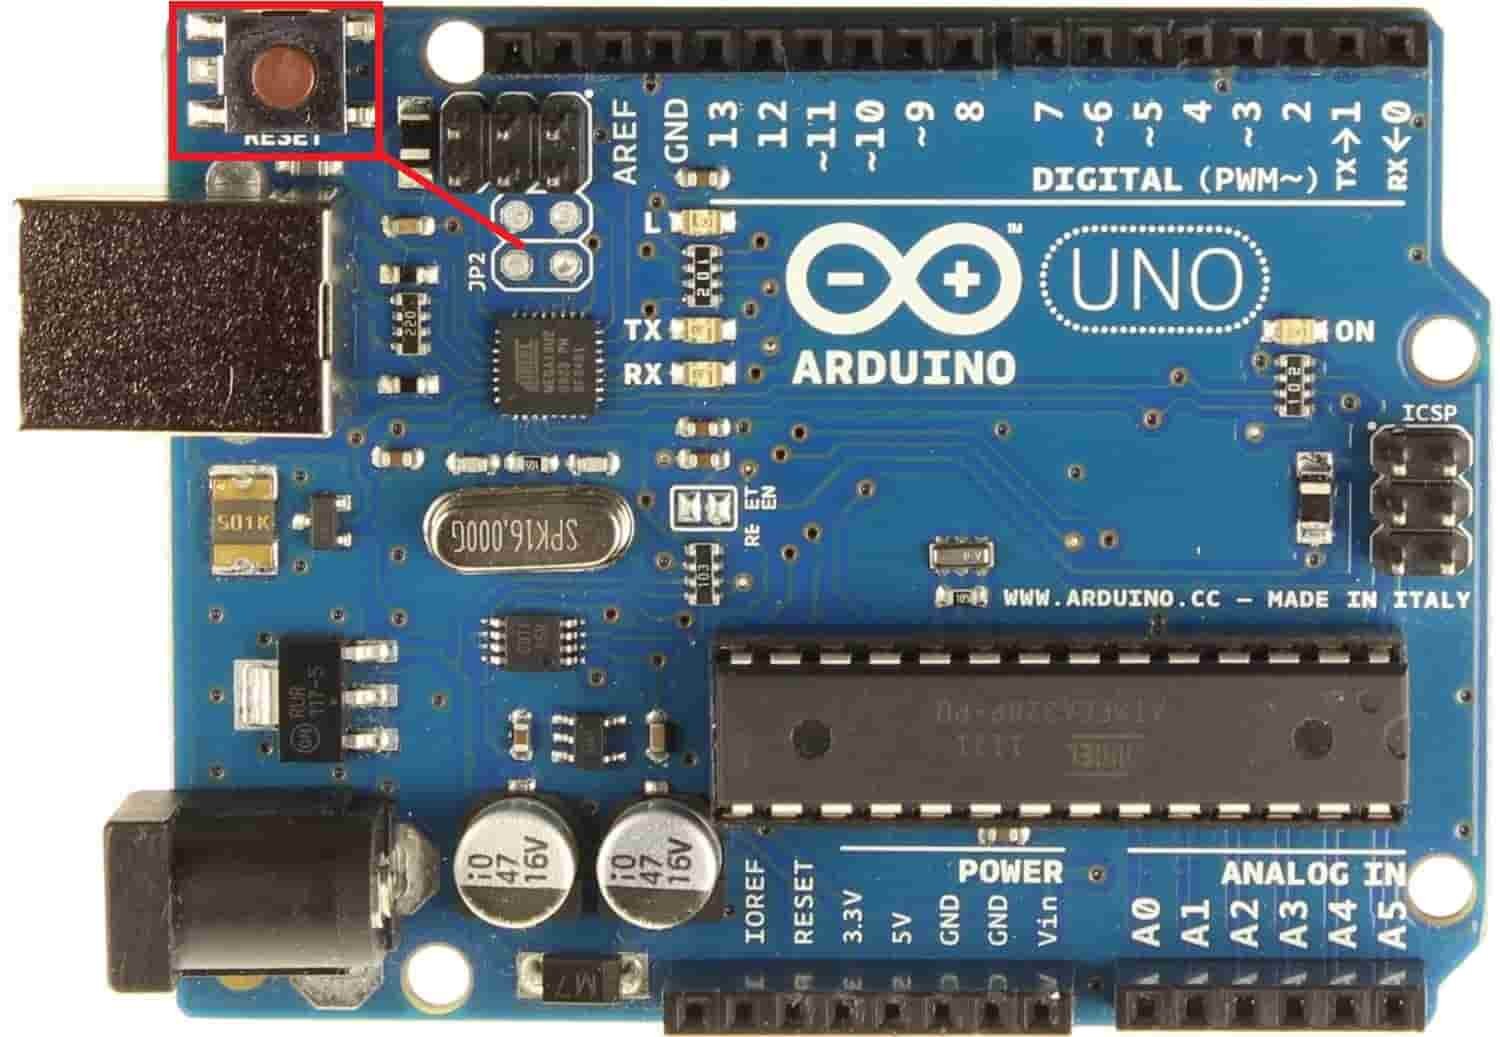
Next, go to Tools > Port and select the appropriate port through which your board is connected. Click on the upload button to upload the code into the Arduino development board. After you have uploaded your code to the Arduino press its RST button.
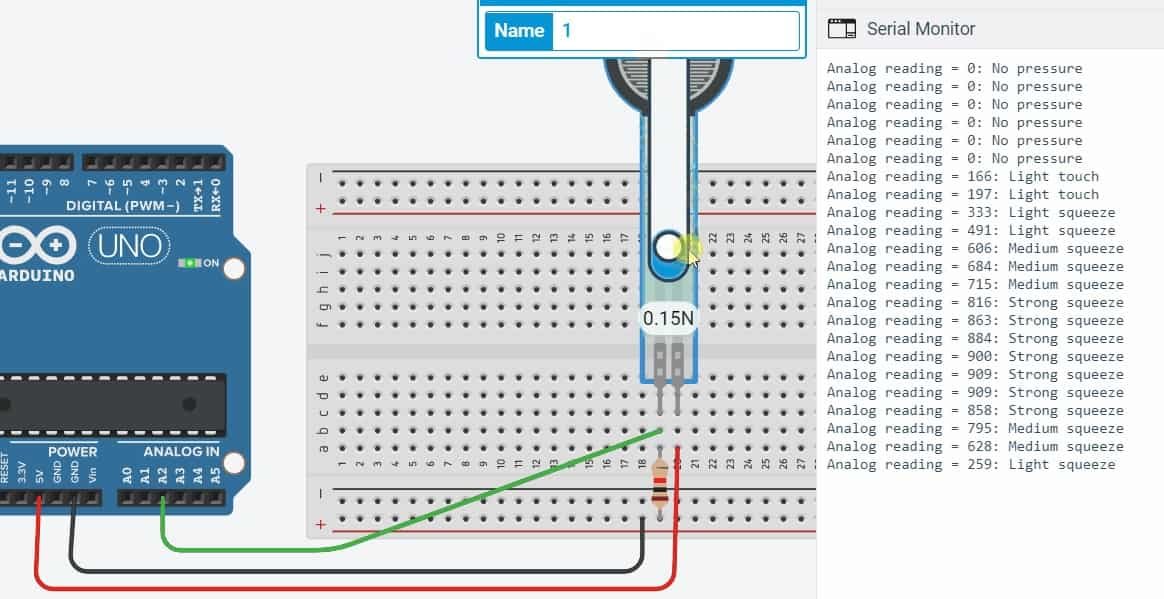
In your Arduino IDE, open up the serial monitor and you will be able to see the various readings as you apply variable pressure to the sensor.
Simulation
Arduino Sketch: Using ADC Reading from FSR to compute useful data
Open your Arduino IDE and go to File > New to open a new file. Copy the code given below in that file and save it.
This sketch will display the ADC values obtained from the FSR while touching it with varying pressure. Additionally, it will use that value to compute voltage reading, resistance, conductance, and force in newtons as well according to the touch.
int sensor_pin = A2;
int sensor_value;
int sensor_voltage;
unsigned long sensor_resistance;
unsigned long sensor_conductance;
long sensor_force;

void setup(void) {
  Serial.begin(9600);
}

void loop(void) {
  sensor_value = analogRead(sensor_pin);
  Serial.print("Analog reading = ");
  Serial.println(sensor_value);
  sensor_voltage = map(sensor_value, 0, 1023, 0, 5000);
  Serial.print("Voltage reading (mV) = ");
  Serial.println(sensor_voltage);

  if (sensor_voltage == 0) {
    Serial.println("No pressure");
  } else {
    sensor_resistance = 5000 - sensor_voltage;
    sensor_resistance *= 10000;
    sensor_resistance /= sensor_voltage;
    Serial.print("FSR resistance (ohms) = ");
    Serial.println(sensor_resistance);

    sensor_conductance = 1000000;
    sensor_conductance /= sensor_resistance;
    Serial.print("Conductance (micro-Mhos): ");
    Serial.println(sensor_conductance);


    if (sensor_conductance <= 1000) {
      sensor_force = sensor_conductance / 80;
      Serial.print("Force (N): ");
      Serial.println(sensor_force);
    } else {
      sensor_force = sensor_conductance - 1000;
      sensor_force /= 30;
      Serial.print("Force (N): ");
      Serial.println(sensor_force);
    }
  }
  Serial.println("--------------------");
  delay(1000);
}
How the Code Works?
Most of the code is the same as the one in the previous sketch. We have added some additional calculations to find the voltage, resistance, conductance, and force (N) readings as well.
We will define some additional variables along with the previous ones to store all the various data. These include the additional four values which we will find that is sensor_voltage, sensor_resistance, sensor_conductance, and sensor_force.
int sensor_voltage;
unsigned long sensor_resistance;
unsigned long sensor_conductance;
long sensor_force;
Now after obtaining the sensor reading from the ADC pin we will use the map() function to estimate the voltage reading according to the reading obtained from the sensor. Our voltage reading will be printed on the serial monitor in millivolts.
 sensor_voltage = map(sensor_value, 0, 1023, 0, 5000);
  Serial.print("Voltage reading (mV) = ");
  Serial.println(sensor_voltage);
The following lines of code calculate the resistance, conductance and force(N) using a series of if-else statements. These are then printed on the serial monitor.
if (sensor_voltage == 0) {
    Serial.println("No pressure");
  } else {
    sensor_resistance = 5000 - sensor_voltage;
    sensor_resistance *= 10000;
    sensor_resistance /= sensor_voltage;
    Serial.print("FSR resistance (ohms) = ");
    Serial.println(sensor_resistance);

    sensor_conductance = 1000000;
    sensor_conductance /= sensor_resistance;
    Serial.print("Conductance (micro-Mhos): ");
    Serial.println(sensor_conductance);


    if (sensor_conductance <= 1000) {
      sensor_force = sensor_conductance / 80;
      Serial.print("Force (N): ");
      Serial.println(sensor_force);
    } else {
      sensor_force = sensor_conductance - 1000;
      sensor_force /= 30;
      Serial.print("Force (N): ");
      Serial.println(sensor_force);
    }
  }
Demonstration
Choose the correct board and COM port before uploading your code to the board.
Go to Tools > Board and select Arduino UNO.
Next, go to Tools > Port and select the appropriate port through which your board is connected. Click on the upload button to upload the code into the Arduino development board. After you have uploaded your code to the Arduino press its RST button.
In your Arduino IDE, open up the serial monitor and you will be able to see the various readings as you apply varying pressure on the FSR.
Simulation
Conclusion
In conclusion, we have learned about Force Sensing Resistor (FSR) and its working mechanism. We see two Arduino example sketches for the force sensor and first displayed the ADC readings obtained from the sensor on Arduino serial monitor. Then, we moved to an advanced sketch where we used the same reading obtained from the sensor to calculate various other useful data including the voltage, resistance, conductance and the force applied in Newtons on the FSR. These values changed accordingly as we varied the force applied to the sensor.
You may like to read our guides on other sensors interfacing with Arduino: