In this guide, we will learn to interface GY-906 MLX90614 non-contact infrared temperature sensor with Arduino. The MLX90614 is a contactless IR Temperature sensor which can measure temperature without even touching the object. This exceptional sensor introduced by Melexis uses IR technology that uses the IR radiations to measure temperature and provides a digital output signal through the I2C port. Contactless temperature sensors played a major contribution during COVID-19 days to check temperature. In this tutorial, we will discuss pinout details, pin configurations, specifications, features interfacing with Arduino, and applications of an MLX90614 temperature sensor. After that, we will show you a program sketch in Arduino IDE where we will use this sensor to acquire both the ambient and object temperature in degrees Celsius and Fahrenheit.
We have similar guides with ESP32 and ESP8266 NodeMCU:
- MLX90614 Non-contact Infrared Temperature Sensor with ESP32
- MLX90614 Non-contact Infrared Temperature Sensor with ESP8266
MLX90614 Temperature Sensor Introduction
MLX90614 is IR based contactless temperature sensor that can measure the temperature of a particular object between -70°C – 382.2°C and an ambient temperature of -40°C – 125°C without even making physical contact with an object under observation. It is embedded with an I2C port to communicate temperature reading to microcontrollers over an I2C bus. On top of that, it is provided with ESD protection to avoid malfunctioning of the sensor.
The tiny device is highly accurate and precise due to its powerful ADC. A 17-bit ADC is embedded in the module to output the values with 0.14 ˚C of resolution. Melexis has introduced different versions of this sensor based on input voltage requirements i.e., 3 Volts or 5volts and resolving power for different project requirements. But MLX90614 is a sensitive temperature sensor that has a long list of applications, especially in home automation
MLX90614 Pinout
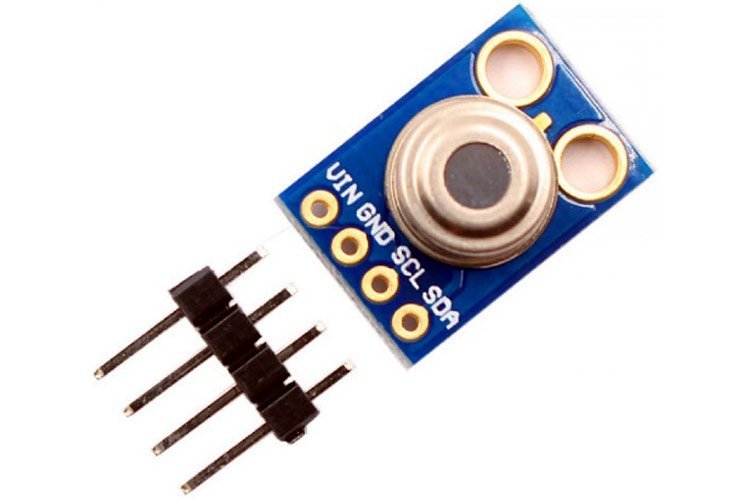
This temperature sensor module comes with a 3.3 voltage regulator, I2C Bus with internal pullup resistors to define a default state and a capacitor for noise filtering. The pinout of the non-contact MLX90614 IR Temperature Sensor module is as shown:
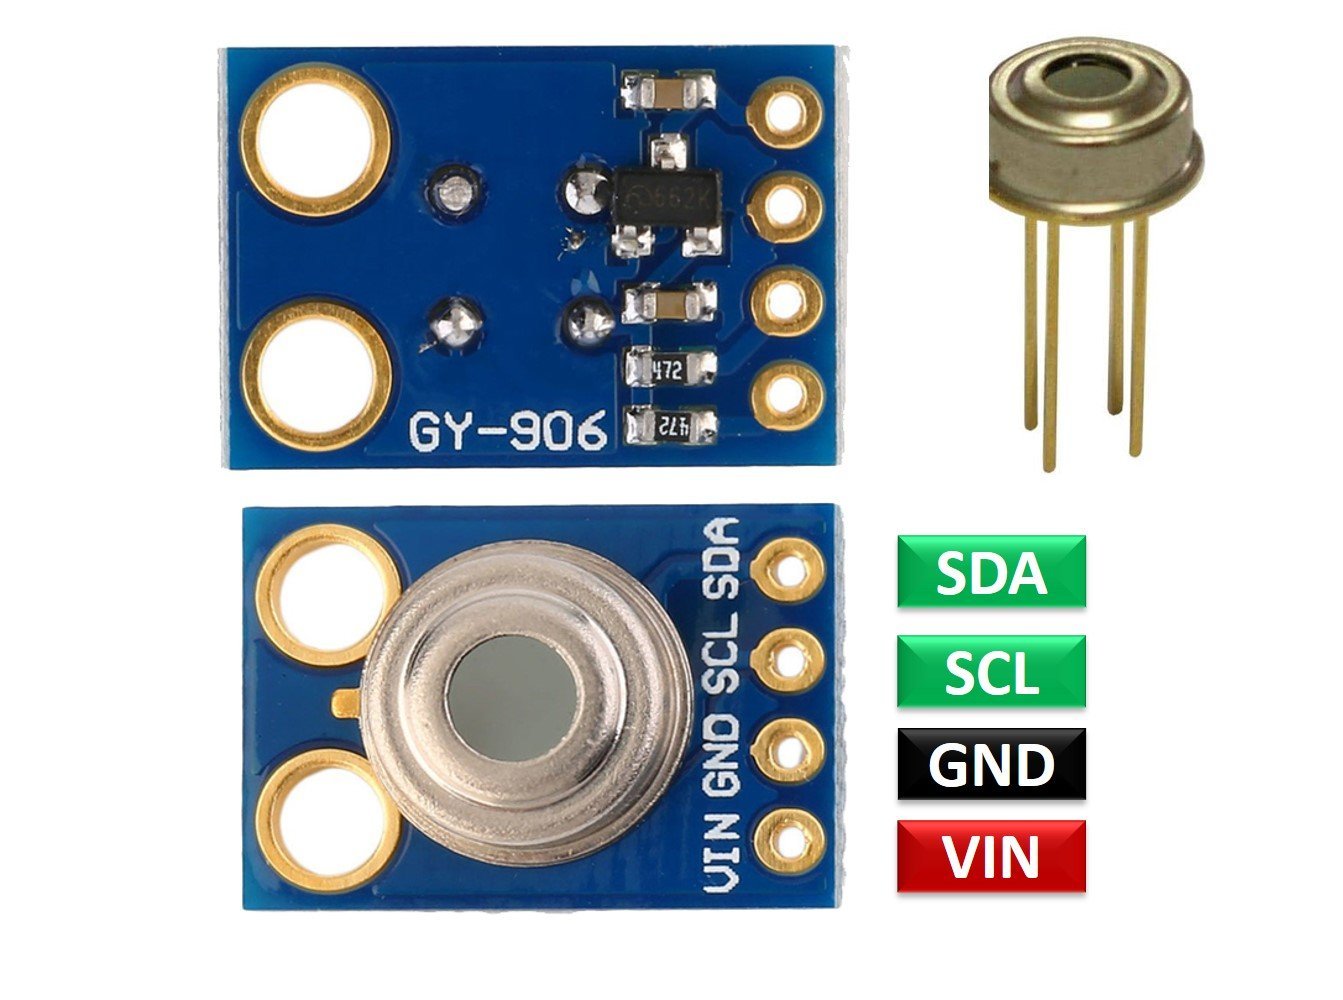
Overview of GY-906 Module
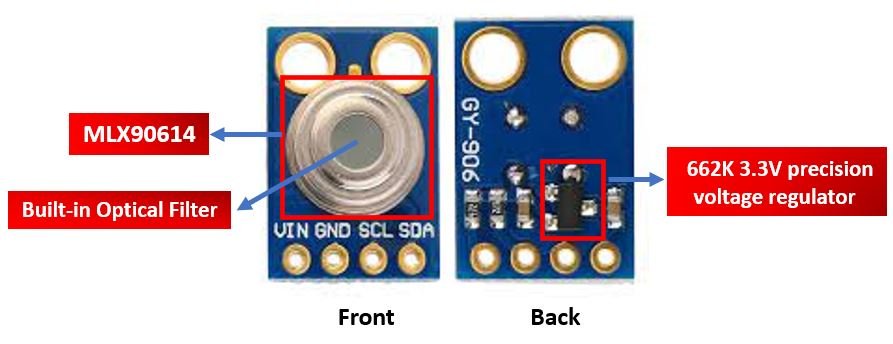
As you can see in the diagram above, the MLX90614 is found at the center of the module. It is a highly precise non-contact temperature sensor. With the aid of this sensor, temperature is measured through emitted IR waves without any physical contact. Additionally, this sensor is able to measure both the ambient temperature and the object temperature with an accuracy of 0.5°C. Notice the built-in optical filter (long-wave pass) present in the MLX90614 sensor. This is useful in cutting off the near-infrared and visible light thereby reducing their impact on the readings.
At the back of the module, you can find the 662K 3.3V precision voltage regulator, therefore we can safely use microcontrollers that use 5/3.3 level input/outputs with this module.
Pin Configuration
MLX90614 has two versions and is available in the TO-39 package. The pin configuration details are listed in the table below:
| Pin Name | Function |
|---|---|
| VCC | Positive power supply pin |
| GND | Reference potential pin |
| SCL | Open drain Serial Clock pin. An I2C line clock pulses pin for data synchronization. |
| SDA | Open drain Serial Data pin. An I2C line to communicate data to the host MCU. |
Features & Specifications
- Operating Voltage: 3.6 Volts – 5.5 Volts
- Ambient Temperature Range: -40°C – 125°C
- Object Temperature Range: -70°C – 380°C
- Measurement resolution: 0.02°C
- ESD Sensitivity: 2kV
- Sink/Source Current: 25mA
- ADC Resolution: 17 bits
- IR sensor is integrated with an optical filter, a DSP, and a low noise amplifier for fine output digital signals.
- Adaptable for 8-16 Volts applications and can be integrated easily.
- Supports power-saving mode and is available in single and dual versions
- It is a power-efficient and highly sensitive sensor.
Take a look at the datasheet to see further technicals of different versions of this IR sensor.
IR Sensor working principle
MLX90614 is a contactless IR temperature sensor that works on the Stefan Boltzmann principle. It states that everybody radiates IR radiation proportional to its temperature. This radiation is then measured through the sensor converted to a digital signal and is communicated through the I2C bus to the microcontroller.
The IR sensor module consists of an IR thermopile detector and a signal ASSP processing unit. Thermopile serves the function of collecting the radiation in its field view which varies from version to version. The processing units convert these analog signals to filtered amplified signals.

Block Diagram
The functional diagram of MLX90614 IR Temperature Sensor for conceiving the knowledge of the internal connections of the module is provided below:

The IR sensor module consists of an infrared thermopile detector and an ASSP (Signal conditioning application processor) unit. Thermopile serves the function of collecting the radiation in its field of view (FOV) which varies from version to version and then produces an electrical signal proportional to the radiation. The ASSP processing unit convert this analog signal to filtered amplified signal which is then sent to the microcontroller.
Field of View (FOV)
One important concept that comes up while learning the working of the infrared thermometer is the field of view of the sensor, also known as FOV. FOV is a solid angle through which the sensor is sensitive to electromagnetic radiation.
When the MLX90614 gives us the object temperature reading, it is the average temperature of all the objects present in the FOV of the sensor. Therefore, if you want to get an accurate temperature reading of an object, make sure it lies completely in the field of view of the sensor.
The field of view of the GY-906 MLX90614 sensor is 90°
The necessary measurement distance is thus determined by the desired field of view. A measuring distance of roughly 1 cm is often employed for measuring the surface temperature of an object such as an IC or a rotating shaft.
MLX90614 Interfacing with Arduino
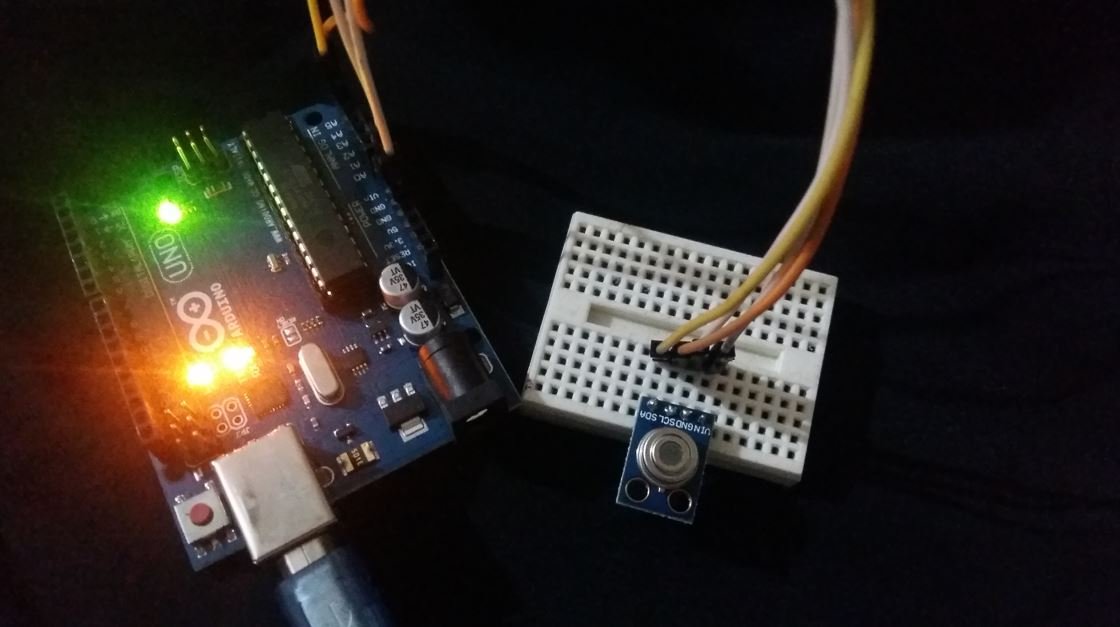
This section explains the interfacing of the Arduino UNO and MLX90614 contactless IR Temperature sensor. But you can use any Arduino board or microcontroller which have an I2C port. Because the MLX90614 sensor provides temperature output on the I2C bus.
Connection Diagram
The following figure shows the connection diagram between MLX90614 temperature sensor and Arduino.
- Connect the power supply pin (Vin) of the temperature sensor to the 5V pin of Arduino and the GND pin of MLX90614 to the GND pin Arduino UNO.
- Connect the SDA and SCL pins of the mentioned IR sensor to the A4 and A5 pins of the Arduino UNO for transferring data serially. A4 and A5 pins of Arduino also share alternate function of SDA and SCL pins of I2C port of Arduino Uno.

| Arduino UNO | MLX90614 IR Sensor |
| 5V | VCC |
| GND | GND |
| SDA | A4 |
| SCL | A5 |
Installing the Adafruit MLX90614 Arduino Library
Before going to the programming section, First, download the Adafruit MLX90614 Arduino library and install it on the Arduino IDE software. It is very convenient to use the prewritten library specifically for the module and add it to the sketches to perform the commands. Download the Adafruit MLX90614 Arduino Library from this link:
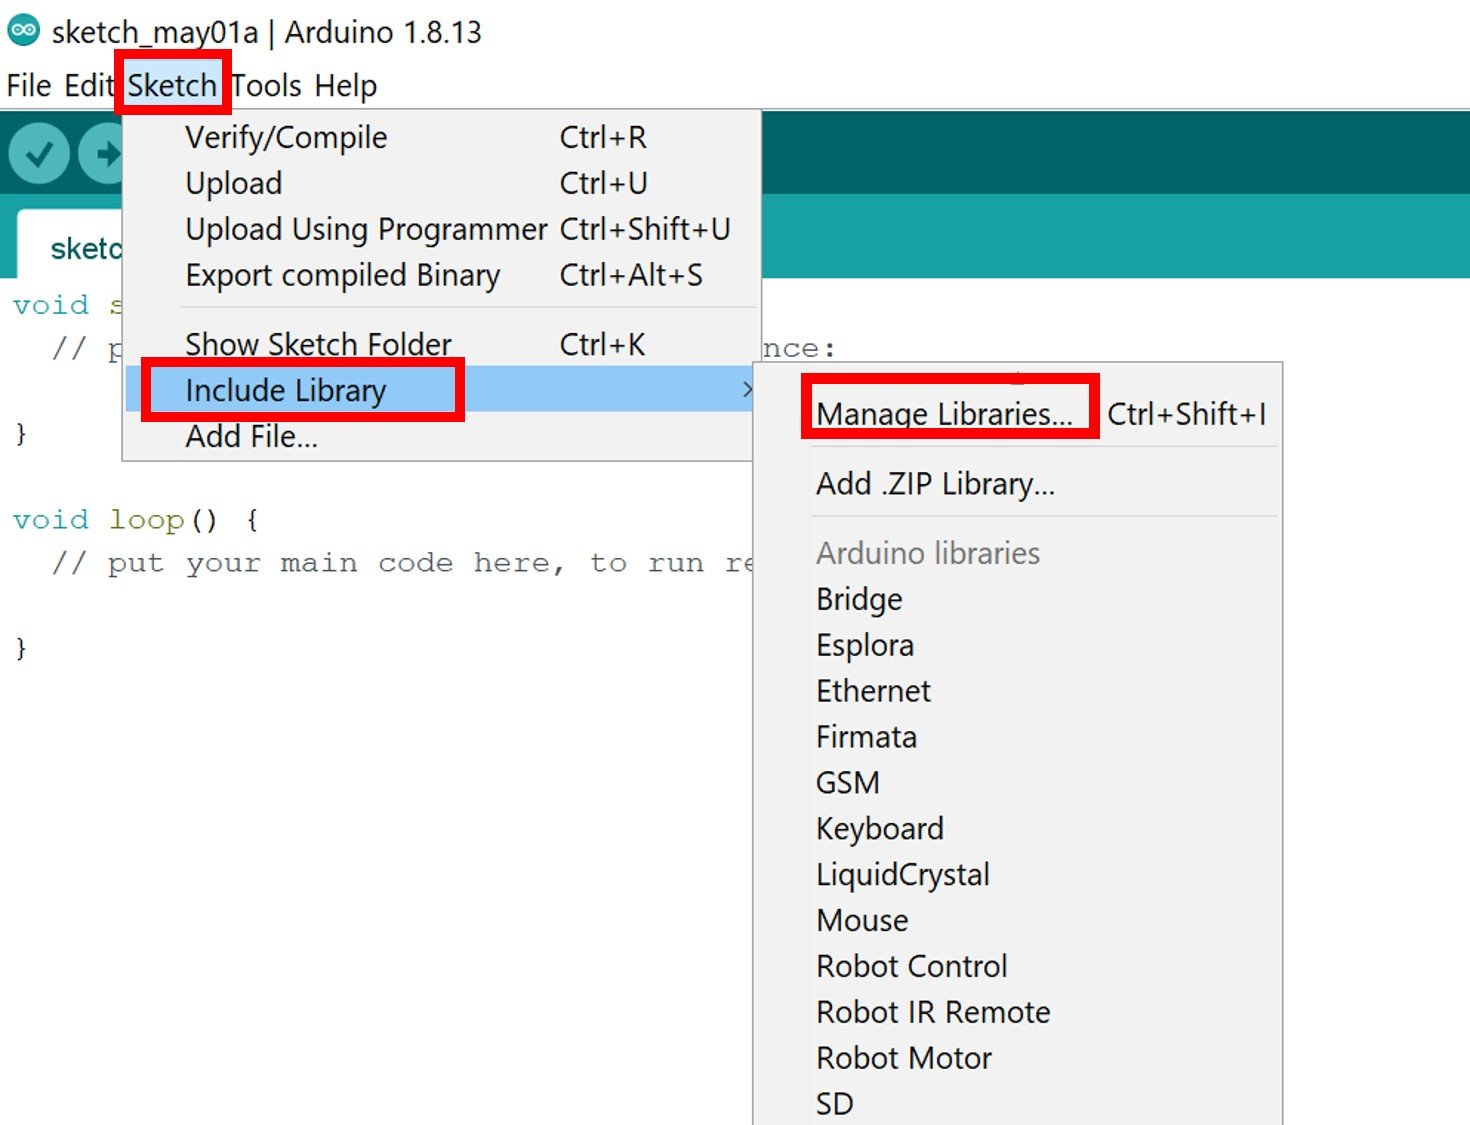
After that, follow these steps to install the library: Sketch >Include Library> Add . ZIP Library. Moreover, you can check this video to know how to install a new library in Arduino IDE:
After installation, restart the Arduino IDE and it is ready to use.
Arduino Code
The Arduino code for MLX90614 IR Temperature Sensor is provided below:
#include <Wire.h>
#include <Adafruit_MLX_Sensor90614.h>
char *Object_Type[]={"Object","Ambient"};

Adafruit_MLX_Sensor90614 MLX_Sensor = Adafruit_MLX_Sensor90614();

void setup() {
  Serial.begin(9600);
  Serial.println("MLX90614 Sensor MicroLab");
  MLX_Sensor.begin();
}

void loop() {

  Display_Temperature('A'); //Get Object temperature in Celsius
  Display_Temperature('B'); //Get Ambient temperature in Celsius

  Display_Temperature('C'); //Get Object temperature in Keliven
  Display_Temperature('D'); //Get Ambient temperature in Keliven


  Display_Temperature('E'); //Get Object temperature in Fahrenheit
  Display_Temperature('F'); //Get Ambient temperature in Fahrenheit
  Serial.println("########");

  delay(2000);


}


float Get_Temperature_Sample(char type)
{
    float temp_value;
    float Object_Temperature = MLX_Sensor.readObjectTempC();
    float Ambient_Temperature = MLX_Sensor.readAmbientTempC();
   if(type =='E')
   {
    temp_value = MLX_Sensor.readObjectTempF(); //Fah. Object
   }else if(type =='F')
   {
    temp_value = MLX_Sensor.readAmbientTempF();//Fah Ambient
   }else if(type =='C')
   {
    temp_value = Object_Temperature + 273.15;// Object Kelvin
   }else if(type =='D')
   {
    temp_value = Ambient_Temperature + 273.15;//Ambient Kelvin
   }else if(type =='A')
   {
    temp_value = Object_Temperature;
   }else if(type =='B')
   {
    temp_value = Ambient_Temperature;
   }
   return temp_value;

}

void Display_Temperature(char type)
{
  float temp_data =Get_Temperature_Sample(type);

  if(type =='A')
  {
    Serial.print(Object_Type[0]);
    Serial.print(" ");
    Serial.print(temp_data);
    Serial.print("°");
    Serial.println("C");
  }else if(type =='B')
  {
    Serial.print(Object_Type[1]);
    Serial.print(" ");
    Serial.print(temp_data);
    Serial.print("°");
    Serial.println("C");
  }else if(type =='C')
  {
    Serial.print(Object_Type[0]);
    Serial.print(" ");
    Serial.print(temp_data);
    Serial.print("°");
    Serial.println("F");
  }else if(type =='D')
  {
    Serial.print(Object_Type[1]);
    Serial.print(" ");
    Serial.print(temp_data);
    Serial.print("°");
    Serial.println("F");
  }

  else if(type =='E')
  {
    Serial.print(Object_Type[0]);
    Serial.print(" ");
    Serial.print(temp_data);
    Serial.print("°");
    Serial.println(" K");
  }
  else if(type =='F')
  {
    Serial.print(Object_Type[1]);
    Serial.print(" ");
    Serial.print(temp_data);
    Serial.print("°");
    Serial.println(" K");
  }

}
How does the code work?
Include libraries
The first step is to include the required libraries i.e. “Adafruit_MLX90614.h” for temperature sensor, “Wire.h” for I2C protocol. An instance of char type ( *Object_Type) to hold an array of characters is introduced. Also, an object “MLX_Sensor” is created to access the MLX90614 library functions.
#include <Wire.h>
#include <Adafruit_MLX_Sensor90614.h>
char *Object_Type[]={"Object","Ambient"};
Adafruit_MLX_Sensor90614 MLX_Sensor = Adafruit_MLX_Sensor90614();
Inside Setup Function
The void setup performs two things. It initializes the serial monitor with 9600 bps and also initializes the MLX_Sensor object which initialized the IR sensor library to begin taking temperature samples.
void setup() {
  Serial.begin(9600);
  Serial.println("MLX90614 Sensor MicroLab");
  MLX_Sensor.begin();
}
Inside Loop Function
Inside the void loop function, we use the function “Display_Temperature” to get temperature measurements in Celcius, Kelvin, and Fahrenheit and display them on Arduino serial monitor. With the help of this function, it displays the ambient temperature plus object temperature in Centigrade, Fahrenheit, and Kelvin. The updated values of temperature will be displayed after a delay of 2000 milliseconds on serial monitor.
void loop() {

  Display_Temperature('A'); //Get Object temperature in Celsius
  Display_Temperature('B'); //Get Ambient temperature in Celsius

  Display_Temperature('C'); //Get Object temperature in Keliven
  Display_Temperature('D'); //Get Ambient temperature in Keliven


  Display_Temperature('E'); //Get Object temperature in Fahrenheit
  Display_Temperature('F'); //Get Ambient temperature in Fahrenheit
  Serial.println("########");

  delay(2000);


}
We can use an if condition and make code applicable for a practical application like turning off the heater or air conditioner if the temperature exceeds a specific value or is less than a specific value.
Get_Temperature_Sample Function
The “Get_Temperature_Sample()” function is created to receive the temperature values based on the user’s instruction. Three float variables “temp_value, Object_Temperature, and Ambient_Temperature” are created to store the temperature values.
float Get_Temperature_Sample(char type)
{
    float temp_value;
    float Object_Temperature = MLX_Sensor.readObjectTempC();
    float Ambient_Temperature = MLX_Sensor.readAmbientTempC();
   if(type =='E')
   {
    temp_value = MLX_Sensor.readObjectTempF(); //Fah. Object
   }else if(type =='F')
   {
    temp_value = MLX_Sensor.readAmbientTempF();//Fah Ambient
   }else if(type =='C')
   {
    temp_value = Object_Temperature + 273.15;// Object Kelvin
   }else if(type =='D')
   {
    temp_value = Ambient_Temperature + 273.15;//Ambient Kelvin
   }else if(type =='A')
   {
    temp_value = Object_Temperature;
   }else if(type =='B')
   {
    temp_value = Ambient_Temperature;
   }
   return temp_value;

}
The object temperature in Celsius is read and stored in Object_Temperature and the ambient temperature in Celsius is read and stored in Ambient_Temperature If the user types a character “E”, the “temp_value” variable receives the temperature of the target object in Fahrenheit through “MLX_Sensor” object and if the user types a character “F”, the “temp_value” variable receives the ambient temperature in Fahrenheit through “MLX_Sensor” object. Similarly, typing the “C” value variable adds 273.15 to the Fahrenheit value present in it and upgrades itself which is the Kelvin temperature of the target object. And “D” will do the same but this time value has the ambient temperature which is upgraded by adding 273.15 to it.
On typing “A” or B”, the “temp_value” variable will get the reading from the Object_Temperature or Ambient_Temperature respectively and returns it.
A is object temperature in Celsius
B is the ambient temperature in Celsius
C is object temperature in Fahrenheit
D is the ambient temperature in Fahrenheit
E is object temperature in Kelvin
F is the ambient temperature in Kelvin
Display_Temperature() Function
It is another function that will call the Get_Temperature_Sample() function and prints the temperature readings as instructed by the user. For example, if the user types “A”, print functions call the getTemp function, get the reading, and show the readings on Arduino serial monitor. The same goes for all the characters defined.
void Display_Temperature(char type)
{
  float temp_data =Get_Temperature_Sample(type);

  if(type =='A')
  {
    Serial.print(Object_Type[0]);
    Serial.print(" ");
    Serial.print(temp_data);
    Serial.print("°");
    Serial.println("C");
  }else if(type =='B')
  {
    Serial.print(Object_Type[1]);
    Serial.print(" ");
    Serial.print(temp_data);
    Serial.print("°");
    Serial.println("C");
  }else if(type =='C')
  {
    Serial.print(Object_Type[0]);
    Serial.print(" ");
    Serial.print(temp_data);
    Serial.print("°");
    Serial.println("F");
  }else if(type =='D')
  {
    Serial.print(Object_Type[1]);
    Serial.print(" ");
    Serial.print(temp_data);
    Serial.print("°");
    Serial.println("F");
  }

  else if(type =='E')
  {
    Serial.print(Object_Type[0]);
    Serial.print(" ");
    Serial.print(temp_data);
    Serial.print("°");
    Serial.println(" K");
  }
  else if(type =='F')
  {
    Serial.print(Object_Type[1]);
    Serial.print(" ");
    Serial.print(temp_data);
    Serial.print("°");
    Serial.println(" K");
  }

}
Upload the code and observe the readings. The Serial monitor displays the respective readings when specific characters are entered. Note that the MLX90614 IR sensor is a very sensitive device and fluctuates very easily.
Example with Other MLX90614 IR Library
In this section, we will see another example of the MLX90614 Arduino library.
Installing the Adafruit MLX90614 Arduino Library
We will use Arduino IDE to program our Arduino UNO. Thus, you should have the latest version of Arduino IDE.
Next, we will download the Adafruit MLX90614 Arduino library and install it on the Arduino IDE software. It is very convenient to use the prewritten library specifically for the module and add it to the sketches to perform the commands. Open Arduino IDE and click on Sketch > Library > Manage Libraries
The following window will open up.

Type ‘adafruit mlx90614’ in the search bar and press enter. Install the latest version of the library as shown below.
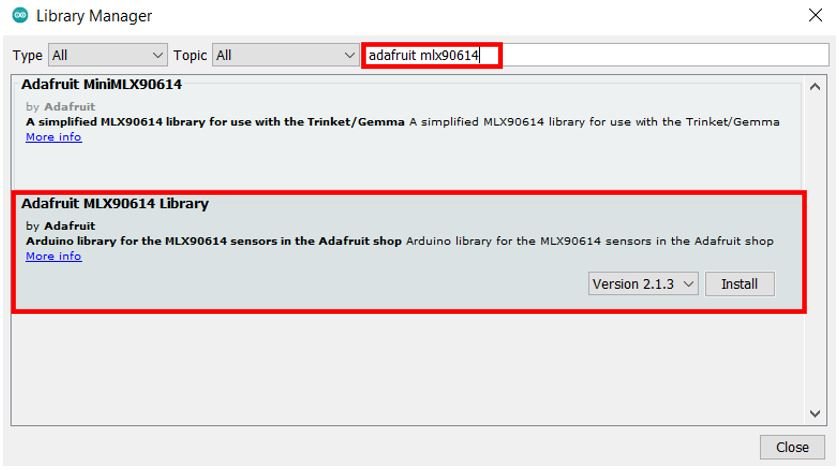
After installation of the library, restart your IDE.
Arduino Sketch
Open your Arduino IDE and go to File > New. A new file will open. Copy the code given below in that file and save it.
This code will display the ambient temperature and object temperature in both degree Celsius and Fahrenheit and update it to new readings after every second.
#include <Adafruit_MLX90614.h>

Adafruit_MLX90614 mlx = Adafruit_MLX90614();

void setup() {
  Serial.begin(115200);
  while (!Serial);

  if (!mlx.begin()) {
    Serial.println("Error connecting to MLX sensor. Check wiring.");
    while (1);
  };
}

void loop() {
  Serial.print("Ambient temperature = ");
  Serial.print(mlx.readAmbientTempC());
  Serial.print("°C");
  Serial.print("   ");
  Serial.print("Object temperature = ");
  Serial.print(mlx.readObjectTempC());
  Serial.println("°C");

  Serial.print("Ambient temperature = ");
  Serial.print(mlx.readAmbientTempF());
  Serial.print("°F");
  Serial.print("   ");
  Serial.print("Object temperature = ");
  Serial.print(mlx.readObjectTempF());
  Serial.println("°F");

  Serial.println("-----------------------------------------------------------------");
  delay(1000);
}
How the Code Works?
The first step is to include the required library i.e. “Adafruit_MLX90614.h” for the temperature sensor.
#include <Adafruit_MLX90614.h>Next create an object ‘mlx’ to access the MLX90614 library functions.
Adafruit_MLX90614 mlx = Adafruit_MLX90614();Inside the setup() function, we first start the serial communication at a baud rate of 115200. Then we initialize the temperature sensor using the begin() method on the Adafruit_MLX90614 object.
void setup() {
  Serial.begin(115200);
  while (!Serial);

  if (!mlx.begin()) {
    Serial.println("Error connecting to MLX sensor. Check wiring.");
    while (1);
  };
}
Inside the loop() function, we access the ambient temperature and the object temperature reading in both degree Celsius and Fahrenheit. These are printed in the serial monitor after every second.
To obtain the ambient temperature in degree Celsius we use the mlx.readAmbientTempC() function and in Fahrenheit we use the mlx.readAmbientTempF(). Similarly, to obtain the object temperature in degree Celsius we use mlx.readObjectTempC() function and in Fahrenheit we use the mlx.readObjectTempF() function.
void loop() {
  Serial.print("Ambient temperature = ");
  Serial.print(mlx.readAmbientTempC());
  Serial.print("°C");
  Serial.print("   ");
  Serial.print("Object temperature = ");
  Serial.print(mlx.readObjectTempC());
  Serial.println("°C");

  Serial.print("Ambient temperature = ");
  Serial.print(mlx.readAmbientTempF());
  Serial.print("°F");
  Serial.print("   ");
  Serial.print("Object temperature = ");
  Serial.print(mlx.readObjectTempF());
  Serial.println("°F");

  Serial.println("-----------------------------------------------------------------");
  delay(1000);
}
Demonstration
Make sure you choose the correct board and COM port before uploading your code to the board. Go to Tools > Board and select Arduino UNO. Next, go to Tools > Port and select the appropriate port through which your board is connected.

Click on the upload button to upload the code into the board.
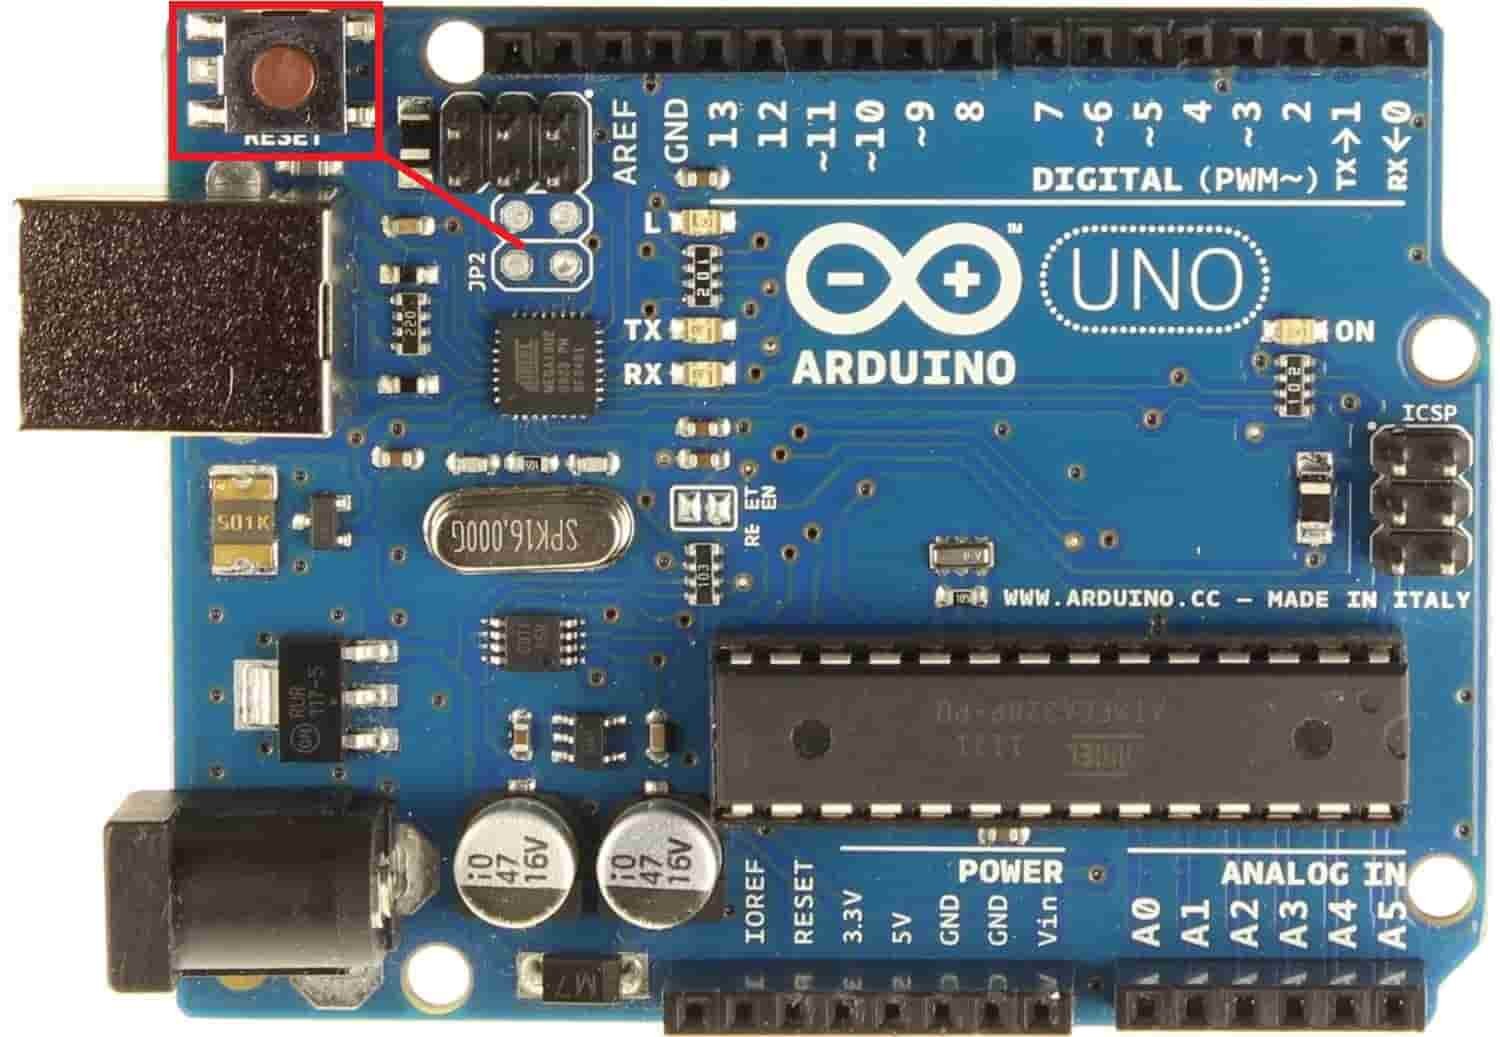
After you have uploaded your code to the development board, press its RST button.
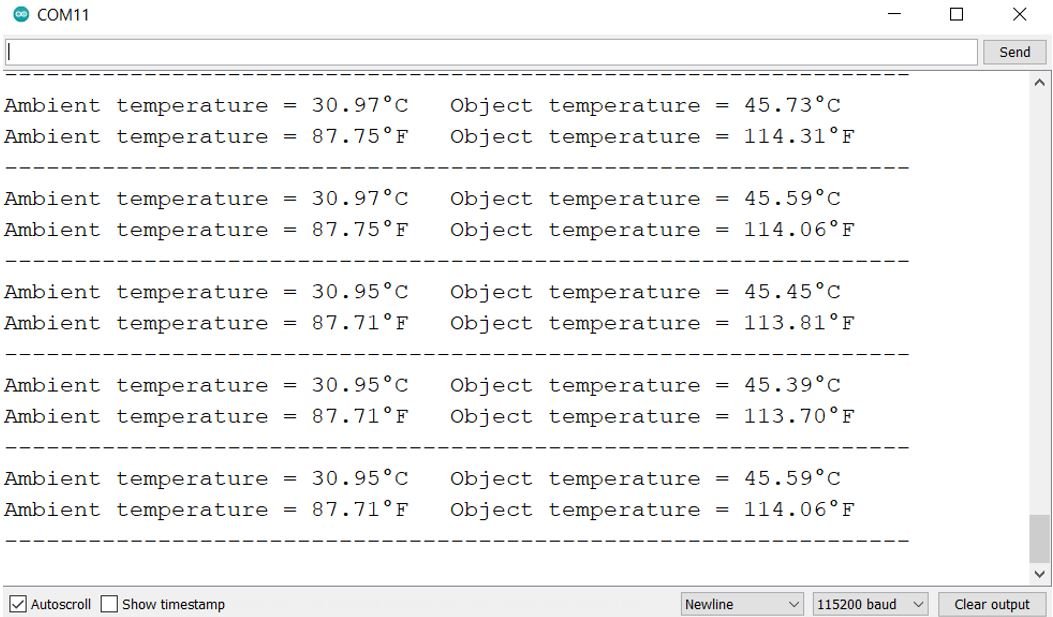
In your Arduino IDE, open up the serial monitor and you will be able to see the temperature readings. Bring the sensor close to an object to monitor its temperature. Moreover, make sure the sensor is away from electromagnetic waves as they can give rise to inaccurate readings.
Alternate Options
- MLX90615
- ZTP115
- TPIS 1S
Applications
- Medical care Systems
- Home temperature monitoring
- Environment Control
- Temperature Gun
- DIY Projects
- Commercial Applications
- Moving object temperature detection
2D Diagram

Related Articles:
- Interface LM35 Temperature Sensor with Arduino
- DHT22 Temperature and Humidity Sensor Interfacing with Pic Microcontroller
- LM35 Temperature Sensor with 7-Segment Display
- BMP280 Barometric Pressure and Temperature Sensor Module
- TMP36 Low Voltage Temperature Sensor
- LM35 Temperature Sensor with ESP32 – Web Server
- XBee Based Temperature and Gas Monitoring System Using Pic Microcontroller
- Automatic Temperature controller using pic microcontroller
- IOT based temperature data logger using esp8266 and pic microcontroller
- DS18B20 Temperature Module interfacing with arduino
- thermistor interfacing with arduino temperature meter
- Temperature sensor using PIC16F877A microcontroller
- Wireless temperature sensor using gsm and microcontroller
this is full documentation for mlx90615 really appreciate your efforts 🙂